Configuration
Overview
The JomDirectory extension can be configured using the options provided with it. You can control multiple factors such as SEO, Printing, Security, Image widths, and more using the options provided.
General tab
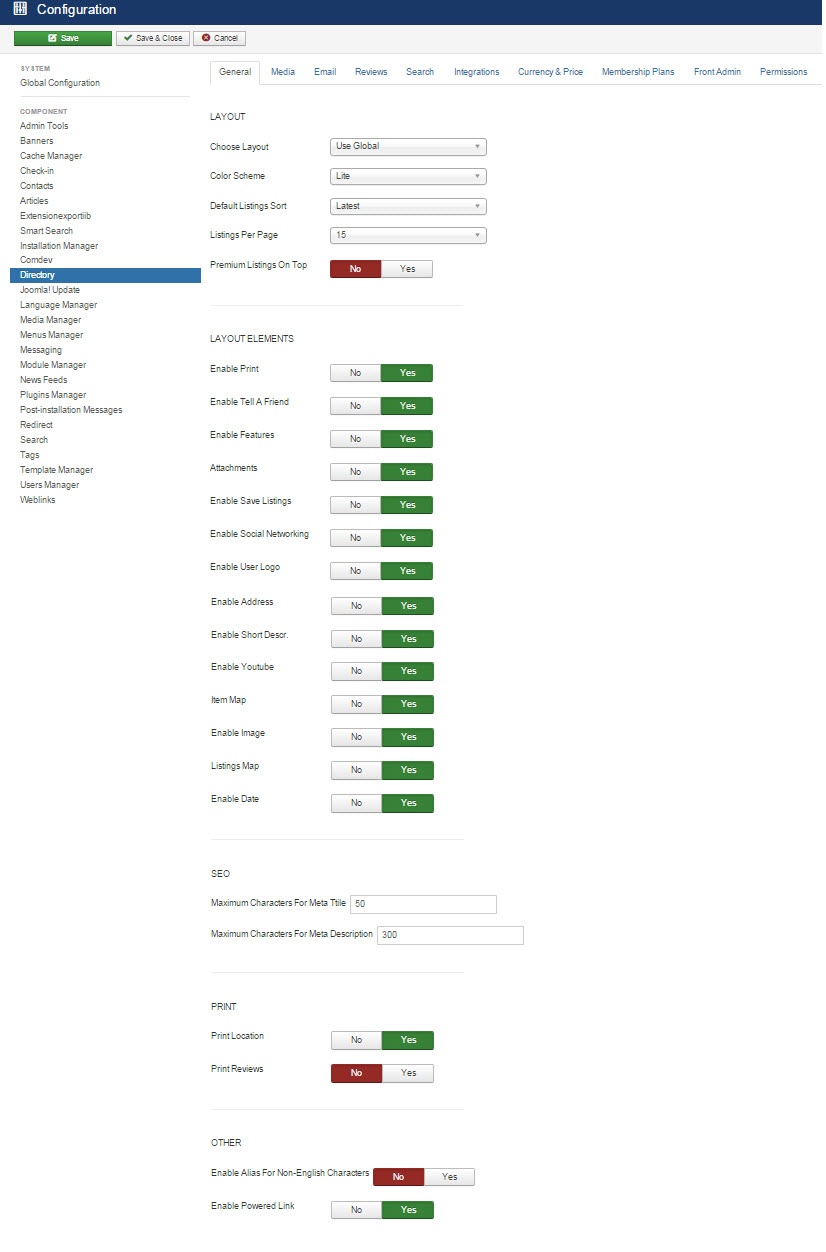
This tab controls the elements for Layout, SEO, Security, and Print options. The following image shows the options available on the General tab.
Screen 1: General tab
The following table explains the different options seen on the screen.
Layout |
Layout |
Select a layout based on existing components. Global layout is selected by default. |
|
|
Color Scheme |
Select Lite, Silver, or Simple scheme. Current build have only one color scheme available. |
|
|
Default Listings Sort |
Select the Listings from the following options:
|
|
|
Listings Per Page |
Select 15, 30, or 60 listings per page. |
|
|
Premium Listings on Top |
Enable to see premium listings on top. |
Layout Elements |
Enable Print |
Enable the “Print” button on listing pages. |
|
|
Enable Tell a Friend |
Enable the “Tell a Friend” button on listing pages. |
| Enable Features | Enables featured listing on the page. | |
|
|
Attachments |
Enable adding attachments to listings. |
|
|
Enable Save Listings |
Enable the “Save” button on listing pages. |
|
|
Enable Social Networking |
Enable social networking buttons on listing pages. |
| Enable User Logo | Enable to display user logo for listing. | |
|
|
Enable Address |
Show the listing address on listing pages. |
|
|
Enable Short Descr. |
Enable short description. |
|
|
Enable Youtube |
Enable YouTube video embedded on listing pages. |
|
|
Item Map |
Enable google map in the detailed view - location tab |
| Enable Image | Enable images to be displayed for listing. | |
|
|
Listings Map |
Enable Google map on the listings (items menu link) |
|
|
Enable Date |
Enable date on listings |
SEO |
Maximum Characters for Meta Title |
The maximum amount of characters used in the meta title. |
|
|
Maximum Characters for Meta Description |
The maximum amount of characters used in the meta-description. |
|
|
Print Location |
Print the map on print requests. |
| Print Reviews | Print reviews available for the listing. | |
Other |
Enable Alias For Non-English Characters | Enable to provide ability to add alias for non-english characters. |
|
Enable Powered By Link |
Enable the “powered by” link on listing pages. |
Media tab
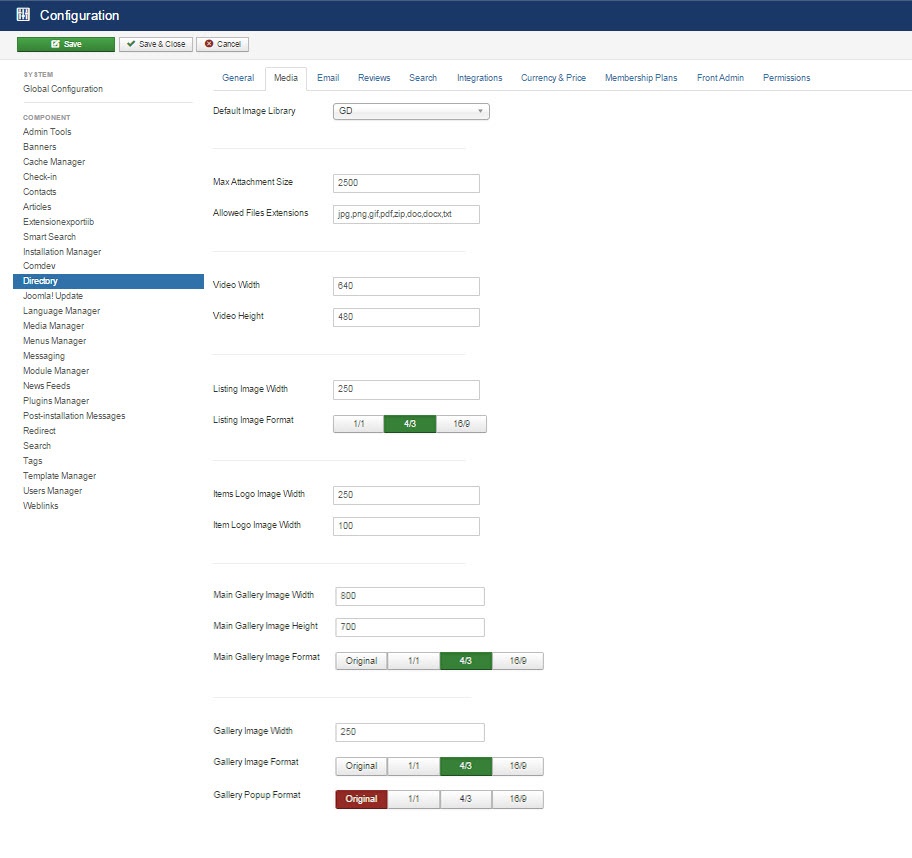
This tab provides options to control display of media such as images or videos on the listing pages.
Screen 2: Media tab
The following table explains the options seen on the screen.
|
Default Image Library |
Select the default image library for the listings component between “GD” and “iMagick”. http://en.wikipedia.org/wiki/GD_Graphics_Library http://en.wikipedia.org/wiki/Imagick
|
|
Max Attachment Size |
The component wide settings for maximum Attachment size in kilo-byte. (1024 KB = 1 MB) |
|
Allowed Files Extensions |
Comma separated list of allowed attachment file-extensions. |
|
Video Width |
Embedded Video width in pixels. |
|
Video Height |
Embedded Video height in pixels. |
|
Listing Image Width |
The main listing image width in pixels. |
|
Listing Image Format |
The format for the main listing image. |
|
Items Logo Image Width |
Image width in pixels for Items Logo on the listing page. |
|
Item Logo Image Width |
Image width in pixels for Item Logo on the listing page. |
|
Main Gallery Image Width |
Image width in pixels for main gallery image. Ensure that the width value given here is as wide as or more than the slideshow width (generally 800-1200 pixels).If this is not done, the slideshow images will be blurred.
|
|
Main Gallery Image Height |
Image height in pixels for main gallery image. |
|
Main Gallery Image Format |
The format for the main gallery image. |
|
Gallery Image Width |
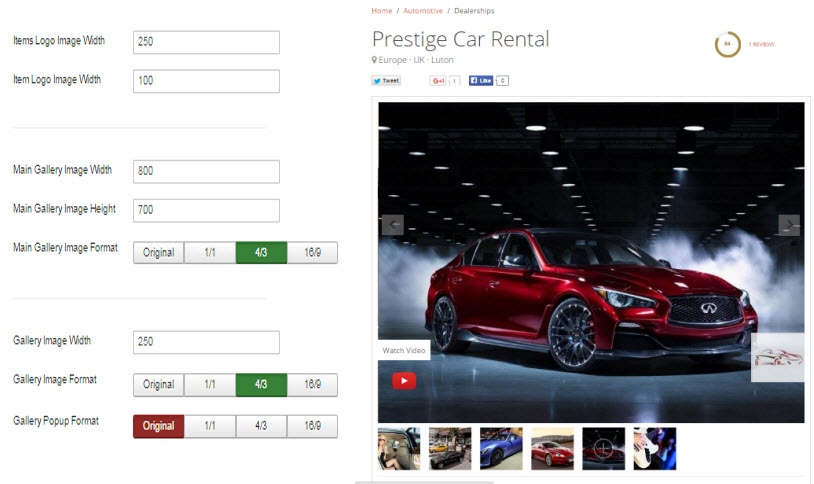
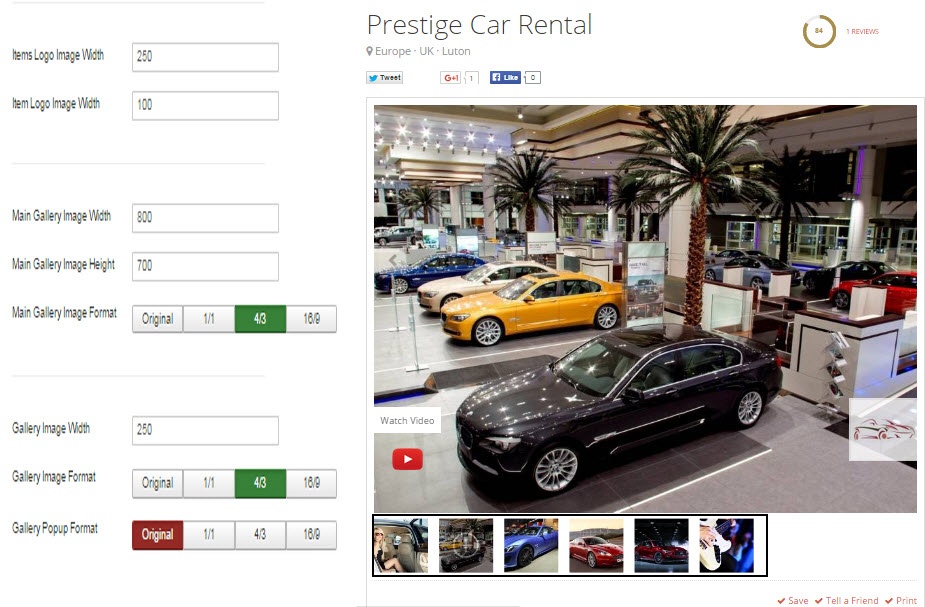
Image width in pixels on the photo gallery on the Items view (Gallery tab). Based on the dimension you provide here, the image can be seen as follows:
|
|
Gallery Image Format |
The format for the main listing image. Original = Image as uploaded by user |
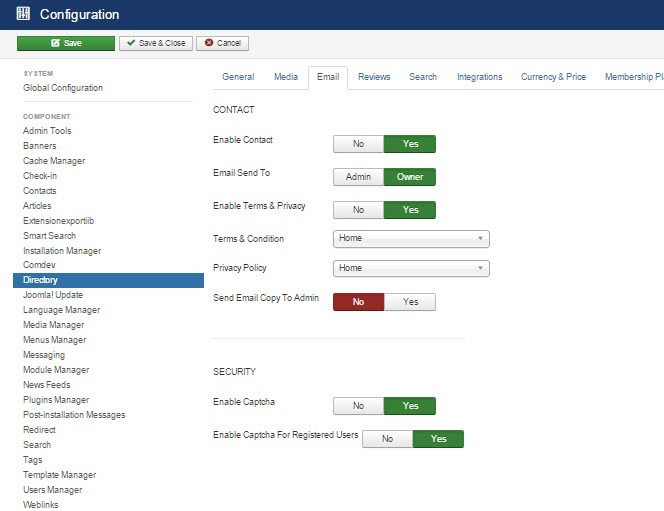
Email tab
This tab provides options to control the email and security options for the JomDirectory extension.
Screen 3: Email tab
The following table explains the options seen on the screen.
|
Contact |
Enable Contact |
Enable the contact function on listing pages. |
|
Email Send To |
Enable Send Email button on listing pages. |
|
|
|
Enable Terms & Privacy |
Activate a check-button for TOS and Privacy statements on contact requests. |
|
|
Terms & Condition |
Provide Terms & Condition statement by category. |
|
|
Privacy Policy |
Choose Privacy Policy by category. |
| Send Email Copy To Admin | Enable to send all email copies to Admin. | |
Security |
Enable Captcha |
Enable Captcha for non-registered/logged-in users.
|
|
Enable Captcha for Registered Users |
Enable Captcha for registered users as well. |
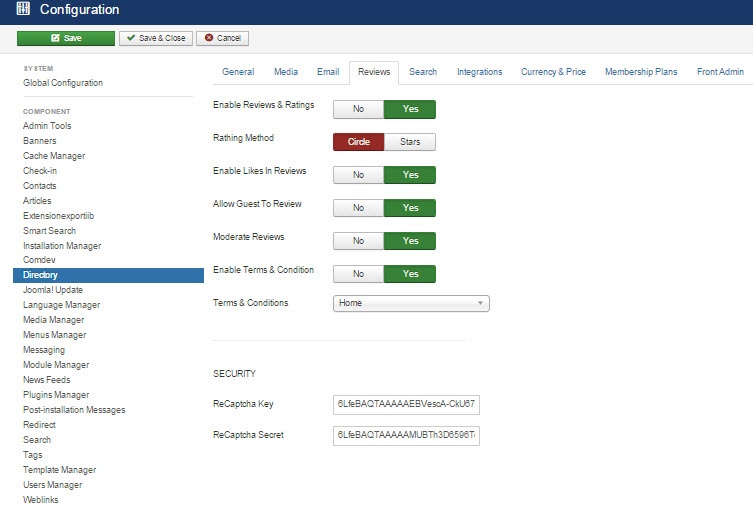
Reviews tab
This tab provides option to enable review ratings when the the slider button is set to Yes as shown in the following image.
Screen 4: Reviews tab
The following table explains the options seen on the screen.
|
Enable Reviews & Ratings |
Enable to make the reviews and ratings option active. |
|
Rating Method |
Select the rating method to be used. Available options are circles and stars. |
|
Enable Likes in Reviews |
Enable to let users like reviews. |
|
Allow Guest to Review |
Enable to let users post guest review without logging in. |
|
Moderate Reviews |
Enable to let admin review reviews before making them active. |
| Enable Terms and Condition | Enable to provide users terms and conditions. |
|
Terms & Conditions |
Select the page where you want to display the Terms & Conditions |
|
Enable Captcha for Registered Users |
Enable Captcha for registered users as well. |
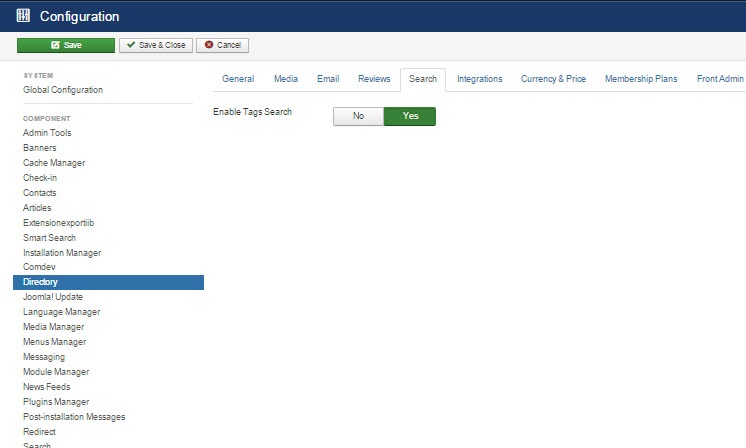
Search tab
This tab provides option to enable search when the the Enable Search tag slider button is set to Yes as shown in the following image.
Screen 5: Search tab
Integrations tab
This tab provides options to control map integration for listings.
Screen 5: Integrations tab
The following table explains the options seen on the screen.
| Google Maps API Key | Specify a Google Maps API key. You can create a key by visiting Google's Get a Key documentation (you will need a Google account to register a key). |
|
Map Type |
Select the map type from Google maps.
|
|
Default Zoom |
Select the default zoom factor for the listing map. Listings (Items) map zoom is calculated automatically based on all listings and can't be adjusted, same apply for the ajax map search module.
|
|
Map Starting Location |
Default location or starting point for map search. |
|
Enable Articles Integration (com_content) |
Enable article assign button when adding a listing (below description) |
| Enable Availability Calendar | Enable to showcase listing availability with every listing. |
| ShareThis Key |
Specify a publisher key for sharing listings via the ShareThis platform. To obtain a key, sign up to ShareThis and retrieve your publisher key from your ShareThis profile. |
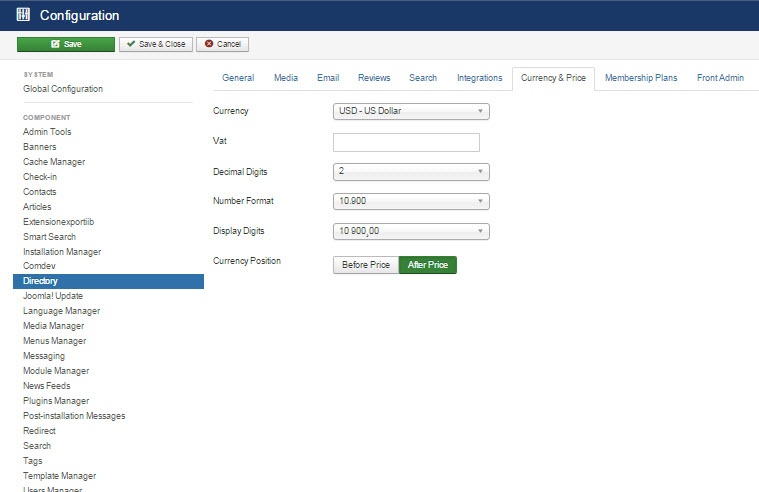
Currency & Price tab
This tab provides options to control display of currency formats for listings.
Screen 6: Currency & Price tab
The following table explains options seen on the screen.
|
Currency |
Select the currency to use. Additional currencies can be added by editing a config file administrator/components/com_JomDirectory/config.xml
|
|
Vat |
The current vat rate for estates in the operating country. |
|
Decimal Digits |
Select the number of decimal digits required. |
|
Number Format |
Select the number format most suitable for your currency. |
|
Display Digits |
Select the format for the digits. |
|
Currency Position |
Select if your currency sign will appear before or after the price. |
Membership Plans
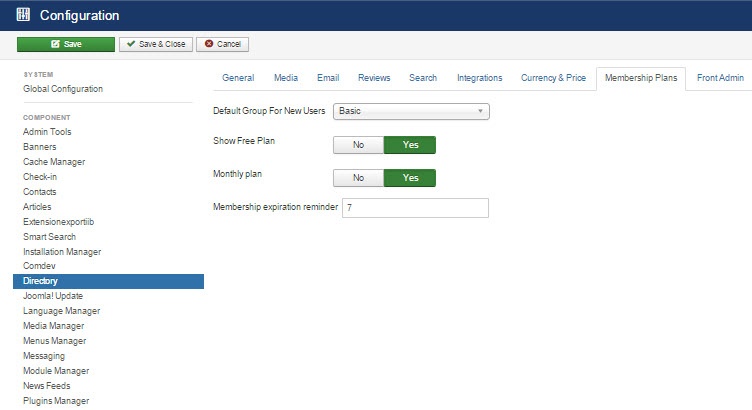
This tab controls membership options that you want to set for your site.
Screen 8: Membership Plans
The following table explains options seen on the screen.
|
Default Group For New Users |
Select the membership plan that new users are grouped in by default. |
|
Show Free Plan |
Enable to display free plan. |
|
Monthly Plan |
Enable to display monthly plan. |
|
Membership expiration reminder |
Define the days before expiration reminder will be sent. |
Front Admin
This tab controls how the menu links are seen on the front admin for JomDirectory. It also provides other options related to front admin.
Screen 7: Front Admin tab
The following table explains the options seen on the screen.
|
Welcome Article-ID |
Set the component's welcome article from Joomla articles. |
|
|
Help Article-ID |
Set the component's help article from Joomla articles. |
|
|
Profile Menu Link |
||
|
Login Menu Link |
||
|
View Profile Menu Link |
||
| Enable Features |
Approve User’s Listings |
When listings are added from the Front Admin, they will not be published unless the site admin approves it. |
| Listing Email Notification | Enable to send an email to user about listing created. | |
|
Reviews Approval By Users |
Turn review approval on or off when you login from the Front Admin. |
|
| Enable Location | Enable to auto map location. | |
| Enable Availability Calendar | Enable to display availability calendar for a listing. | |
| Payment Settings |
Enable Paypal |
|
|
Paypal Email Address |
Provide the Paypal email that will receive the payments. |
|
|
PDT token |
||
|
Use Paypal Sandbox |
Enable for testing your configuration with the Paypal sandbox facility. |
|
|
Paypal Sandbox Merchant Email |
Enable to set your merchant sandbox email address for receiving payments. |
|
|
Paymens success article ID |
Provide the article from Joomla articles that points to the page that the user will go to after payment is made. |
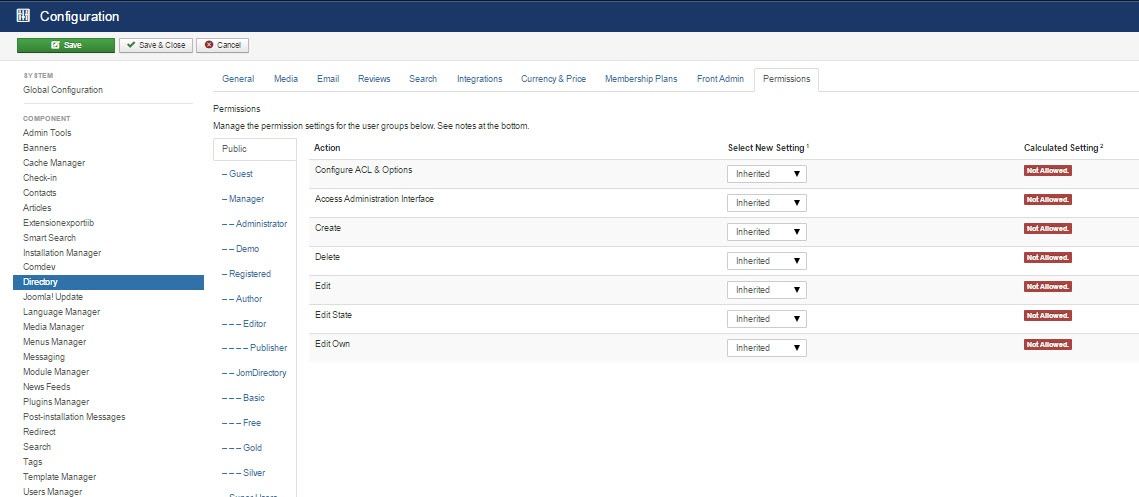
Permissions
This tab provides options to control permissions for different groups.
Screen 8: Permissions tab

