# Administrator's Guide # Auction Types Overview In the context of auctions, the main difference between a reverse auction and a regular (or forward) auction lies in the roles of buyers and sellers, and the direction in which the price moves: ### Regular (Forward) Auction:
1. **Role of Participants**: Sellers offer goods or services, and buyers place bids to purchase them. 2. **Price Movement**: The price typically starts low and increases as buyers compete by placing higher bids. The item is sold to the highest bidder. 3. **Objective**: Buyers aim to outbid each other to win the item or service being auctioned.
**Example**: An art auction where various bidders compete to buy a painting, with the highest bid winning the item. ### Reverse Auction:
1. **Role of Participants**: Buyers post their requirements for goods or services, and sellers place bids to offer the goods or services. 2. **Price Movement**: Sellers decreases price compete by offering lower bids. The buyer selects the lowest bid or the best offer. 3. **Objective**: Sellers aim to underbid each other to win the contract or sale.
**Example**: A company needs a bulk supply of office chairs and invites suppliers to bid. Suppliers compete by offering lower prices, and the company chooses the supplier with the most competitive offer. In summary, the key difference is that in a regular auction, buyers compete to purchase from sellers, driving the price up. In a reverse auction, sellers compete to fulfill a buyer's need, driving the price down. # Dashboard ### Overview Administration dashboard gives you an overview of all the activities you can do using the JomOffers extension. It provides you a view of all the menu items, system configuration checks, license information, and links to the documentation. [![obraz.png](https://wiki.comdev.eu/uploads/images/gallery/2024-03/scaled-1680-/U6bobraz.png)](https://wiki.comdev.eu/uploads/images/gallery/2024-03/U6bobraz.png) **Screen 1: Dashboard screen** ### Menu Items The menu items are present in a grid format format for easy access. The following image shows the Menu items present on the dashboard screen. **Screen 2: Menu items area** The following table provides an explanation about different menu items available:
**Dashboard** Home or dashboard for the JomHoliday extension
**Listings** Shows the Listings administration screen
**Categories** Shows the Categories administration screen
**Custom Fields** Shows the Custom Fields administration screen
**Resource Custom Fields**Shows the Resource Custom Fields administration screen
**Addresses** Shows the Address administration screen
**Business Types**Shows the Business Types administration screen
**Bookings**Shows the Bookings administration screen
**Booking Addons**Shows the Booking addons administration screen
**Membership Plans** Shows the Membership Plans administration screen
**Messages** Shows the messages received
**Reviews: Categories** Shows the Reviews administration screen to add review parameters for each category. For example, Quality, Customer Service, and so on.
**Reviews: Recommended** Shows screen to add recommended audience for the listing or category. For example, For young people, Gizmodo, and so on.
**Documentation** Access the JomHoliday documentation.
### System Configuration Checks Any configuration problems or current configuration status is displayed in this area as shown in the following screen: **Screen 3: System configuration checks area** ![](https://wiki.comdev.eu/download/attachments/7438861/screen1.png?version=2&modificationDateamp;api=v2) # Address {{@105}} # Categories {{@106}} # Custom Fields {{@56}} # Listings ## Overview Listings are essentially auctions, encompassing both reverse auctions and standard bid auctions. Each listing is associated with a specific category. They are created in the same way as Joomla articles, although they are not defined as Joomla articles. ## Creating A New Auction [![obraz.png](https://wiki.comdev.eu/uploads/images/gallery/2024-03/scaled-1680-/8pWobraz.png)](https://wiki.comdev.eu/uploads/images/gallery/2024-03/8pWobraz.png) **Screen 1: Listing screen** The following table explains the different options seen on the screen.
**New** Creates a new Address entry. You must create separate entries for each level of depth that you need.
**Edit** Provides the edit mode to make changes to the existing level or titles created.
**Publish** Publishes the created address entry.
**Unpublish** Removes the entry from the list of published address entries
**Archive** Archives address entries that are not used anymore.
**Trash** Deletes the address entry that is not required anymore.
**Options**Displays the configuration screen for the JomOffers extension.
## Edit Auction If you want to edit existing entries, you can either click the entry from the Listings screen or select the checkbox next to the entry, and then click Edit. ### Edit Auction tab This tab provides options to add title, description, select category, and other options for the Listing as seen in the following image: [![obraz.png](https://wiki.comdev.eu/uploads/images/gallery/2024-03/scaled-1680-/MSkobraz.png)](https://wiki.comdev.eu/uploads/images/gallery/2024-03/MSkobraz.png) **Screen 2: Edit Listing screen** The following table shows the options available:
##### Edit Listing area **Title** Title for the Listing.
**Alias** URL alias for “SEF/SEO” URL.
**Category** Category where the listing will be published.
**Work Type**Work location where the listing needs services for.
**Regular Auction****If set to Yes than Bids auction type is created otherwise Reverse Auction**
**Price/Budget****Budget for the services required or Bid product price**
**Select Company**Select the company that you need specific offers from.
**Ref Number - REF**Reference number for a specific listing.
**Days Published**Number of days for which the listing remains active.
**Text Area** Provide a description for the listing. You can create a short description as well a long description. [![obraz.png](https://wiki.comdev.eu/uploads/images/gallery/2024-03/scaled-1680-/3nOobraz.png)
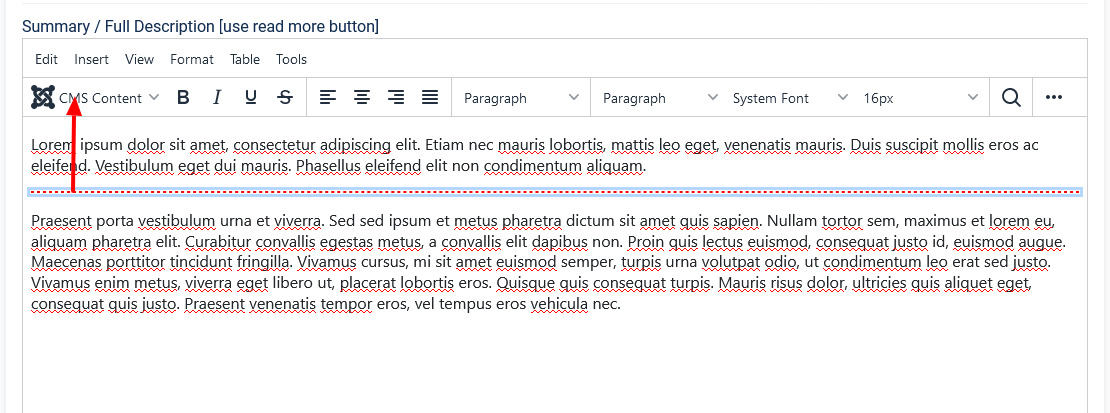
](https://wiki.comdev.eu/uploads/images/gallery/2024-03/3nOobraz.png) ![](https://wiki.comdev.eu/download/attachments/8585295/jomoff_adminguide_31.jpg)
In the above image, the highlighted tag appears when you click **Read More**. Any content above the tag is the **short description**, while the entire content is the **long description**. Also, note that if there is no content after the **Read More** tag, the event description will be blank when users view the listing. Ensure that you have content after the **Read More** tag.
**Article *Button*** Click to select a relevant article. If an article is provided, it can be seen under the Details tab in the listing.
**Page Break *Button*** Insert a page break in the displayed text.
##### Address area **Address** Address of the listing
**Street, House No.** Street and house number of the listing - If both Address and Full Address specified, map location will position automatically.
##### Location area **Maps latitude** It utilizes the GEO-location based on Google Maps. Provide the latitude information for the location mapping.
**Maps longitude** The information provided in this field is used to map the exact location. It utilizes the GEO-location based on Google Maps. Provide the longitude information for the location mapping.
**Maps Search** Search for a specific location. Type in the location and press Enter to go to the exact location.
##### Sidebar **Featured** Enable to make the listing appear as featured listing.
**Approved** Enable to approve the listing. Listing will not be published.
**Language** Select the language for which the listing needs to appear for. [For multiple languages, you must create separate entries for each language](https://wiki.comdev.eu/display/JO/Multilingual+Site).
**Status** Select the required status. - Published - Unpublished - Trashed - Archived
**Created by** Select the user who created the listing.
**Access** Provide the access level for the listing. - Guest - Public - Super Users - Registered - Special
**Date created** Select the date when the listing was created. You can select a future date for publishing the listing as well.
**Publish Up** Select a date when you want to publish the listing. Here too, you can schedule to post the listing at a future date.
**Publish down** Select a date when the listing should stop being published.
**Modified Date** Select a date when the listing was modified.
**Tags** Provide the tags for the listing. Tags are integrated and maintained with Joomla Tags Component.
**ID** This is an auto-generated field.
#### Understanding the Location area in Edit listing tab Let us understand how to provide the address and Street/House No for providing the exact locations on the map. When you provide the address, street and House No. in the backend when creating listings, the location position automatically. If the House No. is not provided, additional location fields needs to be used. ##### Mapping using longitudes and latitudes If you provide the latitudes and longitudes, and the Maps Search setting is left blank, the location mapping is done based on these parameters as shown in the following image. [![obraz.png](https://wiki.comdev.eu/uploads/images/gallery/2024-03/scaled-1680-/e1Dobraz.png)](https://wiki.comdev.eu/uploads/images/gallery/2024-03/e1Dobraz.png)**![](https://wiki.comdev.eu/download/attachments/8585295/jomoff_adminguide_33.jpg?version=2&modificationDateamp;api=v2)** **Screen 3: Map using longitudes and latitudes values** ##### Mapping with Map Search values If the Map Search field has a value provided to it, it takes precedence as shown in the following image. If the Map Search field value is given as “London”, the location will map to this location. [![obraz.png](https://wiki.comdev.eu/uploads/images/gallery/2024-03/scaled-1680-/XACobraz.png)](https://wiki.comdev.eu/uploads/images/gallery/2024-03/XACobraz.png)**![](https://wiki.comdev.eu/download/attachments/8585295/jomoff_adminguide_47.jpg)** **Screen 4: Map using Map Search Field values** ### Custom Fields tab This tab includes all the custom fields created for a particular category. If the custom field is not applied to a specific category, it can be seen for all categories when creating a listing. The following image shows the Custom Fields tab screen. [![obraz.png](https://wiki.comdev.eu/uploads/images/gallery/2024-03/scaled-1680-/HEEobraz.png)](https://wiki.comdev.eu/uploads/images/gallery/2024-03/HEEobraz.png) **Screen 5: Custom Fields tab** For more information about creating custom fields, see [Custom Fields](http://confluence.comdev.eu/display/JD2/Custom+Fields+Templates). ### Images tab This tab includes information about images and videos attached to the listing. Before you can add images to the listing, you must save your listing at least once. This ensure that all the other data you have filled for the listing does not disappear after the images are added. The Images tab can be seen as shown in the following image: [![obraz.png](https://wiki.comdev.eu/uploads/images/gallery/2024-03/scaled-1680-/DyYobraz.png)](https://wiki.comdev.eu/uploads/images/gallery/2024-03/DyYobraz.png) **Screen 6: Images tab**
To set the the Order of the images (which one displayed first) drag and drop images to switch positions.
The first image in the gallery is used as the image thumbnail for the listing.
Provide the options as shown in the following table.
##### Images **Add file area** Add Files Click to select the image that needs to be uploaded.
Drag & Drop Files Here Drag a bunch of images to this area to upload multiple images.
Upload Into Select which category the image falls under: - Slideshow - detailed view main gallery - Gallery - in gallery tab - Logo - displayed in sidebar under custom fields and over the image with transparency in listings page.
Add available images & attachments Click to add already uploaded images and attachments to this listing.
**Images area** Editing an Image ![](https://wiki.comdev.eu/download/attachments/8585295/jomoff_adminguide_36.jpg) Click the ![](https://wiki.comdev.eu/download/attachments/8585295/Listings_edit_icon.jpg) Edit icon to edit the image details. The options are as seen in the following image: ![](https://wiki.comdev.eu/download/attachments/8585295/Listings_Images_edit1.jpg) Click the ![](https://wiki.comdev.eu/download/attachments/8585295/Listings_close_icon.jpg) Delete icon to delete the image.
**Attachments area** Click the ![](https://wiki.comdev.eu/download/attachments/8585295/Listings_edit_icon.jpg) Edit icon to edit an attachment that is linked to the listing. The screen is as shown here: ![](https://wiki.comdev.eu/download/attachments/8585295/Listings_Images_Attachments.jpg) Click the ![](https://wiki.comdev.eu/download/attachments/8585295/Listings_close_icon.jpg) Delete icon to delete the attachment.
Attachments are detected automatically based on file extension that’s are allowed in Configuration .
##### Video YouTube VideoProvide the YouTube video URL in this field as shown in the following image. ![](https://wiki.comdev.eu/download/attachments/8585295/jomoff_adminguide_37.jpg)
## Cron job for BIDS - Regular auctions For regular auctions a cron job needs to be added to clear auctions which have been finished, interval should be set to 1 or 5 minutes: ```bash curl -s 'http://extdev.comdev.eu/index.php?option=com_jomoffers&task=auction.check' ```
Instruction how to set cron job for Plesk panel can be found here: [https://support.plesk.com/hc/en-us/articles/115003121073-How-to-add-a-scheduled-task-in-Plesk-UI-using-crontab-syntax-](https://support.plesk.com/hc/en-us/articles/115003121073-How-to-add-a-scheduled-task-in-Plesk-UI-using-crontab-syntax-)
---
# Work Type ## Overview Work Type for **Reverse Actions** defines the location where you want to avail the services required in the listing. For example, for a service such as gardening, the Work Type would be On Place or Remote. But, in case of accountant services, the Work Type would be In House. ### Creating a Work Type Creating a custom field involves setting certain options. To create a custom field, click New as shown in the following image. [![obraz.png](https://wiki.comdev.eu/uploads/images/gallery/2024-03/scaled-1680-/UHIobraz.png)](https://wiki.comdev.eu/uploads/images/gallery/2024-03/UHIobraz.png) **Screen 1: Work Type screen** The following table explains the different options available on the screen.
**New** Creates a new Custom Field.
**Edit** Provides the edit mode to make changes to the existing level or titles created.
**Publish** Publishes the created custom field.
**Unpublish** Removes the entry from the list of published custom fields.
**Archive** Archives custom fields that are not used anymore.
**Trash** Deletes the custom fields that are not required anymore.
**Rebuild** Refreshes to incorporate the changes made to the entries in the Custom Field feature.
**Options**Displays the configuration screen for the JomOffers extension.
### Editing a Work Type If you want to edit existing entries, you can either click the entry from the Work Type screen or select the checkbox next to the entry, and then click **Edit**. #### Work Type Edit After you click the required entry that you need to edit, you can change the configurations for the fields as shown in the following image. [![obraz.png](https://wiki.comdev.eu/uploads/images/gallery/2024-03/scaled-1680-/zFdobraz.png)](https://wiki.comdev.eu/uploads/images/gallery/2024-03/zFdobraz.png) **Screen 2: New Category tab screen** After you click the required entry that you need to edit, you can change the configurations based on the options as seen in the following table.
**Title** Custom Address Field
**Alias** URL alias for “SEF/SEO” URL
**Parent** Select the parent address entry
**Text box** Provide a description about the entry. You can format the text using the formatting options in the text box. You can also insert images or links to URLs for more information.
**Category Image** Upload an address image
#### Publishing tab After you have provided the above information, you can provide the publishing information in the Publishing tab as seen in the following image. You can change the values for the given options using the following table.
**Status** Based on the status seen here, the visibility changes as follows: - Published - Entries are visible on the front-end. - Unpublished – Entries are invisible in the front-end, but can be published later. - Archived – Older entries that are not ready for deletion yet. - Trashed – Older entries that should be removed.
**Access** Access level for site users is as follows: - Public access grant access to everybody. - Superusers access grants access to only users - Registered access grants access only to registered and logged in users. - Special access only grants access to users specified as “Special”.
**Language** Select the language for the address entry.
**ID** Address ID, which can be used in modules, plugins and menus.
**Created by** User name who created the entry.
**Created Date** Date when the entry was created.
# Offers ## Overview For every listing made, contractors or companies can provide an offer. This offer includes information such as pricing, time taken to complete the task and description about the services provided. ### Making an Offer The following image shows the offer screen. ![](https://wiki.comdev.eu/download/attachments/8585355/jomoff_adminguide_49.jpg) **Screen 1: Making an offer** Let us understand each of the buttons seen on the screen using the following table.
**Title** Title of the offer
**Price** Price of services
**Price Negotiable** Slide to select whether price is negotiable
**Time to Complete (days)** Duration taken to complete the services
**Description**Detailed description of the services offered.
### Editing the Offers The following screen shows the offers made for all the listings available. [![obraz.png](https://wiki.comdev.eu/uploads/images/gallery/2024-03/scaled-1680-/7OVobraz.png)](https://wiki.comdev.eu/uploads/images/gallery/2024-03/7OVobraz.png) **Screen 2: Offers for all listings** If you want to edit existing entries, you can either click the entry from the Offers screen or select the check box next to the entry, and then click **Edit**. [![obraz.png](https://wiki.comdev.eu/uploads/images/gallery/2024-03/scaled-1680-/totobraz.png)](https://wiki.comdev.eu/uploads/images/gallery/2024-03/totobraz.png) **Screen 3: Editing an offer** After you click the required entry that you need to edit, you can change the configurations based on the options as seen in the following table.
**Title** Title of the offer made.
**Price** Price mentioned by the contractor for the services offered.
**Price Negotiable** Enabled if price is negotiable.
**Status**Edit status, if required from the following options. By default, every offer made is in the Published state. - Published - Unpublished - Trashed - Archived
**Offer Status**After reviewing the offer, set the state of the offer to one of the following states. - Not Accepted (Default status) - Accepted - Rejected
**Time to Complete (days)**Number of days to complete the services required.
**ID**Offer ID, which can be used in modules, plugins and menus.
**Created by**User name who created the entry.
**Description**Description about the serviced offered.
# Membership {{@109}} ### Creating a new Group for Membership Plans In order to add users to groups for membership plans, you must create a super group named JomOffers. Then, under it you must create groups for each of your membership plan. These groups are used to provide Group ID when creating a membership plan. Users created using User Manager can be linked to each of these membership plan groups. To create the JomOffers group and other groups, do the following: 1. Click **Users** > **Groups** > **Add New Group**. 2. Provide a name for the group. We need to create JomOffers group before creating other groups. So, provide the name as **JomOffers** [![obraz.png](https://wiki.comdev.eu/uploads/images/gallery/2024-03/scaled-1680-/xi5obraz.png)](https://wiki.comdev.eu/uploads/images/gallery/2024-03/xi5obraz.png) 1. Repeat steps 1 and 2, but select the parent as JomOffers. [![obraz.png](https://wiki.comdev.eu/uploads/images/gallery/2024-03/scaled-1680-/OODobraz.png)](https://wiki.comdev.eu/uploads/images/gallery/2024-03/OODobraz.png) 2. Click **Save**.
Name **JomOffers** for the main group is mandatory, however groups for membership under that group can have any names e.g. Lite, Pro or Free, Basic etc...
### User Permissions based on groups For the users to access Front Admin certain user permissions need to be granted. These settings need to be done in the JomOffers and Comdev Options. To provide user permissions for JomOffers, do the following: 1. Click **Components** > **JomOffers** 2. Click **Options** from the right-hand side of the screen. 3. Click **Permissions**. 4. Provide the permissions as shown in the following image. [![obraz.png](https://wiki.comdev.eu/uploads/images/gallery/2024-03/scaled-1680-/Xtfobraz.png)](https://wiki.comdev.eu/uploads/images/gallery/2024-03/Xtfobraz.png) 5. Click **Save**. User permissions also need to be set for Comdev extension as explained here. 1. Click **Components** > **Comdev**. 2. Click **Options** from the right-hand side of the screen. 3. Click **Comdev**. 4. Provide the permissions as shown in the following image. [![obraz.png](https://wiki.comdev.eu/uploads/images/gallery/2024-03/scaled-1680-/oJrobraz.png)](https://wiki.comdev.eu/uploads/images/gallery/2024-03/oJrobraz.png) 5. Click **Save**.

Users, which belongs to Joomla group JomOffers, will now have access to Front Admin.

If Permissions for the Comdev component are not set, users would not be able to upload images. A 500 error would show that permissions are denied.