User Guide
- Front Admin Overview
- Manage Listings
- Manage Venues
- User Membership
- Profile & Settings (User Profile)
Front Admin Overview
Overview
The dashboard gives a quick snapshot of all the tasks that you can perform using the Front Admin. It also provided multiple menu items that you can use to create listings, view listings, view membership plans, and so on. The other options that you can control are approving reviews, viewing statistics, upgrading membership for a particular user, and so on.
Accessing the dashboard
When you access the home URL for JomEvents extension, do the following:
- Click Front Admin.
- Provide the login details for the required user and click Submit.
You can access Front Admin either as an agent or a company. Based on the login used, the pages displayed change too.
The dashboard as seen by a company with various options can be seen as shown in the following image.
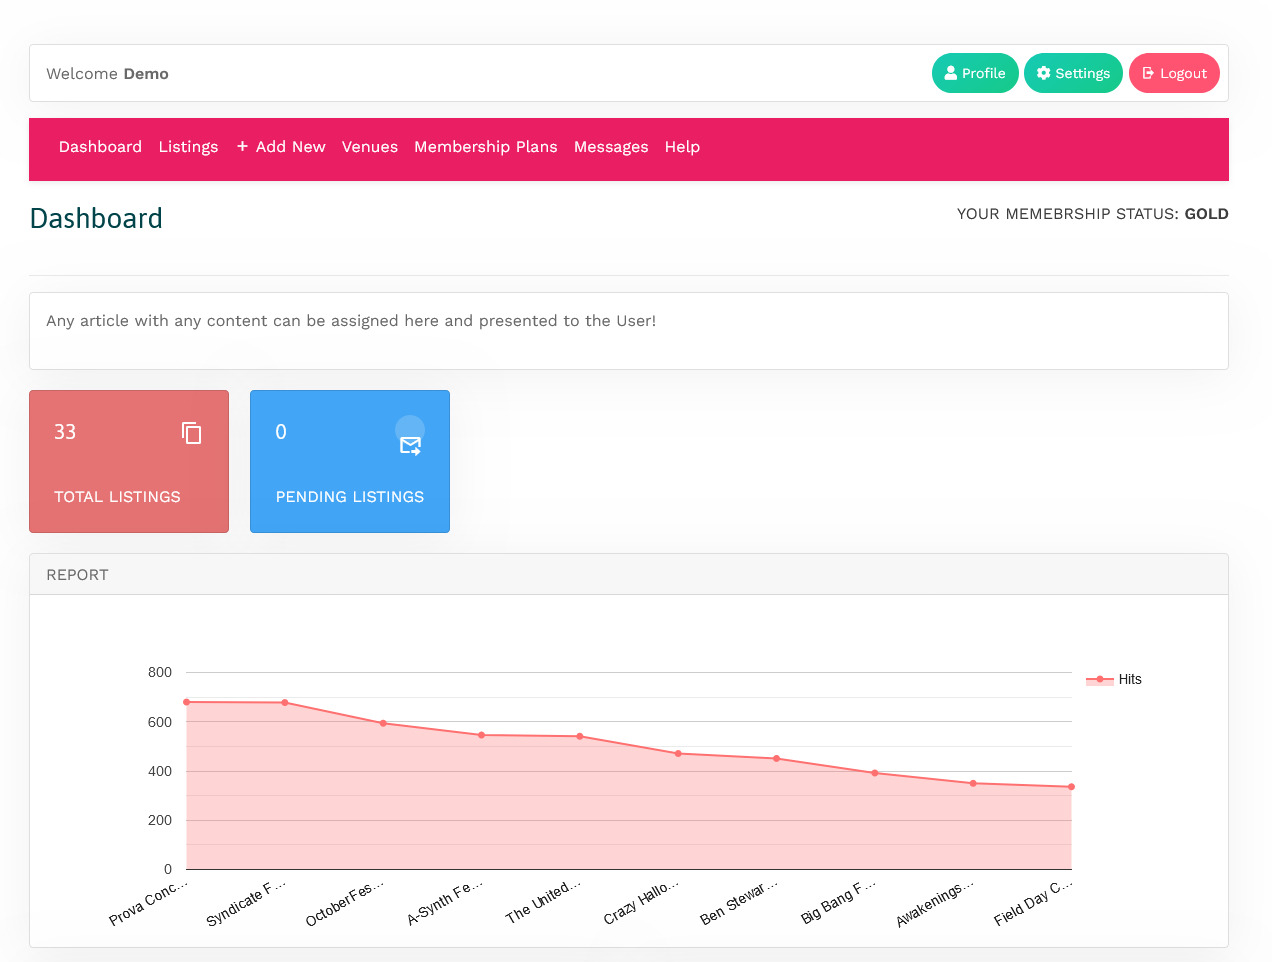 Screen 2: Dashboard screen
You can click the options as seen in the following table.
Report |
Most Viewed graph |
View the statistics for the site based on the listings viewership. |
Membership |
Upgrade Your Membership NOW! |
Upgrade to another membership plan. Click Upgrade on the plan tab for the plan you want to upgrade to as shown here.
|
Profile |
Profile |
View the profile details for your profile. |

Manage Listings
Overview
You can view all the listings created for your site or create a new listing. The listings created let you add descriptions, images, provide ratings, and much more.
Creating a New Listing
The following image shows the Listings screen.
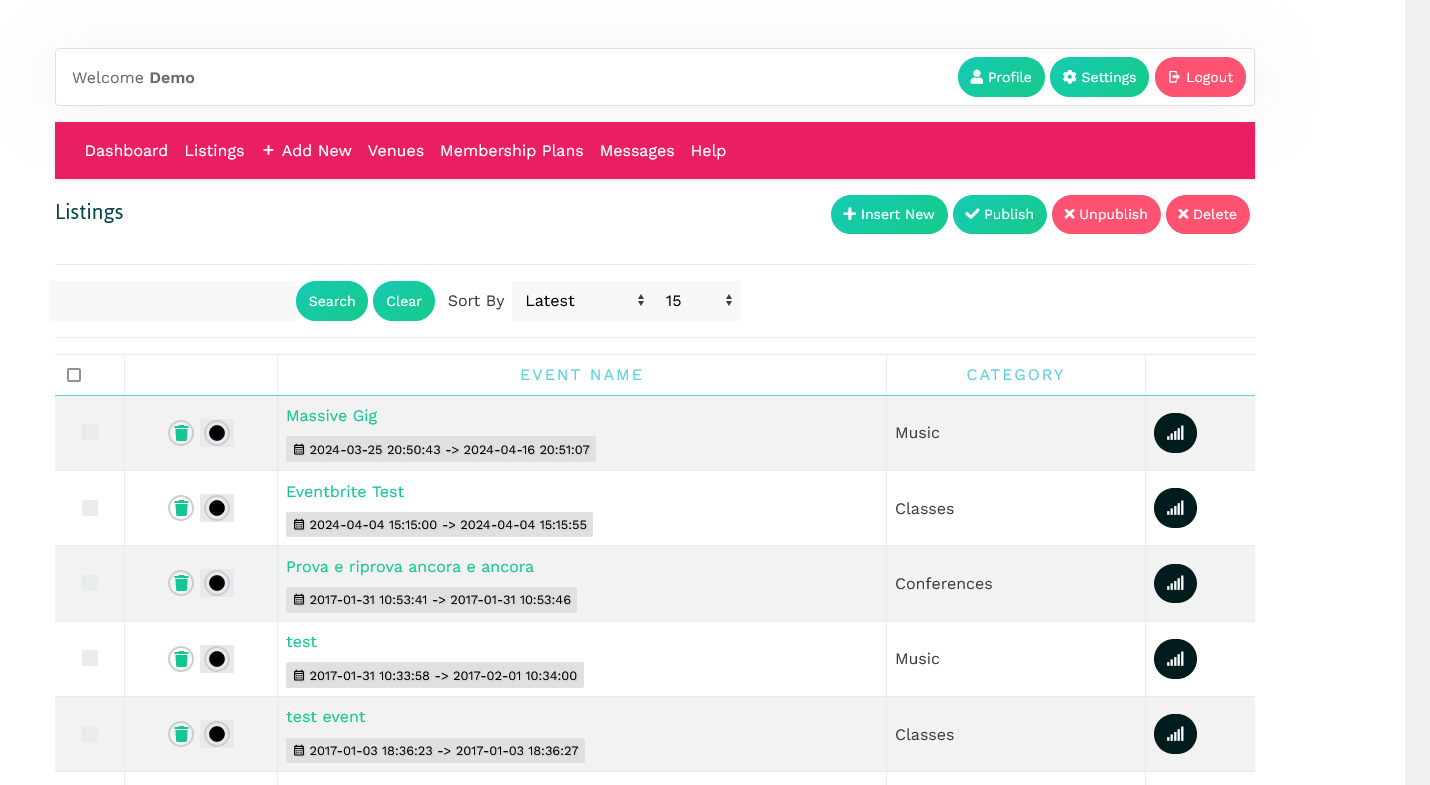 Screen 1: Listing screen
The following table explains the different options seen on the screen.
Adding a new listing
To create a new listing, click Add New from the Dashboard Menu list. The new listing page is displayed.
New Listing tab
This tab provides options to add title, description, select category, and other options for the Listing as seen in the following image:
The following table shows the options available:
|
Area |
Options |
Usage |
|
Edit Listing area |
Title |
Title for the Listing. |
|
Text Area |
Provide a description for the listing. |
|
|
Short Description |
Provide a short description for the listing. |
|
|
Article Button |
Click to select a relevant article. If an article is provided, it can be seen under the Details tab in the listing. Buttons for the editor are available when enabled under Site Backadmin -> Plugins and WYSIWYG editor turned On in Joomla Configuration.
|
|
|
Page Break Button |
Insert a page break in the displayed text. |
|
|
Toggle editor Button |
Toggle between plain text and rich text editor |
|
|
Read More Button |
Insert a separation for creating short description. Any content above the dotted line is displayed as the short description. In the above image, the red dotted line appears when you click Read More. Any content above the red line is the short description, while the entire content is the long description. Also, note that if there is no content after the Read More tag, the event description will be blank when users view the listing. Ensure that you have content after the Read More tag.
|
|
|
Status |
Select the required status.
|
|
|
Featured |
Enable to make the listing appear as featured listing. Feature Count is being checked when saving listing for the selected Membership Plan.
|
|
|
Language |
Select the language for which the listing needs to appear for. For multiple languages, you must create separate entries for each language. |
|
|
Category |
Category where the listing will be published. |
|
| Category Type | Category Type such as house, apartment and so on based on the category types for your site. | |
| Energy Class | Select the energy class for the listing. | |
|
Address area |
Address |
Address of the listing |
|
Full address |
Street and house number of the listing - If both Address and Full Address specified, map location will position automatically. |
|
|
Location area |
Maps latitude |
It utilizes the GEO-location based on Google Maps. Provide the latitude information for the location mapping. |
|
Maps longitude |
The information provided in this field is used to map the exact location. It utilizes the GEO-location based on Google Maps. Provide the longitude information for the location mapping. |
|
|
Maps Search |
Search for a specific location. Type in the location and press Enter to go to the exact location. |
Custom Fields area
This area includes all the custom fields created for a particular category. If the custom field is not applied to a specific category, it can be seen for all categories when creating a listing. The following image shows the Custom Fields tab screen.
For more information about creating custom fields, see Custom Fields.
Images tab
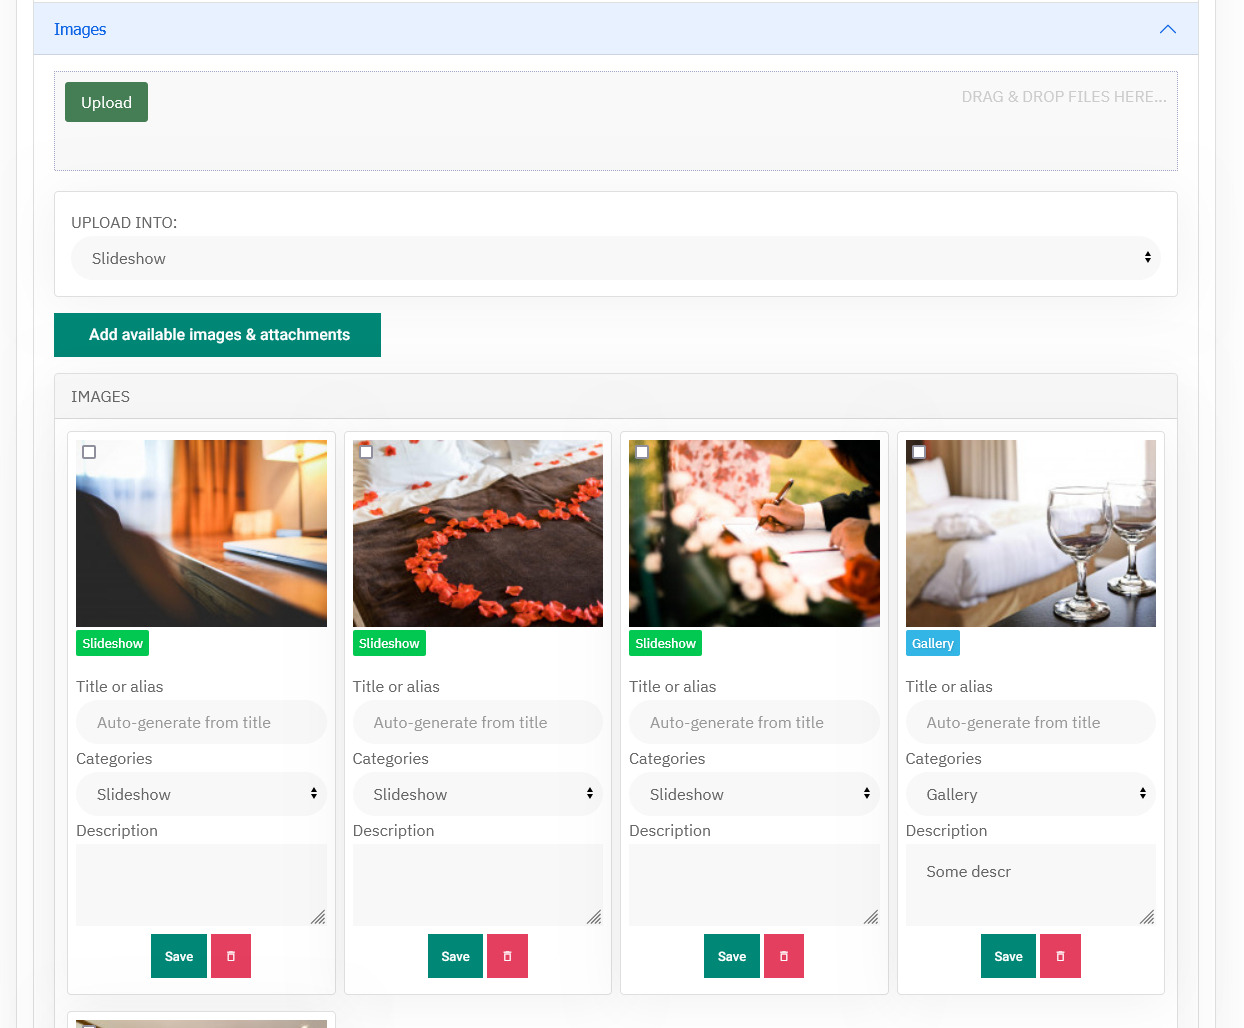
Screen 5: Images tab
To add an image, do the following:
Click Add Image.
Provide options as seen in the following image.
You can provide values using the following table.
|
Title or alias |
Provide a title for the Image. |
|
Categories |
Select from the following options:
|
|
Status |
Select the required status.
|
|
Order |
Order in which you want the image to appear. |
|
File |
Click Choose File and provide the image. |
|
Description |
Provide a description about the image. |
For more information about editing images or deleting images, see Images in the Administrative Guide.
You can also provide YouTube video links for the listing. Provide the link as shown in the above image.
Attachments tab
Click the ![]() Edit icon to edit an attachment that is linked to the listing. Click the
Edit icon to edit an attachment that is linked to the listing. Click the ![]() Delete icon to delete the attachment.
Delete icon to delete the attachment.
Attachments are detected automatically based on file extension that’s are allowed in Configuration.
Some features or tabs are enabled based on the user membership. If the user is attached to a membership plan that does not allow adding attachments, he will not be able to see any options under the Attachments tab. These membership limitations are checked for when you save the listing.
Manage Venues
Overview
You can add venues related to the listings using this tab. The following screen shows the list of venues available for creating a listing.
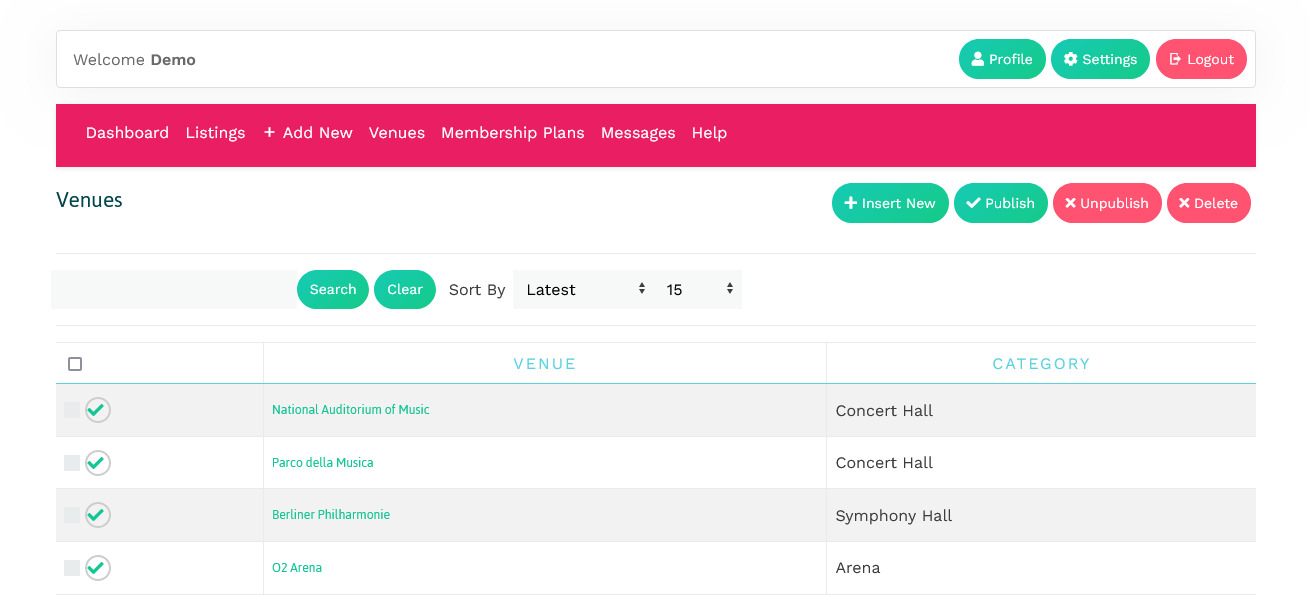 Screen 1: Venues listing
You can select what to do next based on the following table.
| Insert New | Click to add a new agent information. |
| Publish | Click to publish the agent information. |
| Unpublish | Click to unpublish agent information. |
| Delete | Click to delete the agent information from the site. |
Adding a new Venue
To add a new venue for the event, click Insert New from the Venues tab.
For detailed information about information that needs to included in each field, see Venues in the Administrator's guide.
User Membership
Overview
You can view the user membership plan details on the Front Admin page. If eligible for, you can also upgrade the user membership plan to a higher plan.
The following screen shows the Membership details for the user.
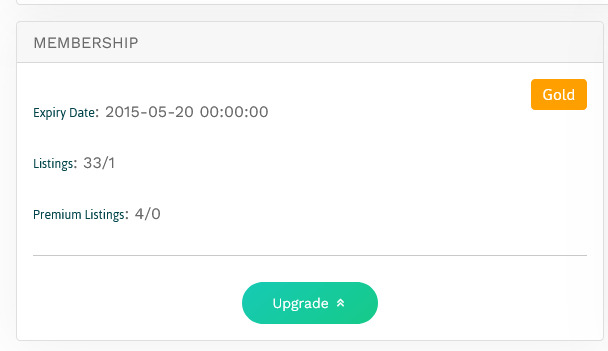

Screen 1: Membership details
To upgrade the user membership plan you can either click Upgrade Your Membership NOW or click the Membership Plans tab on the Front Admin page. The membership plans that are available for upgrade are shown as seen in the following image.
The Membership Plans tab on the Front Admin page is available only if you are logged in as a company.
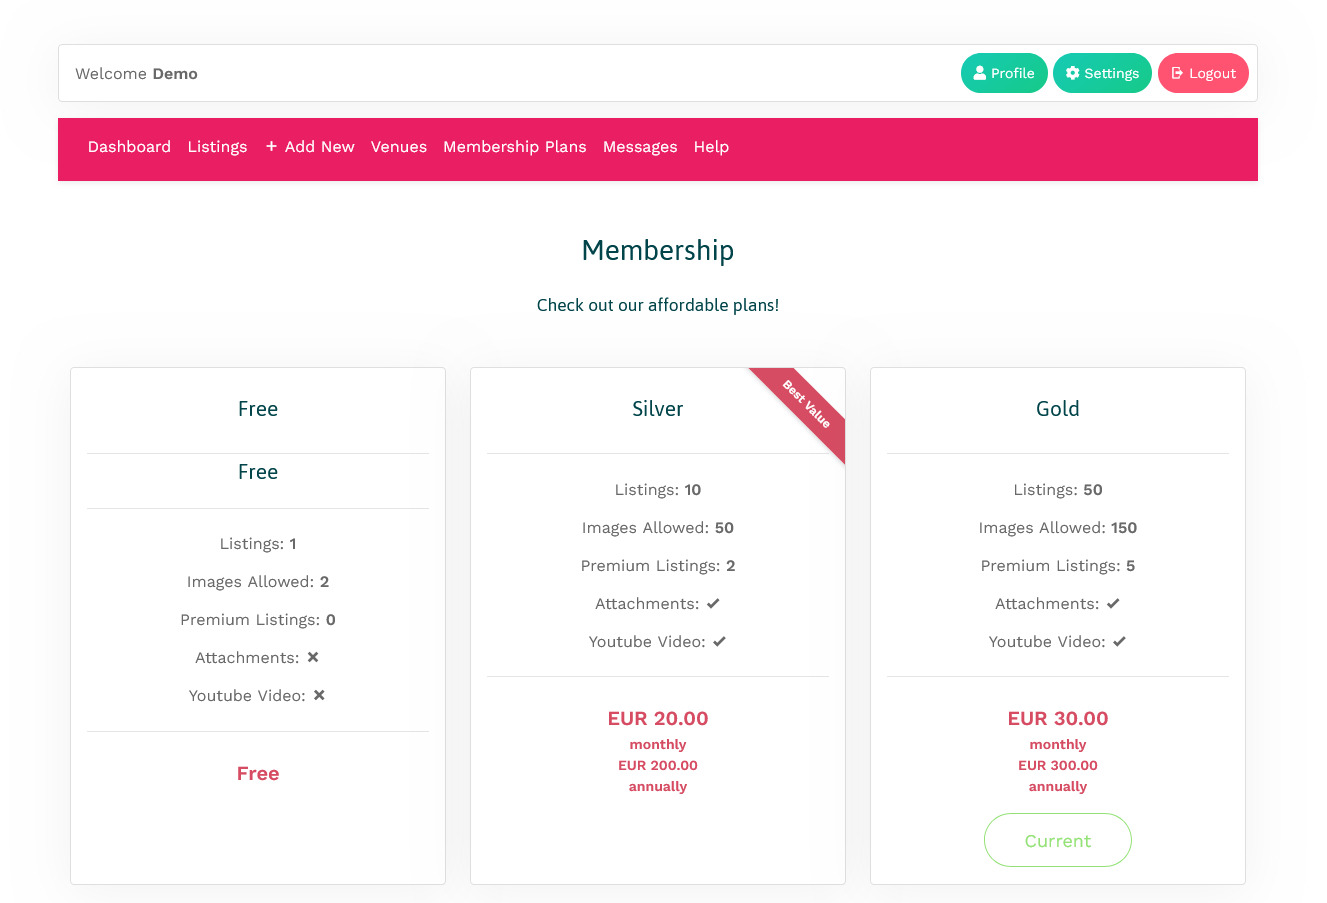

Screen 2: Membership plans
Click Upgrade to upgrade to the higher plan. You can then select an appropriate mode of payments and complete the transaction.
Profile & Settings (User Profile)
Overview
After creating a user, a user can edit his profile details such as password, email address, language settings, timezone settings, and much more.
To edit your profile, from the Front Admin, click Profilen.
Editing a profile
On the Profile screen, click Edit Profile
The following screen shows the different fields you can edit for a profile.
Provide the values as given in the following table.
Edit Your Profile |
Name |
Provide a name. |
|
Username |
Cannot be edited. |
|
|
Password |
Provide a new password. |
|
|
Confirm Password |
Confirm the new password. |
|
|
Email Address |
Provide a new email address. |
|
|
Confirm email Address |
Confirm the new email address. |
|
Basic Settings |
Editor |
Select one of the following:
|
|
Timezone |
Select a timezone. |
|
|
Frontend language |
Select the required language for front end. |
|
|
Backend Template Style |
Select from the available templates or keep as default. |
|
|
Backend language |
Select the required language for back end. |
|
|
Help Site |
Select from the available Help site options for your required language. |
|
Additional Options |
Logo |
Click Choose File to select an image for the user profile picture. |
|
Eventbrite User Key |
Provide the key for JomEvent extension. |
|
|
Plan expiry |
This field is controlled by the site admin. |
To save the settings you changed, click Submit. If you click the Settings link on the Front Admin screen, it will take you to the Edit Profile page.