# JOMESTATE

# Quick Start - JomEstate

### Overview

This guide will help you get started with using the JomEstate extension quickly. It highlights preliminary steps that are a must for JomEstate configurations. After you are done with them, you can go ahead and create the listings on your site.

### Creating Administration Menu Links

This step is not needed if new installation being made.

Go to the System -&gt; Administrator modules and insert new. Than choose Administrator Menu. From the presets, select Comdev and place it under menu position. Do the same for the JomEstate:
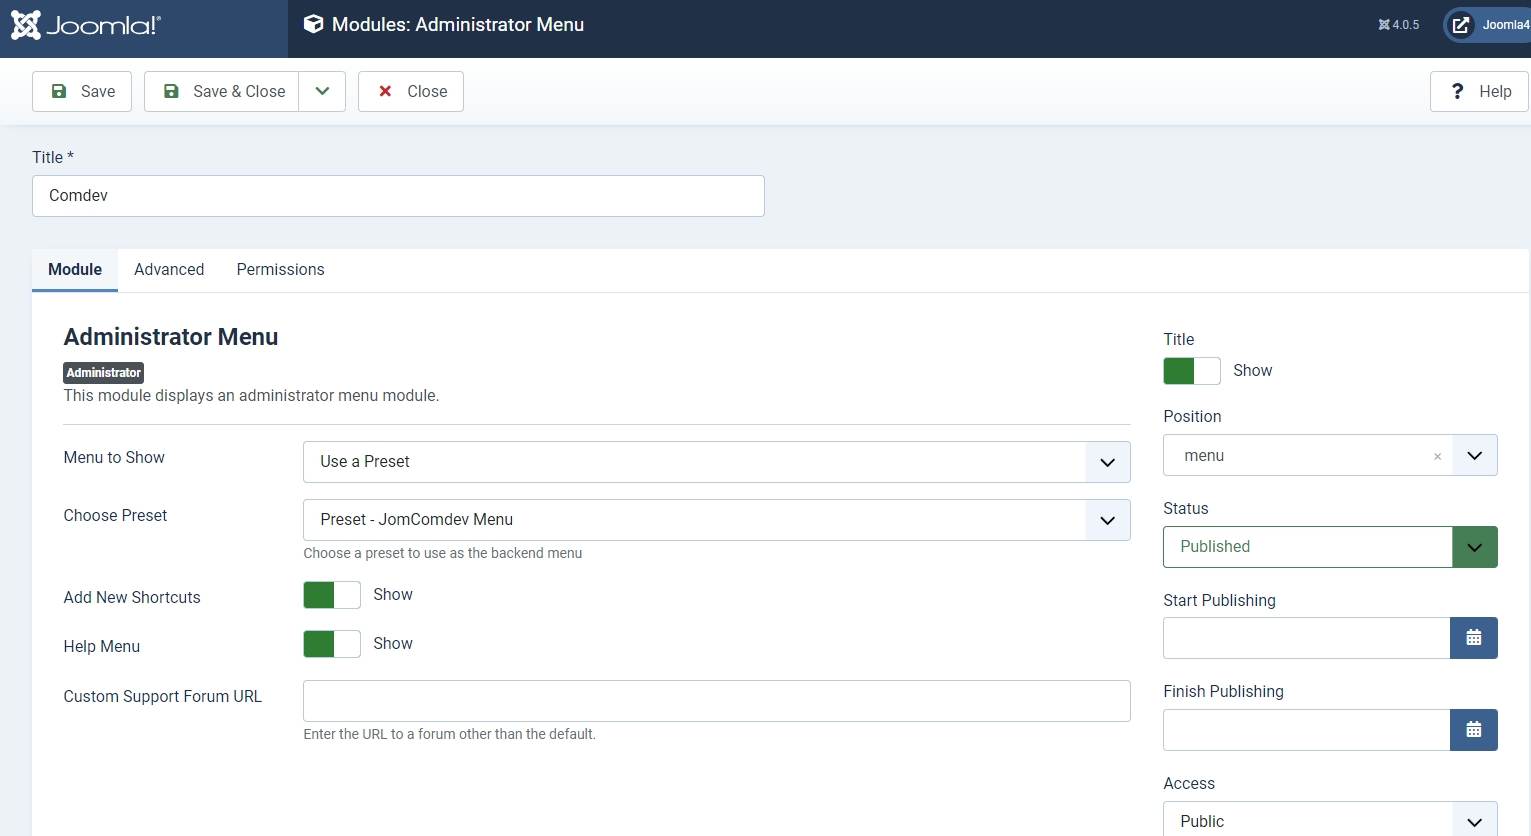
![](https://wiki.comdev.eu/download/attachments/4194513/screenshot-2021-12-22-19-30-33-536.jpeg)

### Creating Menu Links

Menus are used to control website navigation. A menu contains one or more menu items which provides your users with a navigational experience.

The menu items in our case must point to the JomEstate. It is mandatory that you create menu links such that Items menu and the Front Admin access is created.

Get started with creating menu links using the information given in the [Menu Items](https://wiki.comdev.eu/books/JomEstate/page/menu-items "Menu Items") documentation in the Administrative Guide.

### Creating Groups

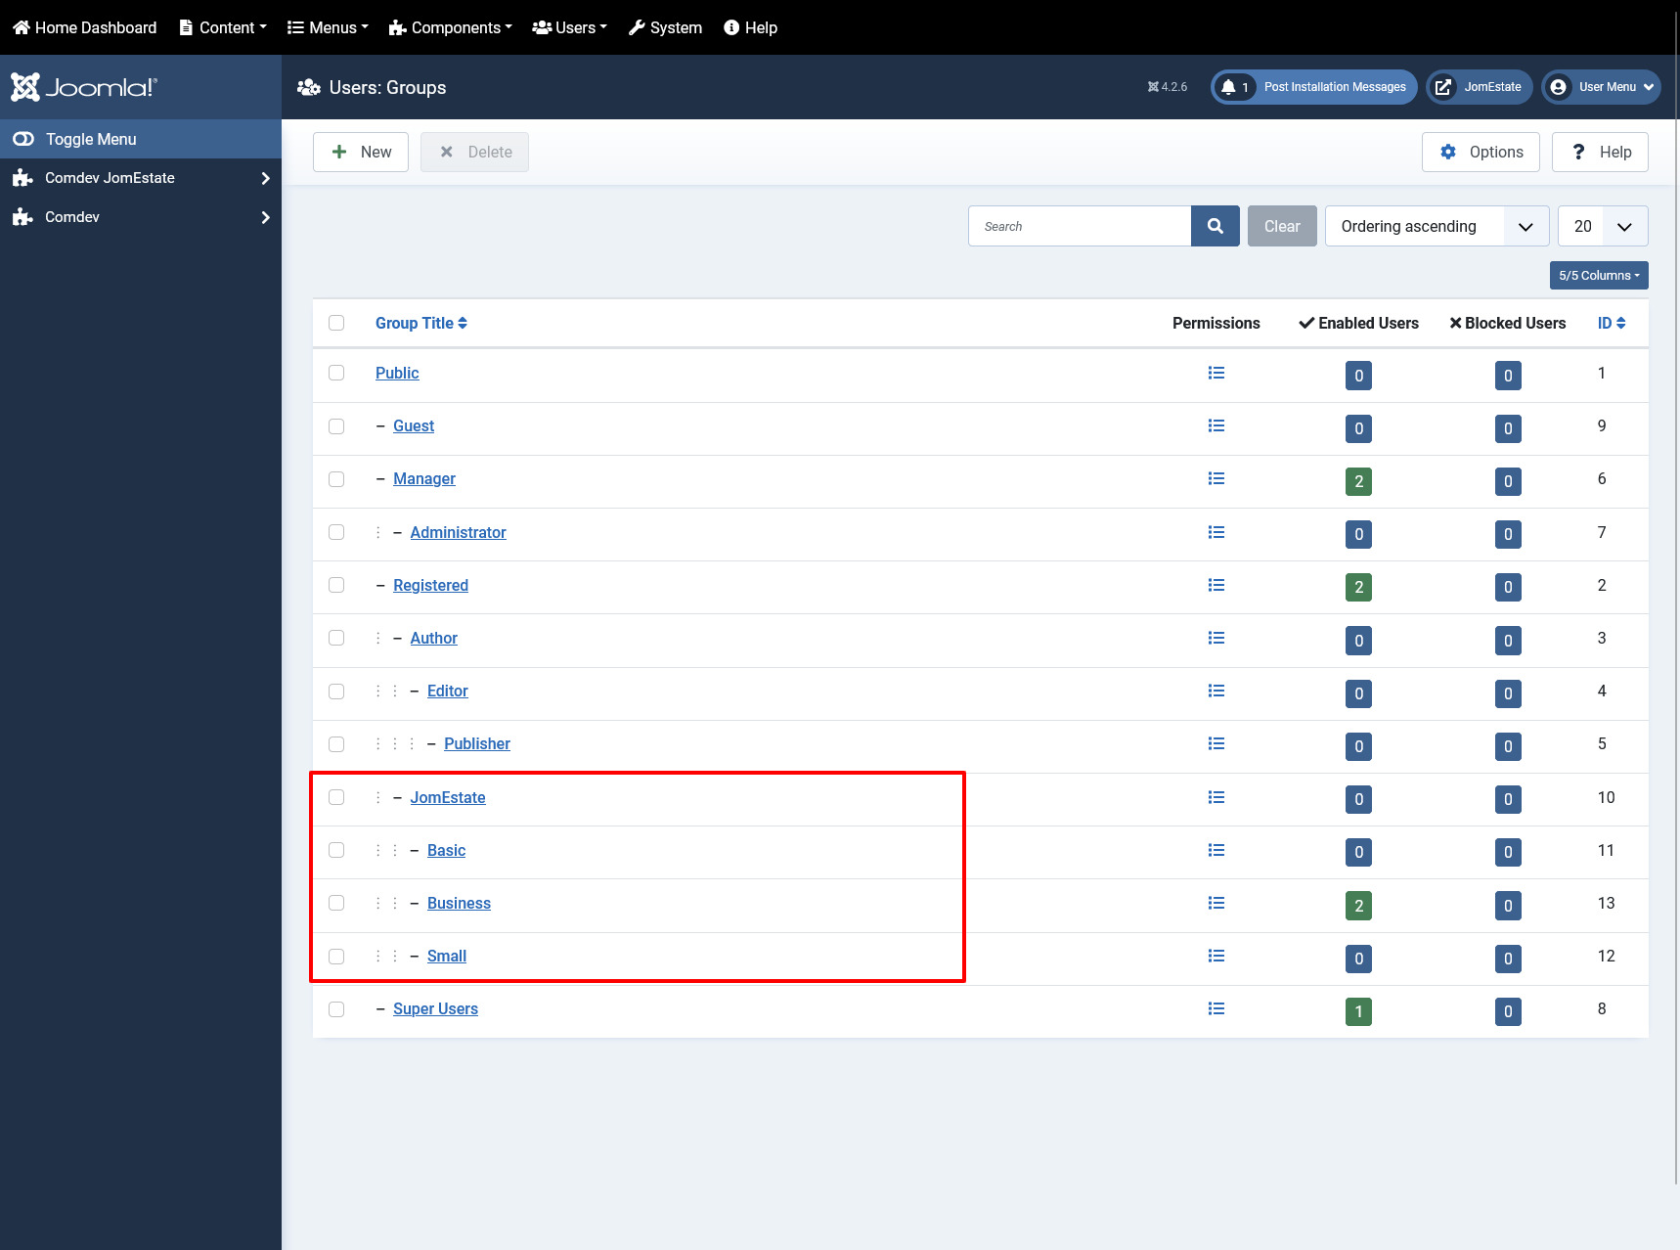
In order to add users to groups for membership plans, you must create a super group named JomEstate, then create groups for each of your membership plans underneath your super group. These groups are used to provide Group ID when creating a membership plan. Users created using User Manager can be linked to each of these membership plan groups.

To begin creating groups for membership plans, follow the [Creating a Group](https://wiki.comdev.eu/books/JomEstate/page/membership "Membership") documentation in the Administrative Guide.

### Creating Membership Plans and Memberships

Memberships in JomEstate are required to set user group level based on the monthly/Yearly pay plan the user selects. Using membership plans, you can decide how much to charge a user and how many listings a user can make a particular membership plan.

Before you can create a membership plan, you must create Joomla groups using the above section information. Read more about creating membership plans for your site using the [Memberships](https://wiki.comdev.eu/books/JomEstate/page/membership "Membership") section in the Administrative Guide.

### Adding a New Address

The Address feature lets you provide the country, region and city for the associated product listing. The advantage with the Address field in JomEstate is that after you configure a particular address, it is shared across various components in the Comdev extension.

Get started with creating addresses that will be used in your listings by referring to the [Address](https://wiki.comdev.eu/display/JD2/Address) documentation in the Administrative Guide.

### Adding a New Category

Categories allow the site owner to categorise listings into appropriate sections. JomEstate categories are independent of the Joomla category system. Nested categories (sub-categories) are supported in JomEstate. The component comes with a default category named "UNCATEGORIZED", which holds listing items that are not attached to any category (same function as the default Joomla system).

To start creating categories, follow the [Categories](https://wiki.comdev.eu/books/JomEstate/page/categories "Categories") documentation in the Administrative Guide.

### Adding Custom Fields

Custom fields are a powerful tool to build content. We provide a variety of field types with the ability to outline into groups. Each field can be assigned to a single category or all categories. Custom fields in JomEstate provide multiple options such as dropdowns, text area, radio buttons, and so on. Based on your requirement create a custom field and make it searchable for better user experience.

Read more about how to create custom fields in the [Custom Fields](https://wiki.comdev.eu/books/JomEstate/page/custom-fields "Custom Fields") section from the Administrative Guide.

### Creating a New Listing

Listings are nothing but the product listings that you want to create in the directory. Each listing is attached to a category. They are created in the same manner as Joomla articles but are not related to Joomla articles in the definition.

Get started with creating listings for each category by referring to the [Listings](https://wiki.comdev.eu/books/JomEstate/page/listings "Listings") section in the Administrative Guide.

# Configuration Steps

### Overview

These configuration steps need to be done in order for the component to work correctly

### Create Menu links

<p class="callout info">More about menu links can be [found here.](https://wiki.comdev.eu/books/jomestate/page/menu-items "Menu Items")</p>

Items menu link needs to be created.

<div bis_skin_checked="1" class="wiki-content" id="bkmrk-items-link-link-whic"><div bis_skin_checked="1" class="table-wrap"><table class="confluenceTable tablesorter tablesorter-default stickyTableHeaders" role="grid" style="padding: 0px; width: 100%;"><tbody aria-live="polite" aria-relevant="all"><tr role="row"><td class="confluenceTd" style="width: 12.2337%;">**Items Link**</td><td class="confluenceTd" style="width: 16.5673%;">Link which does not point to any

category or address

</td><td class="confluenceTd" style="width: 24.4747%;">Latest Link which displays latest added listings

<span class="confluence-embedded-file-wrapper confluence-embedded-manual-size">![](https://wiki.comdev.eu/download/attachments/6914419/jd-scren0001.jpg)</span>

</td><td class="confluenceTd" colspan="1" style="width: 46.6007%;">- Listing details may not be accessible
- This link is being used to display search results, so if the alias is latest than site URL for the search results will be http://domain.com/latest

</td></tr><tr role="row"><td class="confluenceTd" style="width: 12.2337%;">**Items Link - Category**</td><td class="confluenceTd" style="width: 16.5673%;">Links for each of the category.

A separate menu can be created with all the <span style="line-height: 1.4285715; background-color: transparent;">categories created.</span>

</td><td class="confluenceTd" style="width: 24.4747%;">Menu with all categories

<span class="confluence-embedded-file-wrapper confluence-embedded-manual-size">![](https://wiki.comdev.eu/download/attachments/6914419/jd-scren0002.jpg)</span>

<span class="confluence-embedded-file-wrapper confluence-embedded-manual-size">![](https://wiki.comdev.eu/download/attachments/6914419/jd-scren0003.jpg)</span>

</td><td class="confluenceTd" colspan="1" style="width: 46.6007%;">- Listing details may not be accessible
- Individual menu settings can't be applied

</td></tr></tbody></table>

</div></div>### Joomla / Groups

Membership Plans are based on the Joomla Groups therefore before creating any of the Membership plans - corresponding Joomla groups needs to be created. The main group for the component needs to be called JomEstate. Each of the plans needs to be placed under that JomEstate parent group e.g.

**JomEstate**

<div bis_skin_checked="1" class="wiki-content" id="bkmrk-free-basic-silver-go">- Free
- Basic
- Silver
- Gold

</div>[![obraz.png](https://wiki.comdev.eu/uploads/images/gallery/2024-02/scaled-1680-/YLAobraz.png)](https://wiki.comdev.eu/uploads/images/gallery/2024-02/YLAobraz.png)

<span class="confluence-embedded-file-wrapper confluence-embedded-manual-size">  
</span>

### Permissions

It is important to set the right permissions for the components: Comdev and Directory, in order for the users to access the Front Admin. Otherwise, Users won't be able to access the Front Admin (Permissions Denied) or get 500 Error when trying to upload the images.

An example below shows access for the Registered Group. Same settings should be applied for each group that should have access to the Front Admin.

#### Setting permissions for the Comdev Extension

[![obraz.png](https://wiki.comdev.eu/uploads/images/gallery/2024-02/scaled-1680-/3m6obraz.png)](https://wiki.comdev.eu/uploads/images/gallery/2024-02/3m6obraz.png)
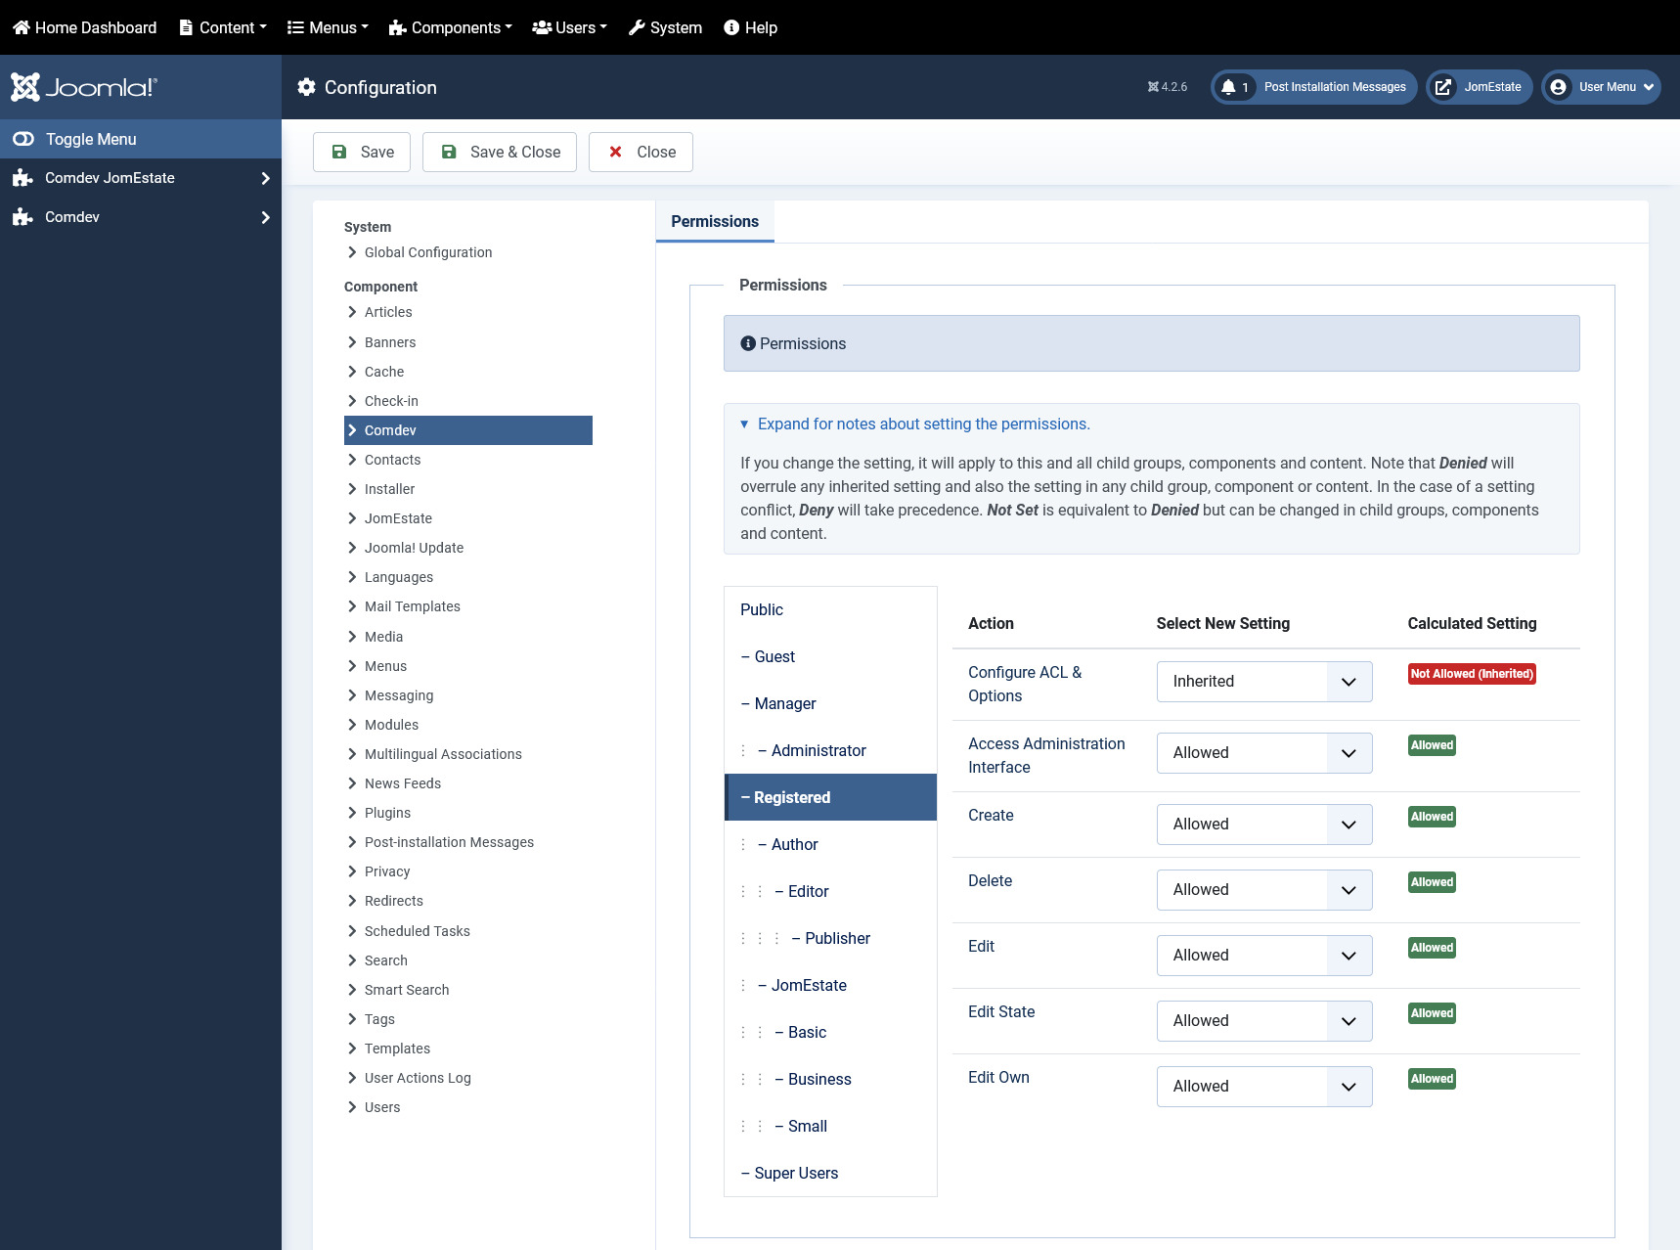
<span class="confluence-embedded-file-wrapper">  
</span>

#### Setting permissions for the JomEstate Extension

[![obraz.png](https://wiki.comdev.eu/uploads/images/gallery/2024-02/scaled-1680-/2iOobraz.png)](https://wiki.comdev.eu/uploads/images/gallery/2024-02/2iOobraz.png)
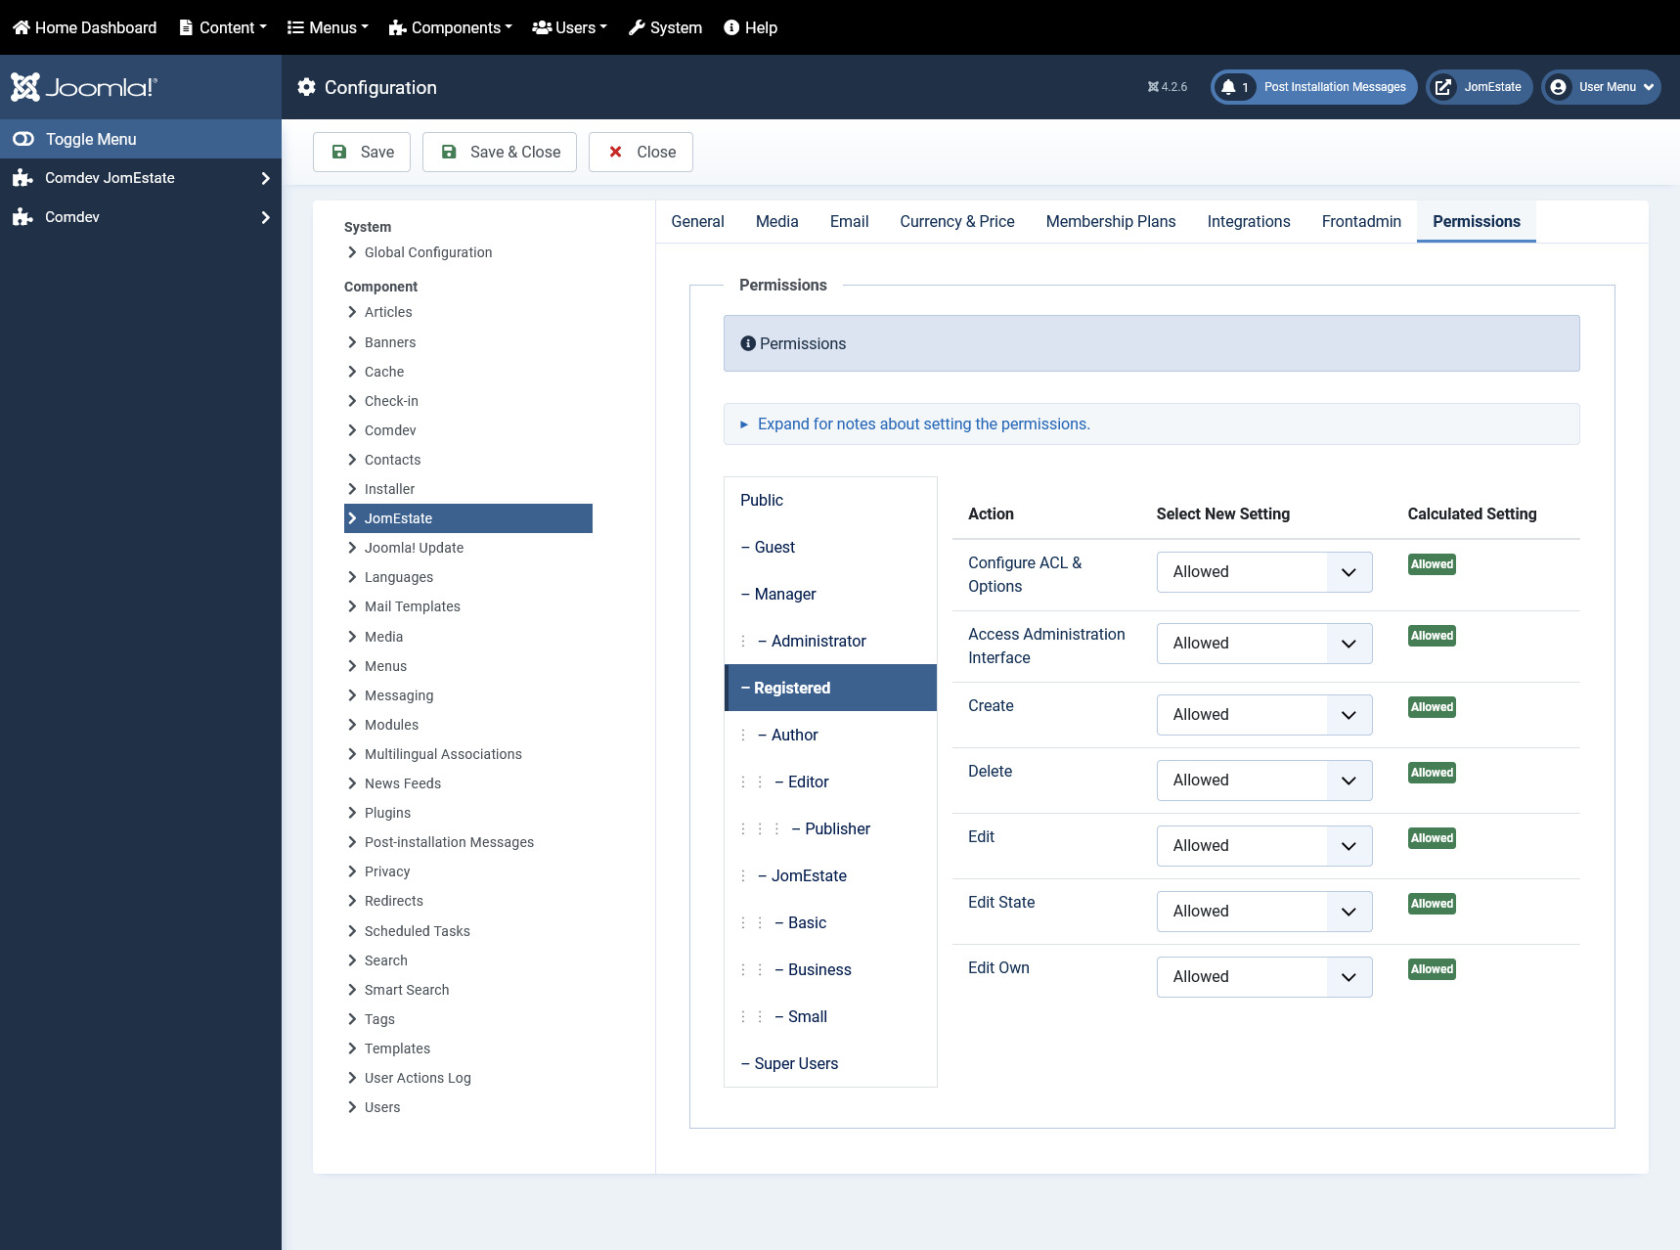
<span class="confluence-embedded-file-wrapper">  
</span>

<div bis_skin_checked="1" class="wiki-content" id="bkmrk--6"></div><div bis_skin_checked="1" id="bkmrk--7"></div>

# Menu Items

### Overview

In this section, we will learn how to create menu items to access JomEstate.

Menus are used to control website navigation and are a set of menu items. Menu items provide the navigational experience to your users. The menu items in our case must point to the JomEstate.

### Creating Administration Menu Links

<p class="callout info">This step is not needed if new installation being made.</p>

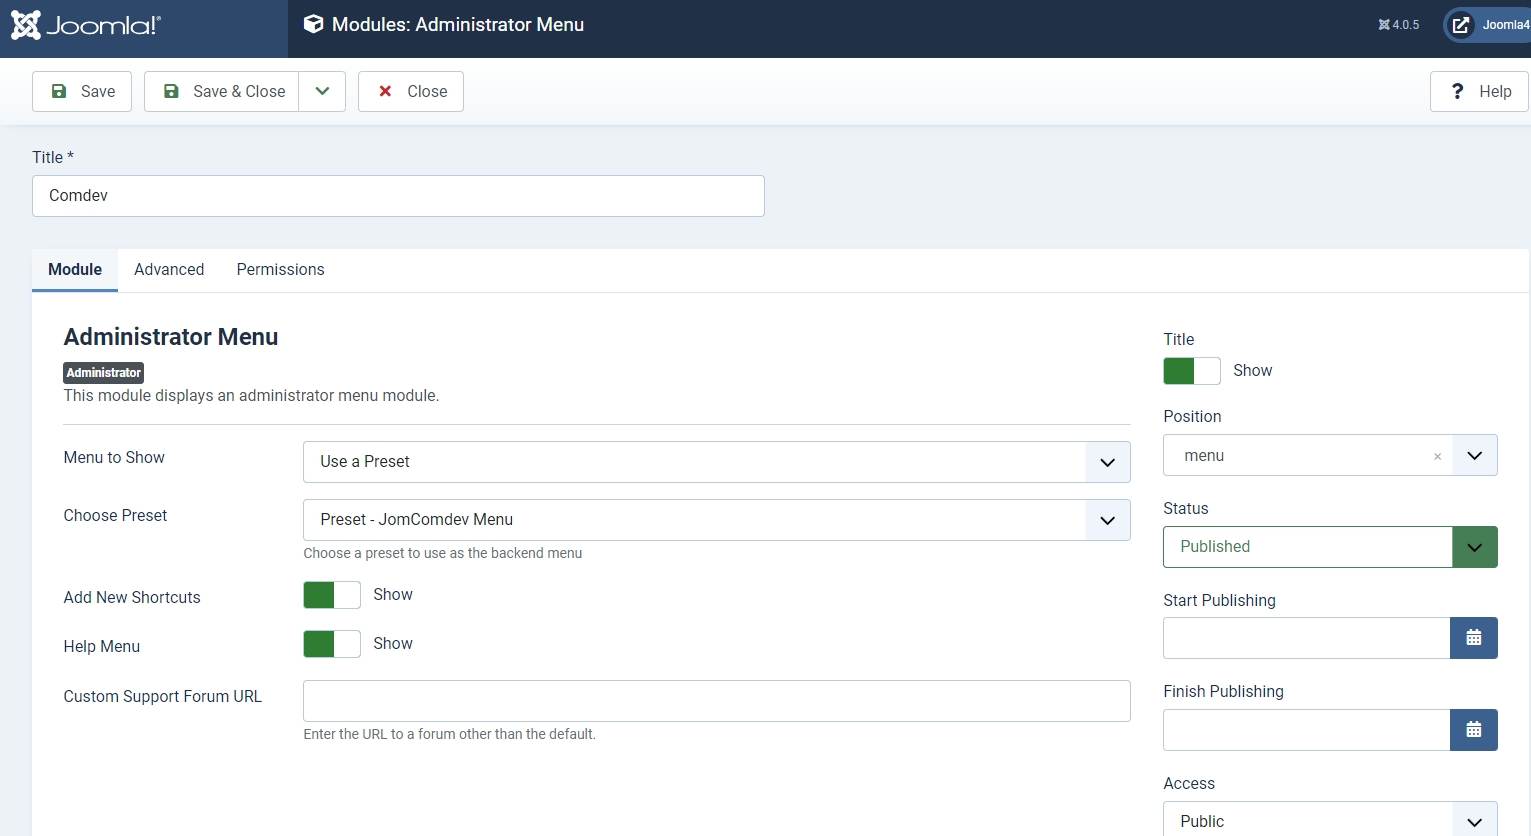
Go to the System -&gt; Administrator modules and insert new. Than choose Administrator Menu. From the presets, select Comdev and place it under menu position. Do the same for the JomEstate

[![screenshot-2021-12-22-19-30-33-536.jpeg](https://wiki.comdev.eu/uploads/images/gallery/2024-03/scaled-1680-/screenshot-2021-12-22-19-30-33-536.jpeg)](https://wiki.comdev.eu/uploads/images/gallery/2024-03/screenshot-2021-12-22-19-30-33-536.jpeg)
### Creating Menu Items to access JomEstate

<div bis_skin_checked="1" class="confluence-information-macro confluence-information-macro-note conf-macro output-block" data-hasbody="true" data-macro-name="note" id="bkmrk-creating-an-items-me"></div><div bis_skin_checked="1" class="confluence-information-macro-body" id="bkmrk--1"></div><p class="callout warning">Creating an Items menu link is mandatory. If you have a multilingual site, ensure that **you create an Items menu link for each language.** You can hide this menu link, but it needs to be create nonetheless. Though you are creating an Items link that does not point to any category or address, you can create other links with Items menu type that can point to an address or a category once main Items link has been created.</p>

To create menu items with Items menu item type, do the following:

1. Click **Menus** &gt; **&lt;your\_menu&gt;** &gt; **Add New Menu Items**.
2. Provide a title in our case is **Latest Listings** in the **Menu Title** field. Now, since the Latest Listings menu item provides a list of all the latest postings on the site, we have selected the menu type as Items. The Alias field will build URL for the site. When search is done this will be the landing page for the search results as well.
3. Provide the options as seen in the following image:  
      
    [![obraz.png](https://xwiki.comdev.eu/uploads/images/gallery/2024-02/scaled-1680-/huVobraz.png)](https://xwiki.comdev.eu/uploads/images/gallery/2024-02/huVobraz.png)
    
      
    **Screen 3:** Items menu item screen
    
      
    Provide the values based on the following table.
    
    <div bis_skin_checked="1" class="table-wrap">  
    </div>

1. <div bis_skin_checked="1" class="table-wrap"><table class="wrapped confluenceTable tablesorter tablesorter-default stickyTableHeaders" role="grid" style="padding: 0px;"><tbody aria-live="polite" aria-relevant="all"><tr role="row"><td class="confluenceTd">**Menu Item Type**
    
    </td><td class="confluenceTd">Click **Select**. A pop up is displayed. In this case, since we are creating the Items menu item, click **JomEstate** &gt; **Items** from the list.
    
    </td></tr><tr role="row"><td class="confluenceTd">**Category**
    
    </td><td class="confluenceTd">Select the appropriate category, if creating direct category link.
    
    </td></tr><tr role="row"><td class="confluenceTd">**Address**
    
    </td><td class="confluenceTd">Select the appropriate address if, creating direct address link.
    
    </td></tr><tr role="row"><td class="confluenceTd">**Link**
    
    </td><td class="confluenceTd">This field is auto populated based on the menu item type selected.
    
    </td></tr><tr role="row"><td class="confluenceTd">**Target Window**
    
    </td><td class="confluenceTd">Select the parent for this menu item.
    
    </td></tr><tr role="row"><td class="confluenceTd">**Template Style**
    
    </td><td class="confluenceTd">Select the template style you want for this menu.
    
    </td></tr></tbody></table>
    
    </div>
2. Click **Save**.

<div bis_skin_checked="1" class="confluence-information-macro confluence-information-macro-note conf-macro output-block" data-hasbody="true" data-macro-name="note" id="bkmrk--2"><div bis_skin_checked="1" class="confluence-information-macro-body">  
</div></div>Ensure that you see a green tick next to this menu item. The green tick indicates that the item is published. To publish an item, select the checkbox next to the item and click **Publish**.

To view the created menu item, go the front end of your site. The new menu item is displayed.

### Creating Menu to access JomEstate Front Admin

To create menu items with Front Admin menu item type, do the following:

1. Click **Menus** &gt; **&lt;your\_menu&gt;** &gt; **Add New Menu Items**.
2. Provide a title as **Front Admin** and the alias as **front-admin** in the Menu Title field.
3. Provide the options as seen in the following image:  
    [![obraz.png](https://xwiki.comdev.eu/uploads/images/gallery/2024-02/scaled-1680-/HiSobraz.png)](https://xwiki.comdev.eu/uploads/images/gallery/2024-02/HiSobraz.png)
    
      
    **Screen4:** JomEstate Front Admin menu item screen
4. Click **Save**.

Front Admin Options

For the Menu to be able to access the JomEstate Front Admin, certain settings need to be made. The following table shows the three menu links that need to be made and linked with JomEstate Options. You can create these 3 menu items anywhere on the site e.g. link them under User Menu.

<div bis_skin_checked="1" class="table-wrap" id="bkmrk--3"><table class="wrapped confluenceTable tablesorter tablesorter-default stickyTableHeaders" role="grid" style="padding: 0px;"><colgroup><col></col><col></col><col></col><col></col></colgroup><thead class="tableFloatingHeaderOriginal" style="position: static; margin-top: 0px; left: 325px; z-index: 3; width: 1332px; top: 40px;"><tr class="tablesorter-headerRow" role="row"></tr></thead></table>

</div><div bis_skin_checked="1" class="table-wrap" id="bkmrk-profile-edit-menu-li"><table class="wrapped confluenceTable tablesorter tablesorter-default stickyTableHeaders" role="grid" style="padding: 0px; width: 100%;"><tbody aria-live="polite" aria-relevant="all"><tr role="row"><td class="highlight-green confluenceTd" data-highlight-colour="green" style="width: 14.3332%;">##### Profile Edit Menu Link

</td><td class="highlight-green confluenceTd" data-highlight-colour="green" style="width: 16.8164%;">This link should point to Edit profile menu item created using Edit User Profile menu item type.

</td><td class="highlight-green confluenceTd" data-highlight-colour="green" style="width: 26.2052%;">1. Click **Menu** &gt; **&lt;your\_menu&gt;**&gt;**Add New Menu Item**.
2. Provide the Title as **Edit Profile** and the menu item type as **Edit User Profile**.
3. Click **Save**.

</td><td class="highlight-green confluenceTd" data-highlight-colour="green" style="width: 42.6452%;"><div bis_skin_checked="1" class="content-wrapper"><span class="confluence-embedded-file-wrapper confluence-embedded-manual-size">![](https://wiki.comdev.eu/download/attachments/5735689/Edit_Profile.jpg)</span></div></td></tr><tr role="row"><td class="highlight-red confluenceTd" data-highlight-colour="red" style="width: 14.3332%;">##### Admin Menu Link

</td><td class="highlight-red confluenceTd" data-highlight-colour="red" style="width: 16.8164%;">This link should point to the login form menu item created using Login Form menu item type.

</td><td class="highlight-red confluenceTd" data-highlight-colour="red" style="width: 26.2052%;">1. Click **Menu** &gt; **&lt;your\_menu&gt;**&gt;**Add New Menu Item**.
2. Provide the Title as **Login Form** and the menu item type as **Login Form**.
3. Click **Save**.

</td><td class="highlight-red confluenceTd" data-highlight-colour="red" style="width: 42.6452%;">The following image shows how the Login Form menu item is used

[![Bez nazwy.jpeg](https://wiki.comdev.eu/uploads/images/gallery/2024-03/scaled-1680-/kgPbez-nazwy.jpeg)](https://wiki.comdev.eu/uploads/images/gallery/2024-03/kgPbez-nazwy.jpeg)

<span class="confluence-embedded-file-wrapper confluence-embedded-manual-size">![](https://wiki.comdev.eu/download/attachments/5735689/Login_Form.jpg)</span>

When user is not logged into the front page, he will be redirected to the built-in Joomla login form. After successful login, he will be redirected to the JomEstate Front Admin.   
The following image shows the redirect URL that needs to be provided. The value you provide in the Login Redirect field depends on the following:

<div bis_skin_checked="1" class="content-wrapper">- <span class="nolink">http://domain.com/index.php/front-admin</span> - Use if URL rewriting is not applicable.
- <span class="nolink">http://domain.com/front-admin</span> - Use if URL rewriting is applicable.

</div>In our example, we are using the <span class="nolink">http://domain.com/front-admin</span> URL as shown in the following image where front-admin is the alias of the [JomEstate Front Admin Menu Link](https://wiki.comdev.eu/display/JE/Menu+Items#MenuItems-front-admin):

<span class="confluence-embedded-file-wrapper confluence-embedded-manual-size">![](https://wiki.comdev.eu/download/attachments/5735689/Login_Form_redirect.jpg)</span>

</td></tr><tr role="row"><td class="highlight-yellow confluenceTd" data-highlight-colour="yellow" style="width: 14.3332%;">##### Profile View Menu Link

</td><td class="highlight-yellow confluenceTd" data-highlight-colour="yellow" style="width: 16.8164%;">This link should point to the user profile created using User Profile menu item type.

</td><td class="highlight-yellow confluenceTd" data-highlight-colour="yellow" style="width: 26.2052%;">1. Click **Menu** &gt; **&lt;your\_menu&gt;**&gt;**Add New Menu Item**.
2. Provide the Title as **User Profile** and the menu item type as **User Profile**.
3. Click **Save**.

</td><td class="highlight-yellow confluenceTd" data-highlight-colour="yellow" style="width: 42.6452%;"><div bis_skin_checked="1" class="content-wrapper"><span class="confluence-embedded-file-wrapper confluence-embedded-manual-size">![](https://wiki.comdev.eu/download/attachments/5735689/User_Profile.jpg)</span></div></td></tr></tbody></table>

</div>**Now link menus with JomEstate Options**:

Make the following settings for the Front Admin are made in the JomEstate options for the user to be redirected correctly to the Front Admin, when he is not logged in.

1. Click **System** &gt; **Control Panel**.
2. Under **Extensions**, click **JomEstate**.
3. Click **Options** in the top right-hand corner of the screen.
4. Click the **Front Admin** tab.
5. Change the **Profile Menu Link**, **Login Menu Link**, and **View Profile Menu Link** field as per the following image.  
    <span class="confluence-embedded-file-wrapper confluence-embedded-manual-size">![](https://wiki.comdev.eu/download/attachments/5735689/menuitems2.jpg)</span>  
    **Screen5:** JomEstate Front Admin options
6. Click **Save**.

The Front Admin lets users add listings in the front of the site. For more information about how to add listings, see [Front Admin](https://wiki.comdev.eu/books/jomestate/page/front-admin-overview "Front Admin Overview"). The following image shows the Front Admin.

<span class="confluence-embedded-file-wrapper confluence-embedded-manual-size">![](https://wiki.comdev.eu/download/attachments/5735689/screenshot-jomestate.comdev.eu-2019.02.03-14-07-49.png)</span>

**Screen 6:** Front Admin screen

# Administrator's Guide


# Dashboard

### Overview

Administration dashboard gives you an overview of all the activities you can do using the JomEstate extension. It provides you a view of all the menu items, system configuration checks, license information, and links to the documentation.

![](https://wiki.comdev.eu/download/attachments/5735690/screenshot-dev.jomestate.comdev.eu-2019.02.03-14-10-38.png)

**Screen 1: Dashboard screen**

### Menu Items

The following table provides an explanation about different menu items available:

<div id="bkmrk--1"><table><colgroup><col></col><col></col></colgroup><thead></thead></table>

</div><div id="bkmrk-dashboard-home-or-da"><table><tbody><tr><td>Dashboard

</td><td>Home or dashboard for the JomEstate extension

</td></tr><tr><td colspan="1">Address</td><td colspan="1">Shows the Address administration screen</td></tr><tr><td>Custom Fields

</td><td>Shows the Custom Fields administration screen

</td></tr><tr><td>Categories

</td><td>Shows the Categories administration screen

</td></tr><tr><td colspan="1">Price Types</td><td colspan="1">Shows the Price Types administration screen</td></tr><tr><td colspan="1">Property Types</td><td colspan="1">Shows the Property Types administration screen</td></tr><tr><td colspan="1">Companies</td><td colspan="1">Shows the Companies administration screen</td></tr><tr><td colspan="1">Agents</td><td colspan="1">Shows the Agents administration screen</td></tr><tr><td>Membership Plans

</td><td>Shows the Membership Plans administration screen

</td></tr><tr><td>Messages

</td><td>Shows the messages received

</td></tr><tr><td colspan="1">Add New</td><td colspan="1">Click to quickly add a listing to the site</td></tr><tr><td>Documentation

</td><td>Access the JomEstate documentation.

</td></tr></tbody></table>

</div>### System Configuration Checks

Any configuration problems or current configuration status is displayed in this area as shown in the following screen:

![](https://wiki.comdev.eu/download/attachments/5735690/screenshot-dev.jomestate.comdev.eu-2019.02.03-14-12-18.png)

**Screen 3: System configuration checks area**

# Address

{{@105}}

# Categories

{{@106}}

# Custom Fields

{{@107}}

#### JomEstate custom fields: Beds, Baths, Garage

For custom fields such as Bed, Bath, and Garage, icons are displayed alongside. To change the style css for these icons, edit the jomestate.css file located in the *components/com\_jomestate/assets/css* folder. These icons are only available for the single language. If the site is multilingual than additional suffixes are added, therefore additional styles needs to be created.

```css
.beds .jd-lab-horizontal-float-icon {background: url("../images/beds.png") 0 50% no-repeat;}
.baths .jd-lab-horizontal-float-icon {background: url("../images/baths.png") 0 50% no-repeat;}
.garage .jd-lab-horizontal-float-icon {background: url("../images/car.png") 0 50% no-repeat;}
```

####   

# Property Types

### Overview

Property types allow the site owner to categorize property types into appropriate sections. Nested property types (sub-property types) are supported in JomEstate. JomEstate comes with a property type named "**UNCATEGORISED**" which is the default setting. This property type will list properties which are not attached to any property type (same function as the default Joomla categories system).

[![obraz.png](https://wiki.comdev.eu/uploads/images/gallery/2024-03/scaled-1680-/d9dobraz.png)](https://wiki.comdev.eu/uploads/images/gallery/2024-03/d9dobraz.png)**Screen 1: Property type listing**

### Creating A New Property Type

To add a Property type to JomEstate, click New.

[![obraz.png](https://wiki.comdev.eu/uploads/images/gallery/2024-03/scaled-1680-/kDhobraz.png)](https://wiki.comdev.eu/uploads/images/gallery/2024-03/kDhobraz.png)

![](https://wiki.comdev.eu/download/attachments/5735874/property_type.jpg?version=2&modificationDateamp;api=v2)

**Screen 2: Create a new property**

New Category tab

Provide the values as given in the following table.

<div id="bkmrk-title-title-for-the-"><table><tbody><tr><td>**Title**

</td><td>Title for the Property Type.

</td></tr><tr><td>**Alias**

</td><td>URL alias for “SEF/SEO” URL.

</td></tr><tr><td>**Parent**

</td><td>Choose the parent category item.

</td></tr><tr><td>**Text area**

</td><td>Provide a description in the text area.

</td></tr><tr><td colspan="1">**Toggle editor *Button***</td><td colspan="1">Click to toggle between rich text and plain text editor.</td></tr><tr><td colspan="1">**Article *Button***</td><td colspan="1">Click to select a relevant article. If an article is provided, it can be seen under the Details tab in the listing.</td></tr><tr><td colspan="1">**Image *Button***</td><td colspan="1">Click to select an image you want to add to the listing.</td></tr><tr><td colspan="1">**Category Image**</td><td colspan="1">Currently not being used.</td></tr></tbody></table>

</div>#### Publishing tab

After you have provided the above information, you can provide the publishing information in the Publishing tab.

You can change the values for the given options using the following table.

<div id="bkmrk-status-based-on-the-"><table><tbody><tr><td>**Status**

</td><td>Based on the status seen here, the visibility changes as follows:

- Published - Entries are visible on the front-end.
- Unpublished – Entries are invisible in the front-end, but can be published later.
- Archived – Older entries that are not ready for deletion yet.
- Trashed – Older entries that should be removed.

</td></tr><tr><td>**Access**

</td><td>Access level for site users is as follows:

- Public access grant access to everybody.
- Registered access grants access only to registered and logged in users.
- Special access only grants access to users specified as “Special”.

</td></tr><tr><td>**Language**

</td><td>Select the language for the property type.

</td></tr><tr><td>**ID**

</td><td>Address ID, which can be used in modules, plugins and menus.

</td></tr><tr><td>**Created by**

</td><td>User name who created the entry.

</td></tr><tr><td>**Created Date**

</td><td>Date when the entry was created.

</td></tr></tbody></table>

</div>#### Metadata tab

The metadata tab is used to provide metadata information for a particular address entry.

You can change the values for the given options using the following table.

<table id="bkmrk-meta-description-met"><tbody><tr><td>**Meta Description**

</td><td>Meta-description for search-engine listings.

</td></tr><tr><td>**Meta Keywords**

</td><td>Meta Keywords for the search-engine

</td></tr><tr><td>**Author**

</td><td>Content author metadata.

</td></tr><tr><td>**Robots**

</td><td>Robots instructions:

- Use Global
- Index, Follow
- No Index, Follow
- Index, No Follow
- No Index, No Follow

</td></tr></tbody></table>

# Listings

## Overview

Properties are nothing but the product listings that you want to create in the JomEstate. Each listing is attached to a category. They are created in the same manner as Joomla articles, but are not related to Joomla articles in definition.

### Creating A New Listing

The following image shows the Listings screen.

[![obraz.png](https://wiki.comdev.eu/uploads/images/gallery/2024-02/scaled-1680-/Yuzobraz.png)](https://wiki.comdev.eu/uploads/images/gallery/2024-02/Yuzobraz.png)

**Screen 1: Properties screen**

The following table explains the different options seen on the screen.

<div id="bkmrk-new-creates-a-new-ad"><table><tbody><tr><td>New

</td><td>Creates a new Address entry. You must create separate entries for each level of depth that you need.

</td></tr><tr><td>Edit

</td><td>Provides the edit mode to make changes to the existing level or titles created.

</td></tr><tr><td>Publish

</td><td>Publishes the created address entry.

</td></tr><tr><td>Unpublish

</td><td>Removes the entry from the list of published address entries

</td></tr><tr><td>Archive

</td><td>Archives address entries that are not used anymore.

</td></tr><tr><td>Trash

</td><td>Deletes the address entry that is not required anymore.

</td></tr></tbody></table>

</div>### Edit Listing

If you want to edit existing entries, you can either click the entry from the Listings screen or select the checkbox next to the entry, and then click Edit.

This tab provides options to add title, description, select category, and other options for the Listing as seen in the following image:

[![obraz.png](https://wiki.comdev.eu/uploads/images/gallery/2024-02/scaled-1680-/6ZDobraz.png)](https://wiki.comdev.eu/uploads/images/gallery/2024-02/6ZDobraz.png)

**Screen 2: Edit Listing screen**

The following table shows the options available:

<div id="bkmrk-edit-listing-area-ti"><table style="width: 100%;"><tbody><tr><td data-highlight-colour="yellow" style="width: 12.3609%;">##### Edit Listing area

</td><td style="width: 11.6141%;">Title

</td><td style="width: 76.025%;">Title for the Listing.

</td></tr><tr><td data-highlight-colour="yellow" style="width: 12.3609%;"> </td><td style="width: 11.6141%;">Alias

</td><td style="width: 76.025%;">URL alias for “SEF/SEO” URL.

</td></tr><tr><td data-highlight-colour="yellow" style="width: 12.3609%;"> </td><td style="width: 11.6141%;">Category

</td><td style="width: 76.025%;">Category where the listing will be published.

</td></tr><tr><td colspan="1" style="width: 12.3609%;">Property Type</td><td colspan="1" style="width: 11.6141%;">Select the property type from the drop down.</td></tr><tr><td data-highlight-colour="yellow" style="width: 12.3609%;"> </td><td style="width: 11.6141%;">Text Area

</td><td style="width: 76.025%;">Provide a description for the listing.

You can create a short description as well a long description.

[![obraz.png](https://wiki.comdev.eu/uploads/images/gallery/2024-03/scaled-1680-/pv9obraz.png)](https://wiki.comdev.eu/uploads/images/gallery/2024-03/pv9obraz.png)
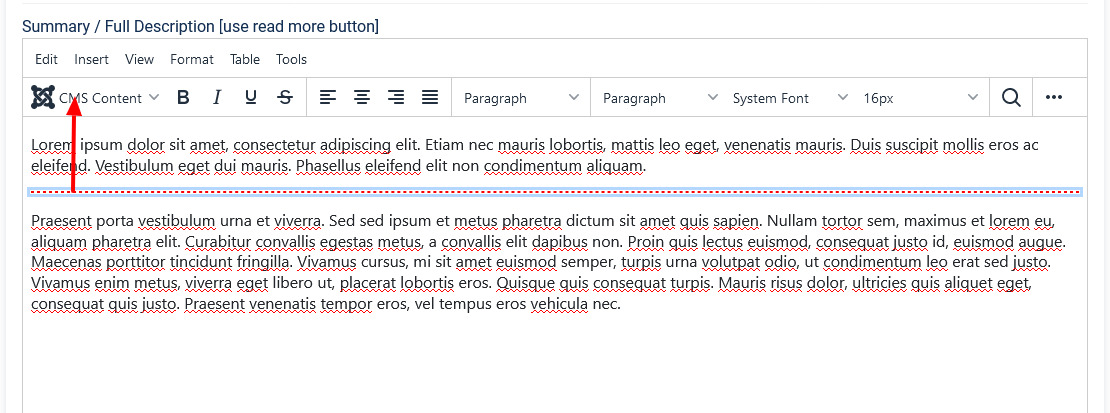
![](https://wiki.comdev.eu/download/attachments/4194545/Listings_Read_More.jpg)

<div data-hasbody="true" data-macro-name="info"><div>In the above image, the red dotted line appears when you click **Read More**. Any content above the red line is the **short description**, while the entire content is the **long description**. Also, note that if there is no content after the **Read More** tag, the event description will be blank when users view the listing. Ensure that you have content after the **Read More** tag.</div></div></td></tr><tr><td data-highlight-colour="yellow" style="width: 12.3609%;"> </td><td style="width: 11.6141%;">Article *Button*

</td><td style="width: 76.025%;">Click to select a relevant article. If an article is provided, it can be seen under the Details tab in the listing.

</td></tr><tr><td data-highlight-colour="yellow" style="width: 12.3609%;"> </td><td style="width: 11.6141%;">Page Break *Button*

</td><td style="width: 76.025%;">Insert a page break in the displayed text.

</td></tr><tr><td data-highlight-colour="yellow" style="width: 12.3609%;"> </td><td style="width: 11.6141%;">Toggle editor *Button*

</td><td style="width: 76.025%;">Toggle between plain text and rich text editor

</td></tr><tr><td data-highlight-colour="red" style="width: 12.3609%;">##### Address area

</td><td style="width: 11.6141%;">Address

</td><td style="width: 76.025%;">Address of the listing

</td></tr><tr><td data-highlight-colour="red" style="width: 12.3609%;"> </td><td style="width: 11.6141%;">Street, House No.

</td><td style="width: 76.025%;">Street and house number of the listing - If both Address and Full Address specified, map location will position automatically.

</td></tr><tr><td data-highlight-colour="green" style="width: 12.3609%;">##### Location area

</td><td style="width: 11.6141%;">Maps latitude

</td><td style="width: 76.025%;">It utilizes the GEO-location based on Google Maps.

Provide the latitude information for the location mapping.

</td></tr><tr><td data-highlight-colour="green" style="width: 12.3609%;"> </td><td style="width: 11.6141%;">Maps longitude

</td><td style="width: 76.025%;">The information provided in this field is used to map the exact location. It utilizes the GEO-location based on Google Maps.

Provide the longitude information for the location mapping.

</td></tr><tr><td data-highlight-colour="green" style="width: 12.3609%;"> </td><td style="width: 11.6141%;">Maps Search

</td><td style="width: 76.025%;">Search for a specific location. Type in the location and press Enter to go to the exact location.

</td></tr><tr><td data-highlight-colour="blue" style="width: 12.3609%;">##### Sidebar

</td><td style="width: 11.6141%;">Featured

</td><td style="width: 76.025%;">Enable to make the listing appear as featured listing.

</td></tr><tr><td data-highlight-colour="blue" style="width: 12.3609%;"> </td><td style="width: 11.6141%;">Approved

</td><td style="width: 76.025%;">Enable to approve the listing. Listing will not be published.

</td></tr><tr><td data-highlight-colour="blue" style="width: 12.3609%;"> </td><td style="width: 11.6141%;">Language

</td><td style="width: 76.025%;">Select the language for which the listing needs to appear for. For [multiple languages](https://wiki.comdev.eu/display/JE/Multilingual+Site), you must create separate entries for each language.

</td></tr><tr><td data-highlight-colour="blue" style="width: 12.3609%;"> </td><td style="width: 11.6141%;">Status

</td><td style="width: 76.025%;">Select the required status.

- Published
- Unpublished
- Trashed
- Archived

</td></tr><tr><td data-highlight-colour="blue" style="width: 12.3609%;"> </td><td style="width: 11.6141%;">Created by

</td><td style="width: 76.025%;">Select the user who created the listing.

</td></tr><tr><td data-highlight-colour="blue" style="width: 12.3609%;"> </td><td style="width: 11.6141%;">Access

</td><td style="width: 76.025%;">Provide the access level for the listing.

- Guest
- Public
- Registered
- Special

</td></tr><tr><td data-highlight-colour="blue" style="width: 12.3609%;"> </td><td style="width: 11.6141%;">Date created

</td><td style="width: 76.025%;">Select the date when the listing was created. You can select a future date for publishing the listing as well.

</td></tr><tr><td data-highlight-colour="blue" style="width: 12.3609%;"> </td><td style="width: 11.6141%;">Publish Up

</td><td style="width: 76.025%;">Select a date when you want to publish the listing. Here too, you can schedule to post the listing at a future date.

</td></tr><tr><td data-highlight-colour="blue" style="width: 12.3609%;"> </td><td style="width: 11.6141%;">Publish down

</td><td style="width: 76.025%;">Select a date when the listing should stop being published.

</td></tr><tr><td data-highlight-colour="blue" style="width: 12.3609%;"> </td><td style="width: 11.6141%;">Modified Date

</td><td style="width: 76.025%;">Select a date when the listing was modified.

</td></tr><tr><td data-highlight-colour="blue" style="width: 12.3609%;"> </td><td style="width: 11.6141%;">ID

</td><td style="width: 76.025%;">This is an auto-generated field.

</td></tr></tbody></table>

</div>#### Understanding the Location area in Edit listing tab

Let us understand how to provide the address and Street/House No for providing the exact locations on the map. When you provide the address, street and House No. in the backend when creating listings, the location position automatically. If the House No. is not provided, additional location fields needs to be used.

##### Mapping using longitudes and latitudes

If you provide the latitudes and longitudes, and the Maps Search setting is left blank, the location mapping is done based on these parameters as shown in the following image.

![e1Dobraz.png](https://wiki.comdev.eu/uploads/images/gallery/2024-03/scaled-1680-/s8xe1dobraz.png)![](https://wiki.comdev.eu/download/attachments/5735695/properties7.jpg)

**Screen 3: Map using longitudes and latitudes values**

##### Mapping with Map Search values 

If the Map Search field has a value provided to it, it takes precedence as shown in the following image. If the Map Search field value is given as “New York”, the location will map to this location.

![XACobraz.png](https://wiki.comdev.eu/uploads/images/gallery/2024-03/scaled-1680-/ZvUxacobraz.png)

![](https://wiki.comdev.eu/download/attachments/5735695/properties8.jpg?version=2&modificationDateamp;api=v2)

**Screen 4: Map using Map Search Field values**

#### Custom Fields tab

This tab includes all the custom fields created for a particular category. If the custom field is not applied to a specific category, it can be seen for all categories when creating a listing. The following image shows the Custom Fields tab screen.

[![obraz.png](https://wiki.comdev.eu/uploads/images/gallery/2024-02/scaled-1680-/5O1obraz.png)](https://wiki.comdev.eu/uploads/images/gallery/2024-02/5O1obraz.png)

**Screen 5: Custom Fields tab**

For more information about creating custom fields, see [Custom Fields](https://wiki.comdev.eu/display/JE/Custom+Fields).

#### Price tab

This tab includes information about the pricing details related to the property listing.

[![obraz.png](https://wiki.comdev.eu/uploads/images/gallery/2024-02/scaled-1680-/yplobraz.png)](https://wiki.comdev.eu/uploads/images/gallery/2024-02/yplobraz.png)

**Screen 6: Price tab**

Provide the information as per the following table.

<div id="bkmrk-add-new-click-to-add"><table><tbody><tr><td>Add New</td><td>Click to add new pricing category. You can provide weekly, monthly, and other offers per listing.

</td></tr><tr><td colspan="1">Price Netto</td><td colspan="1">Provide the pricing value.</td></tr><tr><td colspan="1">Price Group</td><td colspan="1">Select from the following options:

- Price
- Price per day
- Price per week
- Price per month
- Auction
- Offers from

<div data-hasbody="true" data-macro-name="info"><div>After installation, the price types are not defined. You should insert [your own](https://wiki.comdev.eu/display/JE/Price+Types), they will be populated in this drop-down field.</div></div><div data-hasbody="true" data-macro-name="note"><div>When searching, price type always needs to be provided as part of the search criteria.</div></div></td></tr></tbody></table>

</div>#### Images tab

This tab includes information about images and videos attached to the listing. Before you can add images to the listing, you must save your listing at least once. This ensure that all the other data you have filled for the listing does not disappear after the images are added.

The Images tab can be seen as shown in the following image:

[![obraz.png](https://wiki.comdev.eu/uploads/images/gallery/2024-02/scaled-1680-/esbobraz.png)](https://wiki.comdev.eu/uploads/images/gallery/2024-02/esbobraz.png)

**Screen 7: Images tab**

<div data-hasbody="true" data-macro-name="info" id="bkmrk-to-set-the-the-order"></div><p class="callout info">To set the the Order of the images, which one displayed first, drag and drop images to switch positions.  
The first image in the gallery is used as the image thumbnail for the listing.</p>

Provide the options as shown in the following table.

<div id="bkmrk-images-add-file-area"><table style="width: 100%;"><tbody><tr><td colspan="1" data-highlight-colour="yellow" style="width: 12.7286%;">##### Images

</td><td style="width: 24.6015%;">**Add file area**

</td><td style="width: 43.2633%;">Add Files

</td><td style="width: 19.4067%;">Click to select the image that needs to be uploaded.

</td></tr><tr><td style="width: 12.7286%;"> </td><td style="width: 24.6015%;">Drag &amp; Drop Files Here

</td><td style="width: 43.2633%;">Drag a bunch of images to this area to upload multiple images.

</td></tr><tr><td style="width: 12.7286%;"> </td><td style="width: 24.6015%;">Upload Into

</td><td style="width: 43.2633%;">Select which category the image falls under:

- Slideshow - detailed view main gallery
- Gallery - in gallery tab
- Logo - displayed in sidebar under custom fields and over the image with transparency in listings page.

</td></tr><tr><td style="width: 12.7286%;"> </td><td style="width: 24.6015%;">Add available images &amp; attachments

</td><td style="width: 43.2633%;">Click to add already uploaded images and attachments to this listing.

</td></tr><tr><td style="width: 12.7286%;">**Images area**

</td><td style="width: 24.6015%;">Editing an Image

 ![](https://wiki.comdev.eu/download/attachments/5735695/properties_je1.jpg)

</td><td style="width: 43.2633%;">Click the ![](https://wiki.comdev.eu/download/attachments/4194545/Listings_edit_icon.jpg) Edit icon to edit the image details. The options are as seen in the following image:
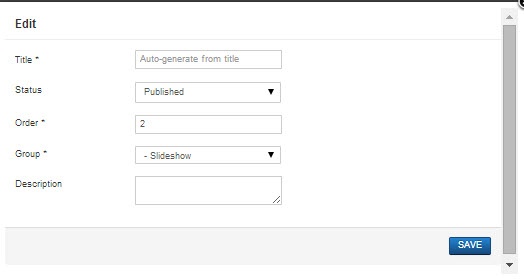
 ![](https://wiki.comdev.eu/download/attachments/4194545/Listings_Images_edit1.jpg)

Click the ![](https://wiki.comdev.eu/download/attachments/4194545/Listings_close_icon.jpg) Delete icon to delete the image.

</td></tr><tr><td style="width: 12.7286%;">**Attachments area**

</td><td style="width: 24.6015%;"> </td><td style="width: 43.2633%;">Click the ![](https://wiki.comdev.eu/download/attachments/4194545/Listings_edit_icon.jpg) Edit icon to edit an attachment that is linked to the listing. The screen is as shown here:

 ![](https://wiki.comdev.eu/download/attachments/4194545/Listings_Images_Attachments.jpg)

Click the ![](https://wiki.comdev.eu/download/attachments/4194545/Listings_close_icon.jpg) Delete icon to delete the attachment.

<div data-hasbody="true" data-macro-name="note">  
</div>Attachments are detected automatically based on file extension that’s are allowed in Configuration .

</td></tr><tr><td colspan="1" data-highlight-colour="blue" style="width: 12.7286%;">##### YouTube Video

</td><td colspan="1" style="width: 24.6015%;">Provide the YouTube video URL in this field as shown in the following image.

![](https://wiki.comdev.eu/download/attachments/5735695/properties_je2.jpg)

</td></tr></tbody></table>

</div><div id="bkmrk--8">---

</div>#### Opeh House Calendar tab

This tab includes an ajax calendar where you can add the date-wise information related to the listing. Based on the services you offer, you can show the availability for that service.

[![obraz.png](https://wiki.comdev.eu/uploads/images/gallery/2024-03/scaled-1680-/0ZKobraz.png)](https://wiki.comdev.eu/uploads/images/gallery/2024-03/0ZKobraz.png)**Screen 8: Open House**
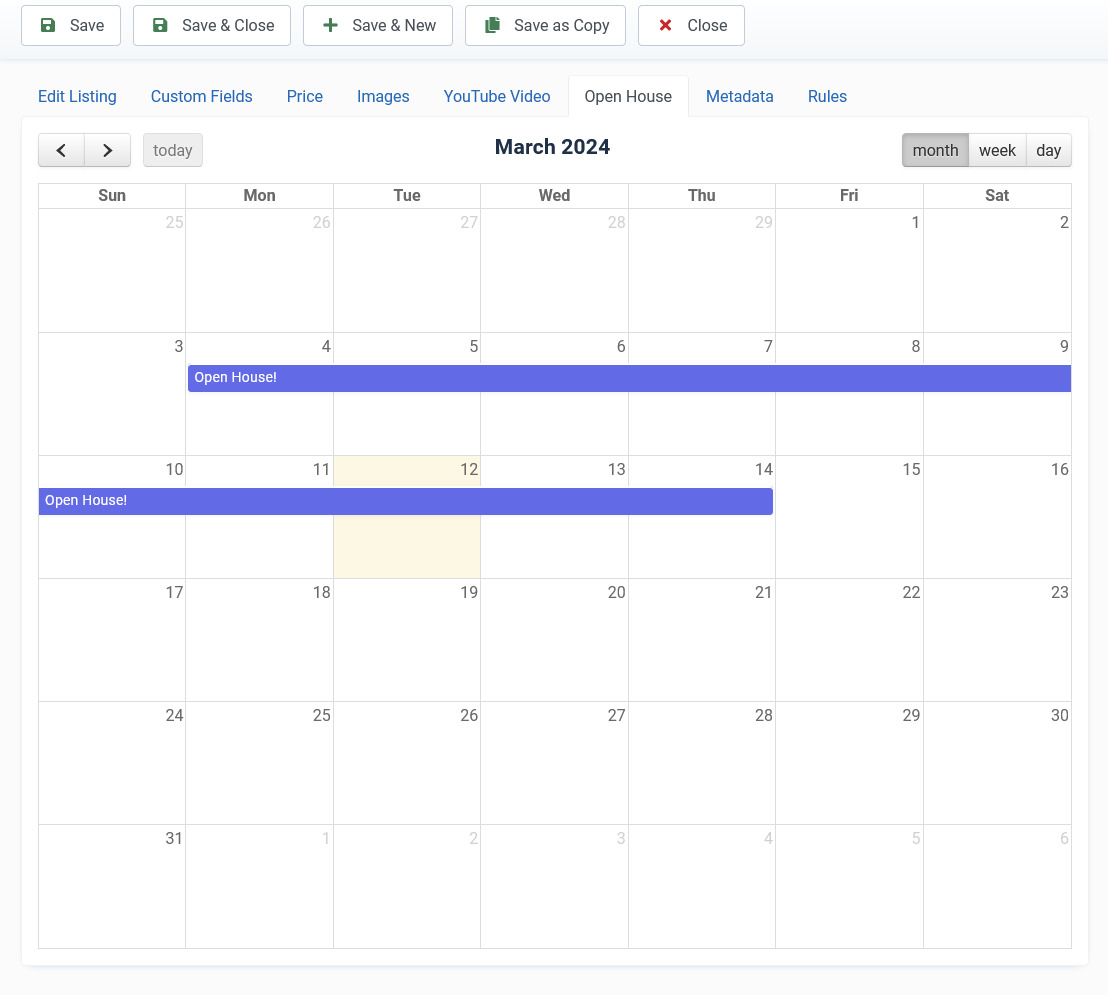
To set the availability for a range of dates, drag and click the required range of dates. Provide the information about availability as shown in the following image.

[![obraz.png](https://wiki.comdev.eu/uploads/images/gallery/2024-03/scaled-1680-/tNEobraz.png)](https://wiki.comdev.eu/uploads/images/gallery/2024-03/tNEobraz.png)**Screen 9: Availability information**
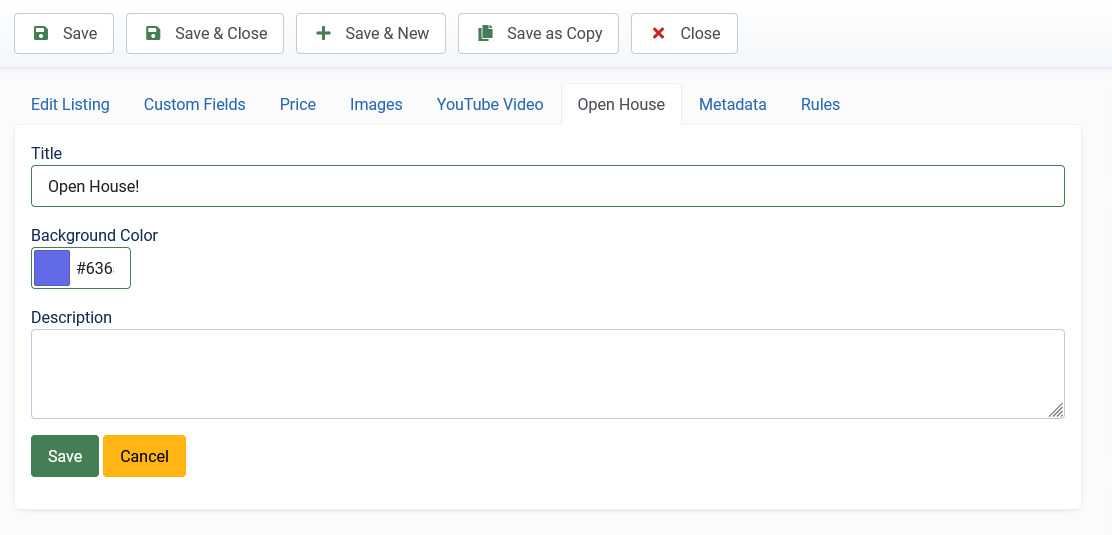
Click Save to save the availability information. If you want to delete a particular entry, click the colored band of availability and click OK as shown in the following image.

# Price Types

### Overview

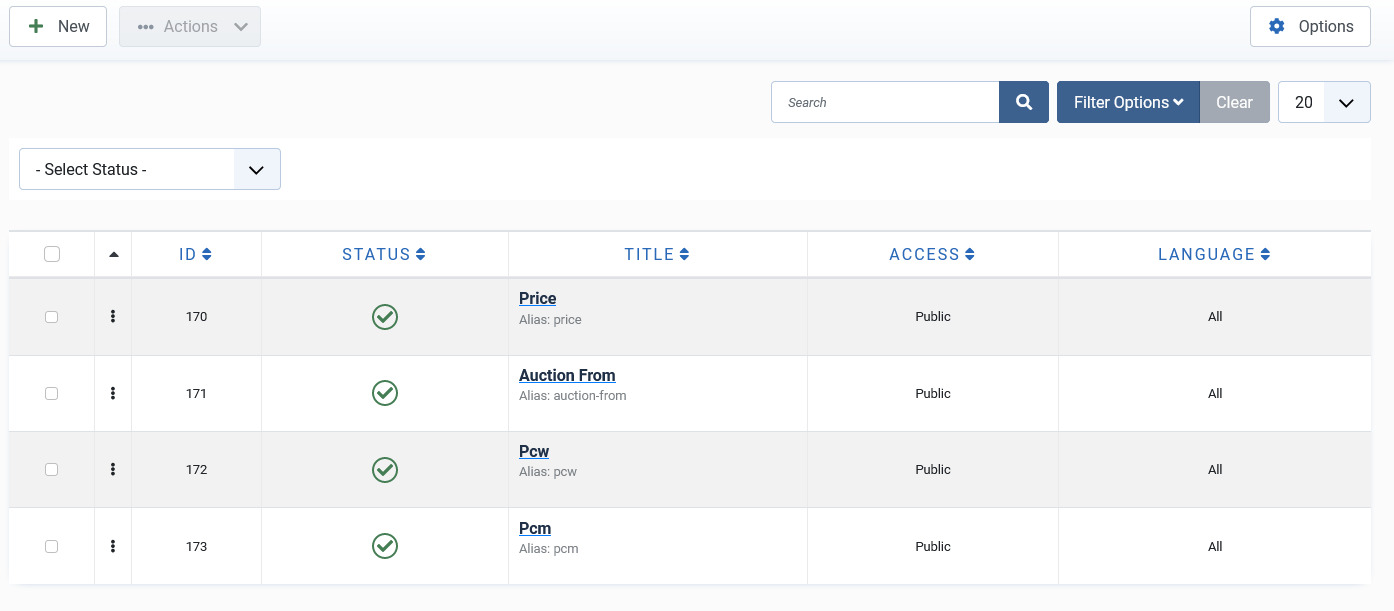
Price types allow the site owner to categorize price types into appropriate sections. Nested price types (sub-price types) are supported in JomEstate. JomEstate comes with a price type named "**UNCATEGORISED**" which is the default setting. This price type will list properties which are not attached to any price type (same function as the default Joomla categories system).

[![obraz.png](https://wiki.comdev.eu/uploads/images/gallery/2024-03/scaled-1680-/wCZobraz.png)](https://wiki.comdev.eu/uploads/images/gallery/2024-03/wCZobraz.png)**Screen 1: Price type listing**
### Creating A New Price Type

To add a Price type to JomEstate, click New.

Provide the values as given in the following table.

<div id="bkmrk-title-title-for-the-"><table><tbody><tr><td>**Title**

</td><td>Title for the price type.

</td></tr><tr><td>**Alias**

</td><td>URL alias for “SEF/SEO” URL.

</td></tr><tr><td>**Parent**

</td><td>Choose the parent category item.

</td></tr><tr><td>**Text area**

</td><td>Provide a description in the text area.

</td></tr><tr><td>**Toggle editor *Button***</td><td>Click to toggle between rich text and plain text editor.</td></tr><tr><td>**Image *Button***</td><td>Click to select an image you want to add to the listing.</td></tr><tr><td>**Category Image**</td><td>Currently not being used.</td></tr></tbody></table>

</div>#### Publishing tab

After you have provided the above information, you can provide the publishing information in the Publishing tab

You can change the values for the given options using the following table.

<div id="bkmrk-status-based-on-the-"><table><tbody><tr><td>**Status**

</td><td>Based on the status seen here, the visibility changes as follows:

- Published - Entries are visible on the front-end.
- Unpublished – Entries are invisible in the front-end, but can be published later.
- Archived – Older entries that are not ready for deletion yet.
- Trashed – Older entries that should be removed.

</td></tr><tr><td>**Access**

</td><td>Access level for site users is as follows:

- Public access grant access to everybody.
- Registered access grants access only to registered and logged in users.
- Special access only grants access to users specified as “Special”.

</td></tr><tr><td>**Language**

</td><td>Select the language for the price type.

</td></tr><tr><td>**ID**

</td><td>Address ID, which can be used in modules, plugins and menus.

</td></tr><tr><td>**Created by**

</td><td>User name who created the entry.

</td></tr><tr><td>**Created Date**

</td><td>Date when the entry was created.

</td></tr></tbody></table>

</div>#### Metadata tab

The metadata tab is used to provide metadata information for a particular address entry. The options for this tab can be seen as shown in the following image.

![](https://wiki.comdev.eu/download/attachments/5735880/price_Type2.jpg)

**Screen 4: Metadata tab**

You can change the values for the given options using the following table.

<table id="bkmrk-meta-description-met"><tbody><tr><td>**Meta Description**

</td><td>Meta-description for search-engine listings.

</td></tr><tr><td>**Meta Keywords**

</td><td>Meta Keywords for the search-engine

</td></tr><tr><td>**Author**

</td><td>Content author metadata.

</td></tr><tr><td>**Robots**

</td><td>Robots instructions:

- Use Global
- Index, Follow
- No Index, Follow
- Index, No Follow
- No Index, No Follow

</td></tr></tbody></table>

# Companies

### Overview

JomEstate has a built in mechanism to create/control Real Estate Companies and Agents. Each Company can have unlimited Agents, however an Agent can join only one Company. The main difference between Agents and Company is that a Company can control Agents listings and Agents itself by adding or deleting them.

[![obraz.png](https://wiki.comdev.eu/uploads/images/gallery/2024-03/scaled-1680-/dzjobraz.png)](https://wiki.comdev.eu/uploads/images/gallery/2024-03/dzjobraz.png)

![](https://wiki.comdev.eu/download/attachments/5735977/companies_screen.jpg)

**Screen 1: Companies listing**

##### Company Agents

Each Company or Agent needs to have an actual Joomla user-assigned to it:

<div data-hasbody="true" data-macro-name="note" id="bkmrk-this-user-needs-to-b"><div>- This user needs to be unique for each Company or Agent
- When adding an Agent from the Front Admin by the Company, Joomla user account needs to be created for that Agent
- Agent does **NOT** have any membership.The Agent inherits the membership details of the company he belongs to.

</div></div>There are two user types in JomEstate:

<div data-hasbody="true" data-macro-name="info" id="bkmrk-public-user-who-can-"><div>- Public User who can add listings.
- Companies that have Agents.

</div></div>### Creating a new Company

To add a Company to JomEstate, click New.

### Edit Company tab

This tab includes information such as company logo, address information, contact details and so on.

Provide the values using information given in the following table.

<div id="bkmrk-options-usage-name-t"><table style="width: 100%;"><thead><tr><th colspan="1" style="width: 14.578%;">Options</th><td colspan="1" style="width: 85.422%;">**Usage**</td></tr></thead><tbody><tr><th class="align-left" style="width: 14.578%;">**Name**

</th><td style="width: 85.422%;">Title for the Company.

</td></tr><tr><th class="align-left" style="width: 14.578%;">**Alias**

</th><td style="width: 85.422%;">URL alias for “SEF/SEO” URL.

</td></tr><tr><th class="align-left" style="width: 14.578%;">**Logo**

</th><td style="width: 85.422%;">Click to upload the company logo. This logo will be seen on the company tab on listings and item view.

</td></tr><tr><th class="align-left" colspan="1" style="width: 14.578%;">**Phone**</th><td colspan="1" style="width: 85.422%;">Provide the phone number for your company.</td></tr><tr><th class="align-left" colspan="1" style="width: 14.578%;">**Website**</th><td colspan="1" style="width: 85.422%;">Provide the website URL for your company.</td></tr><tr><th class="align-left" colspan="1" style="width: 14.578%;">**Background**</th><td colspan="1" style="width: 85.422%;">Set desired tab background color to match the Company logo.</td></tr><tr><th class="align-left" style="width: 14.578%;">**User**

</th><td style="width: 85.422%;">Select a Joomla user account that will be assigned to the Company. **It has to be unique for each Company**.

</td></tr><tr><th class="align-left" style="width: 14.578%;">**Membership**

</th><td style="width: 85.422%;">Choose a membership plan assigned for the Company.

</td></tr><tr><th class="align-left" style="width: 14.578%;">**Address**

</th><td style="width: 85.422%;">Select the appropriate locations to provide your address.

</td></tr><tr><th class="align-left" style="width: 14.578%;">**Street, House no.**

</th><td style="width: 85.422%;">Detailed address like street and house number.</td></tr><tr><th class="align-left" style="width: 14.578%;">**Intro text**

</th><td style="width: 85.422%;">Provide a short description about the company.

</td></tr><tr><th class="align-left" colspan="1" style="width: 14.578%;">**Text area**</th><td colspan="1" style="width: 85.422%;">Provide a description for the listing.

You can create a short description as well a long description.

![](https://wiki.comdev.eu/download/attachments/5735977/companies1.jpg)

</td></tr><tr><th class="align-left" colspan="1" style="width: 14.578%;">**Article *Button***

</th><td colspan="1" style="width: 85.422%;">Click to select a relevant article. If an article is provided, it can be seen under the Details tab in the listing.

</td></tr><tr><th class="align-left" colspan="1" style="width: 14.578%;">**Page Break *Button***

</th><td colspan="1" style="width: 85.422%;">Insert a page break in the displayed text.

</td></tr><tr><th class="align-left" colspan="1" style="width: 14.578%;">**Toggle editor *Button***

</th><td colspan="1" style="width: 85.422%;">Toggle between plain text and rich text editor

</td></tr><tr><th class="align-left" colspan="1" style="width: 14.578%;">**Read More**</th><td colspan="1" style="width: 85.422%;">Click to separate the short description in the text area.

<div data-hasbody="true" data-macro-name="info"><div>In the above image, the red dotted line appears when you click **Read More**. Any content above the red line is the **short description**, while the entire content is the **long description**. Also, note that if there is no content after the **Read More** tag, the event description will be blank when users view the listing. Ensure that you have content after the **Read More** tag.</div></div></td></tr></tbody></table>

</div>#### Images tab

This tab is used to add images to the company gallery![](https://wiki.comdev.eu/download/attachments/5735977/companies3.jpg)

Provide the options as shown in the following table.

<div id="bkmrk-add-image-click-to-u"><div><table><tbody><tr><td>**Add Image**</td><td>Click to upload images to the company gallery.</td></tr><tr><td colspan="1">**Images area**</td><td colspan="1">Click the ![](http://confluence.comdev.eu/download/attachments/4194545/Listings_edit_icon.jpg) Edit icon to edit the image details. The options are as seen in the following image:

![](https://wiki.comdev.eu/download/attachments/5735977/companies4.jpg)

Click the ![](http://confluence.comdev.eu/download/attachments/4194545/Listings_close_icon.jpg) Delete icon to delete the image.

</td></tr></tbody></table>

</div></div>These images will be displayed under Company details page as shown in the following image.

![](https://wiki.comdev.eu/download/attachments/5735977/companies2.jpg)

# Agents

### Overview

Agents can function only if they are assigned to a Company and can have a different phone number, social contact configured, and so on. An agent inherits the membership plans possessed by the company it belongs to.

[![obraz.png](https://wiki.comdev.eu/uploads/images/gallery/2024-03/scaled-1680-/8SIobraz.png)](https://wiki.comdev.eu/uploads/images/gallery/2024-03/8SIobraz.png)![](https://wiki.comdev.eu/download/attachments/5735979/Agents.jpg)

**Screen 1: Agents listing**

### Creating a new Agent

To add an Agent to JomEstate, click New.

### Edit Agent area

This area includes information such as agent picture, company it belongs to, contact information and so on.

Provide the values using the information given in the following table.

<div id="bkmrk-options-usage-first-"><div><table style="width: 100%; height: 1024.45px;"><thead><tr style="height: 29.8px;"><th colspan="1" style="width: 13.59%; height: 29.8px;">Options</th><td colspan="1" style="width: 86.41%; height: 29.8px;">**Usage**</td></tr></thead><tbody><tr style="height: 35.4px;"><th class="align-left" style="width: 13.59%; height: 35.4px;">**First Name**

</th><td style="width: 86.41%; height: 35.4px;">First Name

</td></tr><tr style="height: 29.8px;"><th class="align-left" colspan="1" style="width: 13.59%; height: 29.8px;">**Last Name**</th><td colspan="1" style="width: 86.41%; height: 29.8px;">Last Name</td></tr><tr style="height: 128.05px;"><th class="align-left" colspan="1" style="width: 13.59%; height: 128.05px;">**Status**</th><td colspan="1" style="width: 86.41%; height: 128.05px;">Select from the following status:

- Published
- Unpublished
- Archived
- Trashed

</td></tr><tr style="height: 35.4px;"><th class="align-left" style="width: 13.59%; height: 35.4px;">**Alias**

</th><td style="width: 86.41%; height: 35.4px;">URL alias for “SEF/SEO” URL.

</td></tr><tr style="height: 35.4px;"><th class="align-left" style="width: 13.59%; height: 35.4px;">**Image**

</th><td style="width: 86.41%; height: 35.4px;">Upload a photo of the Agent.

</td></tr><tr style="height: 29.8px;"><th class="align-left" colspan="1" style="width: 13.59%; height: 29.8px;">**Phone**</th><td colspan="1" style="width: 86.41%; height: 29.8px;">Provide the phone number of the agent.</td></tr><tr style="height: 35.4px;"><th class="align-left" colspan="1" style="width: 13.59%; height: 35.4px;">**Website**</th><td colspan="1" style="width: 86.41%; height: 35.4px;">Provide the website URL of the company or agent's personalized page.

</td></tr><tr style="height: 29.8px;"><th class="align-left" colspan="1" style="width: 13.59%; height: 29.8px;">**Fax**</th><td colspan="1" style="width: 86.41%; height: 29.8px;">Provide the fax number of the agent.</td></tr><tr style="height: 35.4px;"><th class="align-left" style="width: 13.59%; height: 35.4px;">**User**

</th><td style="width: 86.41%; height: 35.4px;">Select a Joomla user account that will be assigned to the Agent. It has to be unique for each Agent.

</td></tr><tr style="height: 29.8px;"><th class="align-left" colspan="1" style="width: 13.59%; height: 29.8px;">**Company**</th><td colspan="1" style="width: 86.41%; height: 29.8px;">Choose a Company that Agent belongs to.</td></tr><tr style="height: 35.4px;"><th class="align-left" style="width: 13.59%; height: 35.4px;">**Address**

</th><td style="width: 86.41%; height: 35.4px;">Select the required address levels to create the address of the agent.

</td></tr><tr style="height: 57.8px;"><th class="align-left" style="width: 13.59%; height: 57.8px;">**Street, House no.**

</th><td style="width: 86.41%; height: 57.8px;">Detailed address like street and house number.</td></tr><tr style="height: 147.4px;"><th class="align-left" style="width: 13.59%; height: 147.4px;">**Text area**

</th><td style="width: 86.41%; height: 147.4px;">Provide a description for the listing.

You can create a short description as well a long description.

![](https://wiki.comdev.eu/download/attachments/5735979/Agents2.jpg)

<div data-hasbody="true" data-macro-name="info"><div>In the above image, the red dotted line appears when you click **Read More**. Any content above the red line is the **short description**, while the entire content is the **long description**. Also, note that if there is no content after the **Read More** tag, the event description will be blank when users view the listing. Ensure that you have content after the **Read More** tag.</div></div></td></tr><tr style="height: 35.4px;"><th class="align-left" colspan="1" style="width: 13.59%; height: 35.4px;">**Article *Button***

</th><td colspan="1" style="width: 86.41%; height: 35.4px;">Click to select a relevant article. If an article is provided, it can be seen under the Details tab in the listing.

</td></tr><tr style="height: 57.8px;"><th class="align-left" colspan="1" style="width: 13.59%; height: 57.8px;">**Page Break *Button***

</th><td colspan="1" style="width: 86.41%; height: 57.8px;">Insert a page break in the displayed text.

</td></tr><tr style="height: 57.8px;"><th class="align-left" colspan="1" style="width: 13.59%; height: 57.8px;">**Toggle editor *Button***

</th><td colspan="1" style="width: 86.41%; height: 57.8px;">Toggle between plain text and rich text editor

</td></tr><tr style="height: 29.8px;"><th class="align-left" colspan="1" style="width: 13.59%; height: 29.8px;">**Read More**</th><td colspan="1" style="width: 86.41%; height: 29.8px;">Click to separate the short description in the text area.</td></tr><tr style="height: 29.8px;"><th class="align-left" colspan="1" style="width: 13.59%; height: 29.8px;">**MSN**</th><td colspan="1" style="width: 86.41%; height: 29.8px;">Provide the msn id of the agent.</td></tr><tr style="height: 29.8px;"><th class="align-left" colspan="1" style="width: 13.59%; height: 29.8px;">**Google Talk**</th><td colspan="1" style="width: 86.41%; height: 29.8px;">Provide the google talk id of the agent.</td></tr><tr style="height: 29.8px;"><th class="align-left" colspan="1" style="width: 13.59%; height: 29.8px;">**Skype**</th><td colspan="1" style="width: 86.41%; height: 29.8px;">Provide the skype id of the agent</td></tr><tr style="height: 29.8px;"><th class="align-left" colspan="1" style="width: 13.59%; height: 29.8px;">**Twitter**</th><td colspan="1" style="width: 86.41%; height: 29.8px;">Provide the twitter handle of the agent.</td></tr><tr style="height: 29.8px;"><th class="align-left" colspan="1" style="width: 13.59%; height: 29.8px;">**ID**</th><td colspan="1" style="width: 86.41%; height: 29.8px;">This field is auto-populated.</td></tr></tbody></table>

</div></div>### Sorting Agents  


To sort Agents, double click on second column and drag/drop to set ordering.

<div id="bkmrk--1"></div>

# Membership

{{@109}}

### Creating a new Group for Membership Plans

In order to add users to groups for membership plans, you must create a super group named JomEstate. Then, under it you must create groups for each of your membership plan. These groups are used to provide Group ID when creating a membership plan. Users created using User Manager can be linked to each of these membership plan groups.

To create the JomEstate group and other groups, do the following:

1. Click **Users** &gt; **Groups** &gt; **Add New Group**.
2. Provide a name for the group. We need to create JomEstate group before creating other groups. So, provide the name as **JomEstate**.  
    ![](https://wiki.comdev.eu/download/attachments/5735699/membership2.jpg)
3. Repeat steps 1 and 2, but select the parent as JomEstate.  
    ![](https://wiki.comdev.eu/download/attachments/5735699/membership3.jpg)
4. Click **Save**.

<div data-hasbody="true" data-macro-name="note" id="bkmrk-name-jomestate-for-t"><div>Name **JomEstate** for the main group is mandatory, however groups for membership under that group can have any names e.g. Lite, Pro or Free, Basic etc...</div></div>### User Permissions based on groups

For the users to access Front Admin certain user permissions need to be granted. These settings need to be done in the JomEstate and Comdev Options.

To provide user permissions for JomEstate, do the following:

1. Click **Components** &gt; **JomEstate**
2. Click **Options** from the right-hand side of the screen.
3. Click **Permissions**.
4. Provide the permissions as shown in the following image.  
    ![](https://wiki.comdev.eu/download/attachments/5735699/membership4.jpg)
5. Click **Save**.

User permissions also need to be set for Comdev extension as explained here.

1. Click **Components** &gt; **Comdev**.
2. Click **Options** from the right-hand side of the screen.
3. Click **Comdev**.
4. Provide the permissions as shown in the following image.  
    ![](https://wiki.comdev.eu/download/attachments/5735699/membership5.jpg)
5. Click **Save**.

<div data-hasbody="true" data-macro-name="note" id="bkmrk--2">  
</div><p class="callout success">Users, which belongs to Joomla group JomEstate, will now have access to Front Admin.</p>

<p class="callout warning">If Permissions for the Comdev component are not set, users would not be able to upload images. A 500 error would show that permissions are denied. </p>

# Messages

{{@111}}

# Configuration

### Overview

The JomEstate extension can be configured using the options provided with it. You can control multiple factors such as SEO, Printing, Security, Image widths, and more using the options provided.

#### General tab

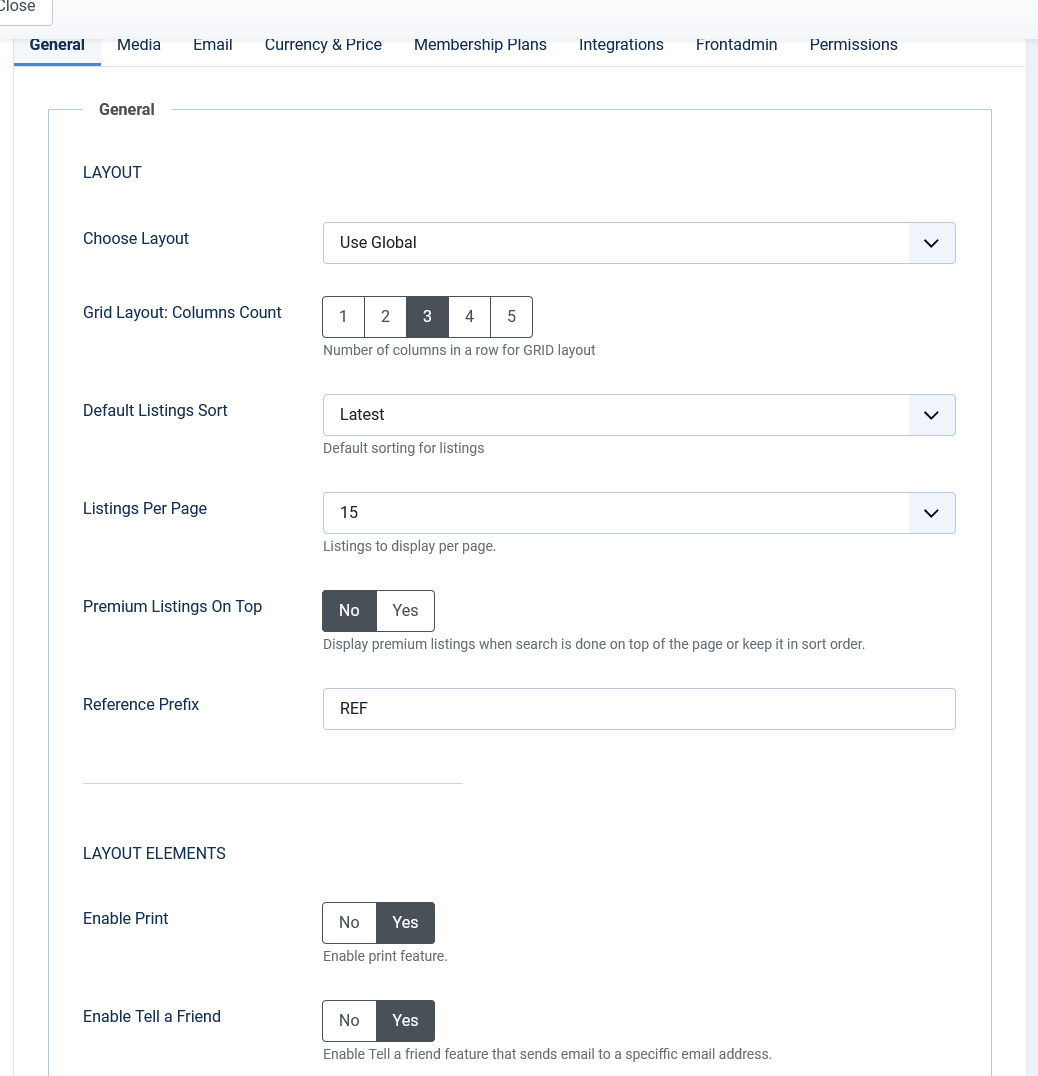
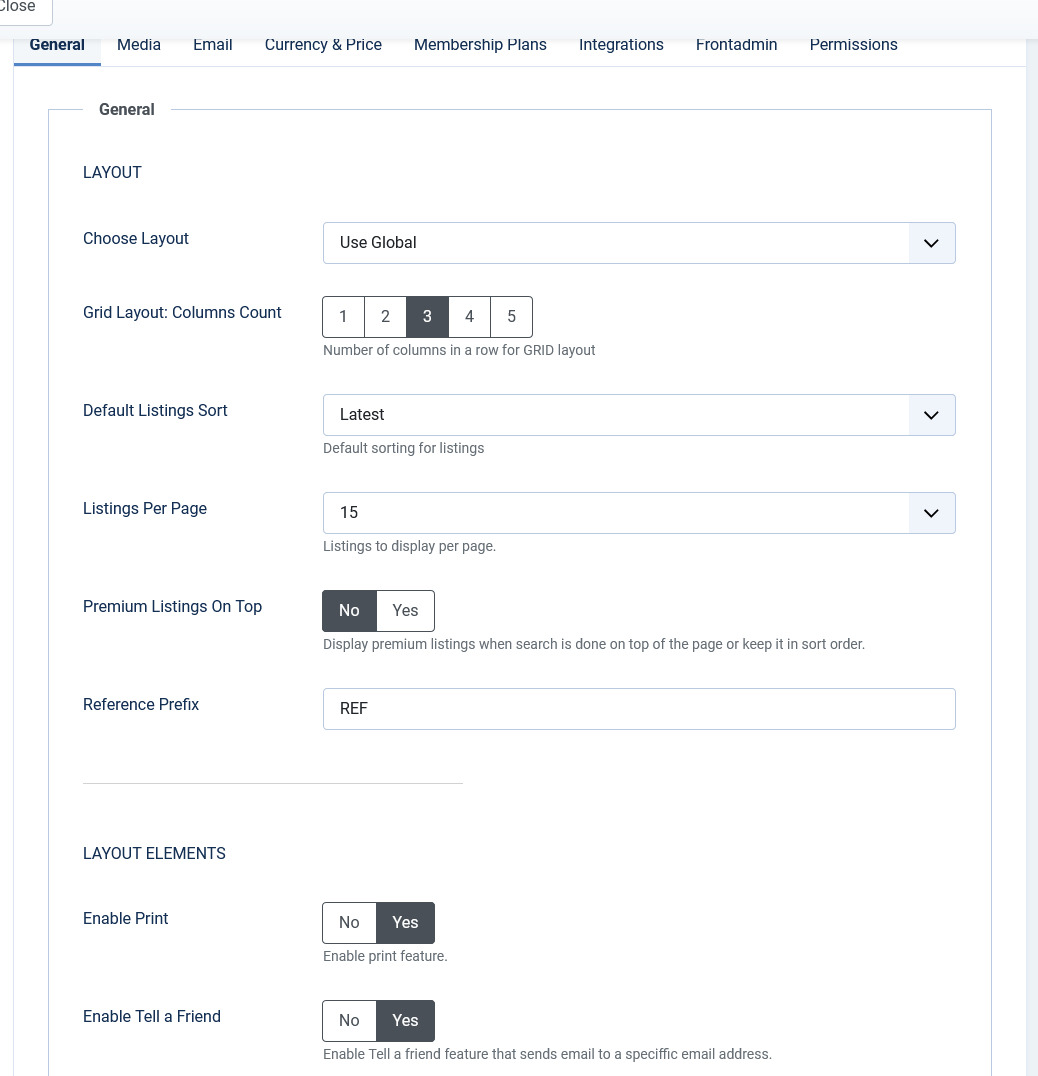
This tab controls the elements for Layout, SEO, Security, Contact, and Print options. The following image shows the options available on the General tab.

[![obraz.png](https://wiki.comdev.eu/uploads/images/gallery/2024-03/scaled-1680-/A5Cobraz.png)](https://wiki.comdev.eu/uploads/images/gallery/2024-03/A5Cobraz.png)
<span class="confluence-embedded-file-wrapper confluence-embedded-manual-size">![](https://wiki.comdev.eu/download/attachments/5735692/dashboard_je1.jpg)</span>

**Screen 1: General tab**

The following table explains the different options seen on the screen.

<div bis_skin_checked="1" class="table-wrap" id="bkmrk--2">  
</div><div bis_skin_checked="1" class="table-wrap" id="bkmrk-layout-choose-layout"><table class="confluenceTable tablesorter tablesorter-default stickyTableHeaders" role="grid" style="padding: 0px;"><tbody aria-live="polite" aria-relevant="all"><tr role="row"><td class="confluenceTd">##### Layout

</td><td class="confluenceTd">Choose Layout

</td><td class="confluenceTd">Select a layout based on existing components. Global layout is selected by default.

</td></tr><tr role="row"><td class="confluenceTd"></td><td class="confluenceTd">Default Listings Sort

</td><td class="confluenceTd">Select the Listings from the following options:

- Latest
- Updated
- Alphabetically
- Rated DESC
- Rated ASC
- Most Viewed

</td></tr><tr role="row"><td class="confluenceTd"></td><td class="confluenceTd">Listings Per Page

</td><td class="confluenceTd">Select 15, 30, or 60 listings per page.

</td></tr><tr role="row"><td class="confluenceTd"></td><td class="confluenceTd">Premium Listings on Top

</td><td class="confluenceTd">Enable to see premium listings on top.

</td></tr><tr role="row"><td class="confluenceTd">##### Layout Elements

</td><td class="confluenceTd">Enable Print

</td><td class="confluenceTd">Enable the “Print” button on listing pages.

</td></tr><tr role="row"><td class="confluenceTd"></td><td class="confluenceTd">Enable Tell a Friend

</td><td class="confluenceTd">Enable the “Tell a Friend” button on listing pages.

</td></tr><tr role="row"><td class="confluenceTd"></td><td class="confluenceTd">Enable Save Listings

</td><td class="confluenceTd">Enable the “Save” button on listing pages.

</td></tr><tr role="row"><td class="confluenceTd"></td><td class="confluenceTd">Enable Social Networking

</td><td class="confluenceTd">Enable social networking buttons on listing pages.

</td></tr><tr role="row"><td class="confluenceTd"></td><td class="confluenceTd">Enable Address

</td><td class="confluenceTd">Show the listing address on listing pages.

</td></tr><tr role="row"><td class="confluenceTd"></td><td class="confluenceTd">Enable Short Descr.

</td><td class="confluenceTd">Enable short description.

</td></tr><tr role="row"><td class="confluenceTd"></td><td class="confluenceTd">Enable Youtube

</td><td class="confluenceTd">Enable YouTube video embedded on listing pages.

</td></tr><tr role="row"><td class="confluenceTd"></td><td class="confluenceTd">Item Map

</td><td class="confluenceTd">Enable google map in the detailed view - location tab

</td></tr><tr role="row"><td class="confluenceTd"></td><td class="confluenceTd">Enable Image

</td><td class="confluenceTd">Enable display of image on listing pages.

</td></tr><tr role="row"><td class="confluenceTd"></td><td class="confluenceTd">Listings Map

</td><td class="confluenceTd">Enable Google map on the listings (items menu link)

</td></tr><tr role="row"><td class="confluenceTd"></td><td class="confluenceTd">Enable Date

</td><td class="confluenceTd">Enable date on listings

</td></tr><tr role="row"><td class="confluenceTd" colspan="1"> </td><td class="confluenceTd" colspan="1">Enable Energy Class</td><td class="confluenceTd" colspan="1">Enable Energy Class for the listing</td></tr><tr role="row"><td class="confluenceTd">##### Contact

</td><td class="confluenceTd">Email Send To

</td><td class="confluenceTd">Enable Send Email button on listing pages.

</td></tr><tr role="row"><td class="confluenceTd"></td><td class="confluenceTd">Enable Contact

</td><td class="confluenceTd">Enable the contact function on listing pages.

</td></tr><tr role="row"><td class="confluenceTd" colspan="1"> </td><td class="confluenceTd" colspan="1">Send Copy to Agent's Company</td><td class="confluenceTd" colspan="1">Enable to send a copy of the email to the agent's company's registered email.</td></tr><tr role="row"><td class="confluenceTd"></td><td class="confluenceTd">Enable Terms &amp; Privacy

</td><td class="confluenceTd">Activate a check-button for TOS and Privacy statements on contact requests.

</td></tr><tr role="row"><td class="confluenceTd"></td><td class="confluenceTd">Terms &amp; Condition

</td><td class="confluenceTd">Provide Terms &amp; Condition statement by category.

</td></tr><tr role="row"><td class="confluenceTd"></td><td class="confluenceTd">Privacy Policy

</td><td class="confluenceTd">Choose Privacy Policy by category.

</td></tr><tr role="row"><td class="confluenceTd">##### Security

</td><td class="confluenceTd">Enable Captcha

</td><td class="confluenceTd">Enable Captcha for non-registered/logged-in users.

<div bis_skin_checked="1" class="confluence-information-macro confluence-information-macro-note conf-macro output-block" data-hasbody="true" data-macro-name="note"><div bis_skin_checked="1" class="confluence-information-macro-body">Captcha needs to be **configured** in Plugins -&gt; ReCaptcha and **enabled** under Joomla Global Configuration</div></div></td></tr><tr role="row"><td class="confluenceTd"></td><td class="confluenceTd">Enable Captcha for Registered Users

</td><td class="confluenceTd">Enable Captcha for registered users as well.

</td></tr><tr role="row"><td class="confluenceTd">##### SEO

</td><td class="confluenceTd">Maximum Characters for Meta Title

</td><td class="confluenceTd">The maximum amount of characters used in the meta title.

</td></tr><tr role="row"><td class="confluenceTd"></td><td class="confluenceTd">Maximum Characters for Meta Description

</td><td class="confluenceTd">The maximum amount of characters used in the meta-description.

</td></tr><tr role="row"><td class="confluenceTd">##### Print

</td><td class="confluenceTd">Print Location

</td><td class="confluenceTd">Print the map on print requests.

</td></tr><tr role="row"><td class="confluenceTd">##### Other

</td><td class="confluenceTd">Enable Powered By Link

</td><td class="confluenceTd">Enable the “powered by” link on listing pages.

</td></tr></tbody></table>

</div>#### Media tab

This tab provides options to control display of media such as images or videos on the listing pages.

[![obraz.png](https://wiki.comdev.eu/uploads/images/gallery/2024-03/scaled-1680-/6dAobraz.png)](https://wiki.comdev.eu/uploads/images/gallery/2024-03/6dAobraz.png)
<span class="confluence-embedded-file-wrapper confluence-embedded-manual-size">![](https://wiki.comdev.eu/download/attachments/5735692/dashboard_je2.jpg)</span>

**Screen 2: Media tab**

The following table explains the options seen on the screen.

<div bis_skin_checked="1" class="table-wrap" id="bkmrk--5">  
</div><div bis_skin_checked="1" class="table-wrap" id="bkmrk-default-image-librar"><table class="confluenceTable tablesorter tablesorter-default stickyTableHeaders" role="grid" style="padding: 0px;"><tbody aria-live="polite" aria-relevant="all"><tr role="row"><td class="confluenceTd">**Default Image Library**

</td><td class="confluenceTd">Select the default image library for the listings component between “GD” and “iMagick”.   
For more information see:

[http://en.wikipedia.org/wiki/GD\_Graphics\_Library](http://en.wikipedia.org/wiki/GD_Graphics_Library)

[http://en.wikipedia.org/wiki/Imagick](http://en.wikipedia.org/wiki/Imagick)

</td></tr><tr role="row"><td class="confluenceTd">**Max Attachment Size**

</td><td class="confluenceTd">The component wide settings for maximum Attachment size in kilo-byte. (1024 KB = 1 MB)

</td></tr><tr role="row"><td class="confluenceTd">**Video Width**

</td><td class="confluenceTd">Embedded Video width in pixels.   
(size of the grey-box video player)   
Default Youtube.com size is either 480×385 for a 4:3 video, or 640×385 for a 16:9 video.

</td></tr><tr role="row"><td class="confluenceTd">**Video Height**

</td><td class="confluenceTd">Embedded Video height in pixels.   
(size of the grey-box video player)   
Default Youtube.com size is either 480×385 for a 4:3 video, or 640×385 for a 16:9 video.

</td></tr><tr role="row"><td class="confluenceTd">**Allowed Files Extensions**

</td><td class="confluenceTd">Comma separated list of allowed attachment file-extensions.

</td></tr><tr role="row"><td class="confluenceTd">**Listing Image Width**

</td><td class="confluenceTd">The main listing image width in pixels.

</td></tr><tr role="row"><td class="confluenceTd">**Listing Image Format**

</td><td class="confluenceTd">The format for the main listing image.   
1:1 = Image will be unchanged.   
4:3 = image will be resized to 4:3 format.   
10:9 = Image will be resized to 10:9 format.

</td></tr><tr role="row"><td class="confluenceTd">**Items Logo Image Width**

</td><td class="confluenceTd">Image width in pixels for Items Logo on the listing page.

</td></tr><tr role="row"><td class="confluenceTd">**Item Logo Image Width**

</td><td class="confluenceTd">Image width in pixels for Item Logo on the listing page.

</td></tr><tr role="row"><td class="confluenceTd">**Main Gallery Image Width**

</td><td class="confluenceTd">Image width in pixels for main gallery image. Ensure that the width value given here is as wide as or more than the slideshow width (generally 800-1200 pixels). If this is not done, the slideshow images will be blurred.

 <span class="confluence-embedded-file-wrapper confluence-embedded-manual-size">![](https://wiki.comdev.eu/download/attachments/5735692/config_slideshow.jpg)</span>

</td></tr><tr role="row"><td class="confluenceTd">**Main Gallery Image Height**

</td><td class="confluenceTd">Image height in pixels for main gallery image.

</td></tr><tr role="row"><td class="confluenceTd">**Main Gallery Image Format**

</td><td class="confluenceTd">The format for the main gallery image.   
1:1 = Image will be unchanged.   
4:3 = image will be resized to 4:3 format.   
10:9 = Image will be resized to 10:9 format.

</td></tr><tr role="row"><td class="confluenceTd">**Gallery Image Width**

</td><td class="confluenceTd">Image width in pixels on the photo gallery on the Items view (Gallery tab). Based on the dimension you provide here, the image can be seen as follows:

<span class="confluence-embedded-file-wrapper confluence-embedded-manual-size">![](https://wiki.comdev.eu/download/attachments/5735692/Config_Gallery.jpg)</span>

</td></tr><tr role="row"><td class="confluenceTd">**Gallery Image Format**

</td><td class="confluenceTd">The format for the main listing image.   
1:1 = Image will be unchanged.   
4:3 = image will be resized to 4:3 format.   
10:9 = Image will be resized to 10:9 format.

</td></tr></tbody></table>

</div><div bis_skin_checked="1" class="confluence-information-macro confluence-information-macro-warning conf-macro output-block" data-hasbody="true" data-macro-name="warning" id="bkmrk-after-the-images-wid"><div bis_skin_checked="1" class="confluence-information-macro-body">After the images width or format are changed in the Media tab, ensure that you **clear the cache** for JomEstate extension. Click System &gt; Clear Cache -&gt; check com_jomcomdev to clear the Joomla cache for our extension.</div></div><div bis_skin_checked="1" class="confluence-information-macro confluence-information-macro-information conf-macro output-block" data-hasbody="true" data-macro-name="info" id="bkmrk-if-possible%2C-image-f"><div bis_skin_checked="1" class="confluence-information-macro-body">If possible, image format should be constant for both component and modules. Otherwise, cache issues may appear. </div></div>#### Currency &amp; Price tab

This tab provides options to control display of currency formats for listings.

[![obraz.png](https://wiki.comdev.eu/uploads/images/gallery/2024-03/scaled-1680-/hpXobraz.png)](https://wiki.comdev.eu/uploads/images/gallery/2024-03/hpXobraz.png)<span class="confluence-embedded-file-wrapper confluence-embedded-manual-size">![](https://wiki.comdev.eu/download/attachments/5735692/dashboard_je3.jpg)</span>
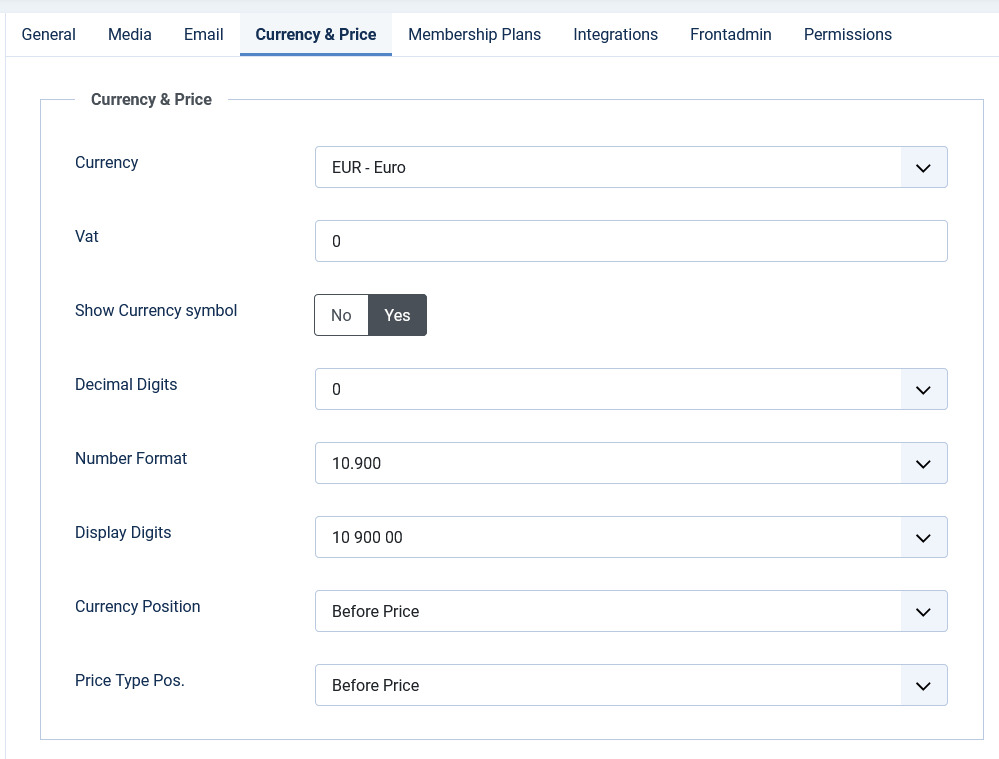
**Screen 3: Currency &amp; Price tab**

The following table explains options seen on the screen.

<div bis_skin_checked="1" class="table-wrap" id="bkmrk--7">  
</div><div bis_skin_checked="1" class="table-wrap" id="bkmrk-currency-select-the-"><table class="confluenceTable tablesorter tablesorter-default stickyTableHeaders" role="grid" style="padding: 0px;"><tbody aria-live="polite" aria-relevant="all"><tr role="row"><td class="confluenceTd">**Currency**

</td><td class="confluenceTd">Select the currency to use.

<div bis_skin_checked="1" class="confluence-information-macro confluence-information-macro-information conf-macro output-block" data-hasbody="true" data-macro-name="info"><div bis_skin_checked="1" class="confluence-information-macro-body">Additional currencies can be added by editing a config file administrator/components/com_jomestate/config.xml</div></div></td></tr><tr role="row"><td class="confluenceTd">**Vat**

</td><td class="confluenceTd">The current vat rate for estates in the operating country.

</td></tr><tr role="row"><td class="confluenceTd">**Decimal Digits**

</td><td class="confluenceTd">Select the number of decimal digits required.

</td></tr><tr role="row"><td class="confluenceTd">**Number Format**

</td><td class="confluenceTd">Select the number format most suitable for your currency.

</td></tr><tr role="row"><td class="confluenceTd">**Display Digits**

</td><td class="confluenceTd">Select the format for the digits.

</td></tr><tr role="row"><td class="confluenceTd">**Currency Position**

</td><td class="confluenceTd">Select if your currency sign will appear before or after the price.

</td></tr></tbody></table>

</div>#### Integrations tab

This tab provides options to control map integration for listings.

[![obraz.png](https://wiki.comdev.eu/uploads/images/gallery/2024-03/scaled-1680-/EdGobraz.png)](https://wiki.comdev.eu/uploads/images/gallery/2024-03/EdGobraz.png)<span class="confluence-embedded-file-wrapper confluence-embedded-manual-size">![](https://wiki.comdev.eu/download/attachments/5735692/dashboard_je4.jpg)</span>
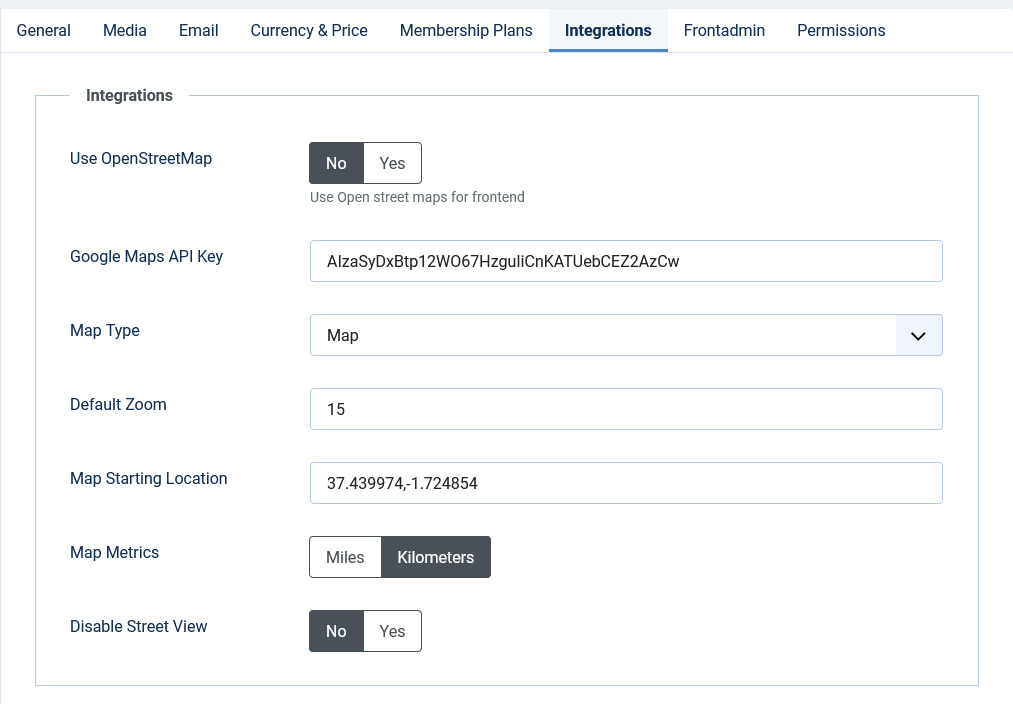
**Screen 4: Integrations tab**

The following table explains the options seen on the screen.

<div bis_skin_checked="1" class="table-wrap" id="bkmrk-map-type-select-the-"><table class="confluenceTable tablesorter tablesorter-default stickyTableHeaders" role="grid" style="padding: 0px;"><tbody aria-live="polite" aria-relevant="all"><tr role="row"><td class="confluenceTd">**Map Type**

</td><td class="confluenceTd">Select the map type from Google maps.

- Satellite
- Hybrid
- Terrain

</td></tr><tr role="row"><td class="confluenceTd">**Default Zoom**

</td><td class="confluenceTd">Select the default zoom factor for the listing map.

<div bis_skin_checked="1" class="confluence-information-macro confluence-information-macro-information conf-macro output-block" data-hasbody="true" data-macro-name="info"><div bis_skin_checked="1" class="confluence-information-macro-body">Listings (Items) map zoom is calculated automatically based on all listings and can't be adjusted, same apply for the ajax map search module.</div></div></td></tr><tr role="row"><td class="confluenceTd">**Map Starting Location**

</td><td class="confluenceTd">Default location or starting point for map search.

</td></tr></tbody></table>

</div>#### Front Admin

This tab controls how the menu links are seen on the front admin for JomEstate. It also provides other options related to front admin.

[![obraz.png](https://wiki.comdev.eu/uploads/images/gallery/2024-03/scaled-1680-/51sobraz.png)](https://wiki.comdev.eu/uploads/images/gallery/2024-03/51sobraz.png)<span class="confluence-embedded-file-wrapper confluence-embedded-manual-size">![](https://wiki.comdev.eu/download/attachments/5735692/dashboard_je5.jpg)</span>
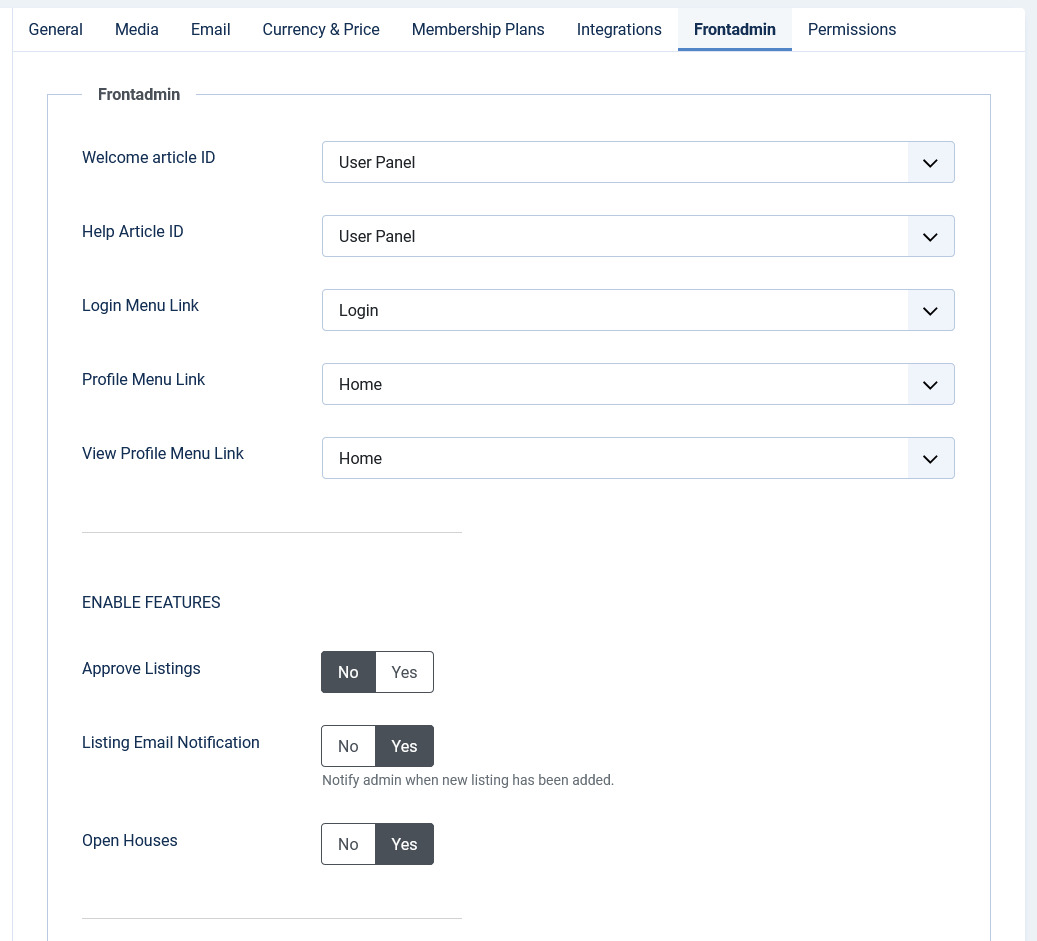
**Screen 5: Front Admin tab**

The following table explains the options seen on the screen.

<div bis_skin_checked="1" class="table-wrap" id="bkmrk-default-new-user-gro"><table class="confluenceTable tablesorter tablesorter-default stickyTableHeaders" role="grid" style="padding: 0px;"><tbody aria-live="polite" aria-relevant="all"><tr role="row"><td class="confluenceTd" colspan="1">**Default New User Group**</td><td class="confluenceTd" colspan="1">Set default group (membership) for users which are not assigned into any component group. Usually it is the first free group.</td></tr><tr role="row"><td class="confluenceTd">**Welcome Article-ID**

</td><td class="confluenceTd">Set the component's welcome article from Joomla articles.

</td></tr><tr role="row"><td class="confluenceTd">**Help Article-ID**

</td><td class="confluenceTd">Set the component's help article from Joomla articles.

</td></tr><tr role="row"><td class="confluenceTd">**Profile Menu Link**

</td><td class="confluenceTd">Set the page for the Profile Menu Link.

</td></tr><tr role="row"><td class="confluenceTd">**Login Menu Link**

</td><td class="confluenceTd">Set the page for the Login Menu Link.

</td></tr><tr role="row"><td class="confluenceTd">**View Profile Menu Link**

</td><td class="confluenceTd">Set the page for the View Profile Menu Link.

</td></tr><tr role="row"><td class="confluenceTd">**Approve Listings**

</td><td class="confluenceTd">When listings are added from the Front Admin, they will not be published unless the site admin approves it.

</td></tr><tr role="row"><td class="confluenceTd">**Enable Alias For Non-English Characters**

</td><td class="confluenceTd">Enable to set Non-English titles in other languages automatically

</td></tr><tr role="row"><td class="confluenceTd">**Enable Paypal**

</td><td class="confluenceTd">[Enable the Paypal facility for user subscriptions.](https://wiki.comdev.eu/books/installation-requirements-language/page/paypal-configuration "PayPal Configuration")

</td></tr><tr role="row"><td class="confluenceTd">**Paypal Email Address**

</td><td class="confluenceTd">Provide the Paypal email that will receive the payments.

</td></tr><tr role="row"><td class="confluenceTd">**PDT token**

</td><td class="confluenceTd">Provide your Paypal PDT token for secure payments.

</td></tr><tr role="row"><td class="confluenceTd">**Use Paypal Sandbox**

</td><td class="confluenceTd">Enable for testing your configuration with the Paypal sandbox facility.

</td></tr><tr role="row"><td class="confluenceTd">**Paypal Sandbox Merchant Email**

</td><td class="confluenceTd">Enable to set your merchant sandbox email address for receiving payments.

</td></tr><tr role="row"><td class="confluenceTd">**Paymens success article ID**

</td><td class="confluenceTd">Provide the article from Joomla articles that points to the page that the user will go to after payment is made.

</td></tr><tr role="row"><td class="confluenceTd">**Membership expiration reminder**

</td><td class="confluenceTd">Provide the number of days after which a notice will be sent about membership expiry. For this configuration, you need to set the Cron job. See [Cron Job Settings](http://confluence.comdev.eu/display/JE/Membership#Membership-Cronsetting) for more information.

</td></tr><tr role="row"><td class="confluenceTd">**Monthly plan**

</td><td class="confluenceTd">Enable to set monthly payment in membership plans.

</td></tr></tbody></table>

</div>#### Permissions

This tab provides options to control permissions for different groups.

For more information about how to configure permissions, see the Joomla documentation.

# User Guide


# Front Admin Overview

### Overview

The dashboard gives a quick snapshot of all the tasks that you can perform using the Front Admin. It also provided multiple menu items that you can use to create listings, view listings, view membership plans, and so on. The other options that you can control are approving reviews, viewing statistics, upgrading membership for a particular user, and so on.

For the Menu to be able to access the JomEstate Front Admin, certain settings need to be made. You must create the Profile Edit Menu link, Admin Menu link, and Profile View Menu link in the JomEstate Front Admin configurations to be able to access Front Admin. For more information, see the Front Admin Options section in the [Menu Items](https://wiki.comdev.eu/books/jomestate/page/menu-items "Menu Items") documentation.

### Accessing the dashboard

When you access the home URL for JomEstate extension, do the following:

1. Click **Front Admin**.
2. Provide the login details for the required user and click **Submit**.

<p class="callout warning">You can access Front Admin either as an agent or a company. Based on the login used, the pages displayed change too.</p>

The dashboard as seen by a company with various options can be seen as shown in the following image.

<span class="confluence-embedded-file-wrapper confluence-embedded-manual-size">![](https://wiki.comdev.eu/download/attachments/5735704/frontadmin_company.jpg)</span>

**Screen 2: Dashboard screen for company login**

You can click the options as seen in the following table.

<div bis_skin_checked="1" class="wiki-content" id="bkmrk-report-most-viewed-g"><div bis_skin_checked="1" class="table-wrap"><table class="confluenceTable tablesorter tablesorter-default stickyTableHeaders" role="grid" style="padding: 0px; width: 100%;"><tbody aria-live="polite" aria-relevant="all"><tr role="row"><td class="confluenceTd" style="width: 16.1879%;">##### Report

</td><td class="confluenceTd" style="width: 16.6922%;">Most Viewed graph

</td><td class="confluenceTd" style="width: 67.1199%;">View the statistics for the site based on the listings viewership.

</td></tr><tr role="row"><td class="confluenceTd" style="width: 16.1879%;">##### Membership

</td><td class="confluenceTd" style="width: 16.6922%;">Upgrade Your Membership NOW!

</td><td class="confluenceTd" style="width: 67.1199%;">Upgrade to another membership plan. Click Upgrade on the plan tab for the plan you want to upgrade to as shown here.

<span class="confluence-embedded-file-wrapper confluence-embedded-manual-size">![](https://wiki.comdev.eu/download/attachments/5735704/frontadmin.jpg)</span>

</td></tr><tr role="row"><td class="confluenceTd" style="width: 16.1879%;">##### Profile

</td><td class="confluenceTd" style="width: 16.6922%;">Profile

</td><td class="confluenceTd" style="width: 67.1199%;">View the profile details for your profile.

</td></tr></tbody></table>

</div></div><div bis_skin_checked="1" id="bkmrk--1"></div>

# Manage Listings

## Overview

You can view all the listings created for your site or create a new listing. The listings created let you add descriptions, images, provide ratings, and much more.

## Creating a New Listing

The following image shows the Listings screen.

![](https://wiki.comdev.eu/download/attachments/5735706/frontadmin_listings.jpg)

**Screen 1: Listing screen**

The following table explains the different options seen on the screen.

<div id="bkmrk-button-usage-insert-"><table><thead><tr><td data-highlight-colour="blue">**Button**

</td><td data-highlight-colour="blue">**Usage**

</td></tr></thead><tbody><tr><td>Insert New

</td><td>Creates a new listing entry. You must create separate entries for each level of depth that you need.

</td></tr><tr><td>Publish

</td><td>Publishes the created listing entry.

</td></tr><tr><td>Unpublish

</td><td>Removes the entry from the list of published entries.

</td></tr><tr><td>Delete

</td><td>Deletes the listing entry that is not required anymore.

</td></tr></tbody></table>

</div>## Adding a new listing

To create a new listing, click **Add New** from the Dashboard Menu list. The new listing page is displayed.

#### New Listing tab

This tab provides options to add title, description, select category, and other options for the Listing as seen in the following image:

The following table shows the options available:

<div id="bkmrk-area-options-usage-e"><table style="width: 100%;"><thead><tr><td data-highlight-colour="blue" style="width: 15.9336%;">**Area**

</td><td data-highlight-colour="blue" style="width: 10.2716%;">**Options**

</td><td data-highlight-colour="blue" style="width: 73.9184%;">**Usage**

</td></tr></thead><tbody><tr><td style="width: 15.9336%;">**Edit Listing area**

</td><td style="width: 10.2716%;">Title

</td><td style="width: 73.9184%;">Title for the Listing.

</td></tr><tr><td style="width: 15.9336%;"> </td><td style="width: 10.2716%;">Text Area

</td><td style="width: 73.9184%;">Provide a description for the listing.

</td></tr><tr><td style="width: 15.9336%;"> </td><td style="width: 10.2716%;">Short Description

</td><td style="width: 73.9184%;">Provide a short description for the listing.

</td></tr><tr><td style="width: 15.9336%;"> </td><td style="width: 10.2716%;">Article *Button*

</td><td style="width: 73.9184%;">Click to select a relevant article. If an article is provided, it can be seen under the Details tab in the listing.

<div data-hasbody="true" data-macro-name="note"><div>***Buttons*** for the editor are available when enabled under Site Backadmin -&gt; Plugins and WYSIWYG editor turned On in Joomla Configuration.</div></div></td></tr><tr><td style="width: 15.9336%;"> </td><td style="width: 10.2716%;">Page Break *Button*

</td><td style="width: 73.9184%;">Insert a page break in the displayed text.

</td></tr><tr><td style="width: 15.9336%;"> </td><td style="width: 10.2716%;">Toggle editor *Button*

</td><td style="width: 73.9184%;">Toggle between plain text and rich text editor

</td></tr><tr><td style="width: 15.9336%;"> </td><td style="width: 10.2716%;">Read More Button

</td><td style="width: 73.9184%;">Insert a separation for creating short description. Any content above the dotted line is displayed as the short description.

<div data-hasbody="true" data-macro-name="info"><div>In the above image, the red dotted line appears when you click **Read More**. Any content above the red line is the **short description**, while the entire content is the **long description**. Also, note that if there is no content after the **Read More** tag, the event description will be blank when users view the listing. Ensure that you have content after the **Read More** tag.</div></div></td></tr><tr><td style="width: 15.9336%;"> </td><td style="width: 10.2716%;">Status

</td><td style="width: 73.9184%;">Select the required status.

- Published
- Unpublished
- Trashed
- Archived

</td></tr><tr><td style="width: 15.9336%;"> </td><td style="width: 10.2716%;">Featured

</td><td style="width: 73.9184%;">Enable to make the listing appear as featured listing.

<div data-hasbody="true" data-macro-name="note"><div>Feature Count is being checked when saving listing for the selected Membership Plan.</div></div></td></tr><tr><td style="width: 15.9336%;"> </td><td style="width: 10.2716%;">Language

</td><td style="width: 73.9184%;">Select the language for which the listing needs to appear for. For [multiple languages](https://wiki.comdev.eu/books/installation-requirements-language/page/multilingual-site "Multilingual Site"), you must create separate entries for each language.

</td></tr><tr><td style="width: 15.9336%;"> </td><td style="width: 10.2716%;">Category

</td><td style="width: 73.9184%;">Category where the listing will be published.

</td></tr><tr><td colspan="1" style="width: 15.9336%;">Category Type</td><td colspan="1" style="width: 10.2716%;">Category Type such as house, apartment and so on based on the category types for your site.</td></tr><tr><td colspan="1" style="width: 15.9336%;">Energy Class</td><td colspan="1" style="width: 10.2716%;">Select the energy class for the listing.</td></tr><tr><td style="width: 15.9336%;">**Address area**

</td><td style="width: 10.2716%;">Address

</td><td style="width: 73.9184%;">Address of the listing

</td></tr><tr><td style="width: 15.9336%;"> </td><td style="width: 10.2716%;">Full address

</td><td style="width: 73.9184%;">Street and house number of the listing - If both Address and Full Address specified, map location will position automatically.

</td></tr><tr><td style="width: 15.9336%;">**Location area**

</td><td style="width: 10.2716%;">Maps latitude

</td><td style="width: 73.9184%;">It utilizes the GEO-location based on Google Maps.

Provide the latitude information for the location mapping.

</td></tr><tr><td style="width: 15.9336%;"> </td><td style="width: 10.2716%;">Maps longitude

</td><td style="width: 73.9184%;">The information provided in this field is used to map the exact location. It utilizes the GEO-location based on Google Maps.

Provide the longitude information for the location mapping.

</td></tr><tr><td style="width: 15.9336%;"> </td><td style="width: 10.2716%;">Maps Search

</td><td style="width: 73.9184%;">Search for a specific location. Type in the location and press Enter to go to the exact location.

</td></tr></tbody></table>

</div><div data-hasbody="true" data-macro-name="tip" id="bkmrk-for-more-information"><div>For more information about how the location mapping is done in the listing, see [Listings](http://confluence.comdev.eu/display/JE/Listings) in the Administrative Guide.</div></div>#### Custom Fields area

This area includes all the custom fields created for a particular category. If the custom field is not applied to a specific category, it can be seen for all categories when creating a listing. The following image shows the Custom Fields tab screen.

For more information about creating custom fields, see [Custom Fields](https://wiki.comdev.eu/books/jomestate/page/custom-fields "Custom Fields").

#### Price tab

This tab includes pricing information for the listing.

![](https://wiki.comdev.eu/download/attachments/5735706/frontadmin_listings3.jpg)

**Screen 4: Price tab**

Provide the options as given in the following table.

<div id="bkmrk-add-new-click-to-add"><table><tbody><tr><td>Add New</td><td>Click to add a new pricing item.</td></tr><tr><td colspan="1">Price Netto</td><td colspan="1">Provide a value.</td></tr><tr><td colspan="1">Price Group</td><td colspan="1">Select from the Pricing options you have created for the site.</td></tr></tbody></table>

</div>#### Images tab

[![obraz.png](https://wiki.comdev.eu/uploads/images/gallery/2024-02/scaled-1680-/mexobraz.png)](https://wiki.comdev.eu/uploads/images/gallery/2024-02/mexobraz.png)

**Screen 5: Images tab**

To add an image, do the following:

1. Click **Add Image**.
2. Provide options as seen in the following image.  
    ![](https://wiki.comdev.eu/download/attachments/5735004/Listings_Images1.jpg)You can provide values using the following table.

1. <div><table><tbody><tr><td>Title or alias
    
    </td><td>Provide a title for the Image.
    
    </td></tr><tr><td>Categories
    
    </td><td>Select from the following options:
    
    
    - Slideshow - detailed view main gallery
    - Gallery - in gallery tab
    - Features- displayed under features.
    
    </td></tr><tr><td>Status
    
    </td><td>Select the required status.
    
    
    - Published
    - Unpublished
    
    </td></tr><tr><td>Order
    
    </td><td>Order in which you want the image to appear.
    
    </td></tr><tr><td>File
    
    </td><td>Click Choose File and provide the image.
    
    </td></tr><tr><td>Description
    
    </td><td>Provide a description about the image.
    
    </td></tr></tbody></table>
    
    </div>
2. Click **Save**.

For more information about editing images or deleting images, see [Images](http://confluence.comdev.eu/display/JE/Listings) in the Administrative Guide.

You can also provide YouTube video links for the listing. Provide the link as shown in the above image.

#### Attachments tab

Click the ![](https://wiki.comdev.eu/download/attachments/5735004/Listings_edit_icon.jpg)Edit icon to edit an attachment that is linked to the listing. Click the ![](https://wiki.comdev.eu/download/attachments/5735004/Listings_close_icon.jpg) Delete icon to delete the attachment.

<div data-hasbody="true" data-macro-name="note" id="bkmrk--3">  
</div><p class="callout info">Attachments are detected automatically based on file extension that’s are allowed in Configuration.</p>

<div data-hasbody="true" data-macro-name="info" id="bkmrk--4"></div><p class="callout warning">Some features or tabs are enabled based on the user membership. If the user is attached to a membership plan that does not allow adding attachments, he will not be able to see any options under the Attachments tab. These membership limitations are checked for when you save the listing.</p>

# User Membership

### Overview

You can view the user membership plan details on the Front Admin page. If eligible for, you can also upgrade the user membership plan to a higher plan.

<p class="callout info">User membership plan can be upgraded through the Front Admin. You can perform other membership tasks from the back end using information given in the [Membership](https://wiki.comdev.eu/books/jomestate/page/membership "Membership") section of the Administrator's Guide.</p>

The following screen shows the Membership details for the user.

<span class="confluence-embedded-file-wrapper confluence-embedded-manual-size">![](https://wiki.comdev.eu/download/attachments/5735705/membership_userguide.jpg)</span>

**Screen 1: Membership details**

To upgrade the user membership plan you can either click **Upgrade Your Membership NOW** or click the Membership Plans tab on the Front Admin page. The membership plans that are available for upgrade are shown as seen in the following image.

<div bis_skin_checked="1" class="wiki-content" id="bkmrk--1"><div bis_skin_checked="1" class="confluence-information-macro confluence-information-macro-note conf-macro output-block" data-hasbody="true" data-macro-name="note"><div bis_skin_checked="1" class="confluence-information-macro-body">  
</div></div></div>The Membership Plans tab on the Front Admin page is available only if you are logged in as a company.

<span class="confluence-embedded-file-wrapper confluence-embedded-manual-size">![](https://wiki.comdev.eu/download/attachments/5735705/membership_userguide1.jpg)</span>

**Screen 2: Membership plans**

Click **Upgrade** to upgrade to the higher plan. You can then select an appropriate mode of payments and complete the transaction.

<div bis_skin_checked="1" class="wiki-content" id="bkmrk-to-see-the-upgrade-b"><div bis_skin_checked="1" class="confluence-information-macro confluence-information-macro-note conf-macro output-block" data-hasbody="true" data-macro-name="note"><div bis_skin_checked="1" class="confluence-information-macro-body">To see the Upgrade button for any plan, ensure that you have configured PayPal or other payment gateway details. For more information, see [PayPal Configuration](https://wiki.comdev.eu/books/installation-requirements-language/page/paypal-configuration "PayPal Configuration").</div></div></div><span class="confluence-embedded-file-wrapper">![](https://wiki.comdev.eu/download/attachments/5735705/userguide_membership_jv2.jpg)</span>

**Screen 3: PayPal configurations**

<div bis_skin_checked="1" class="wiki-content" id="bkmrk--4"><div bis_skin_checked="1">  
</div></div>

# Listings Messages

{{@111}}

# Adding a new Agent

### Overview

You can add agents that belong to your company and provide them separate access. The agents are listed in the Agents tab under Front Admin as shown in the following image.

![](https://wiki.comdev.eu/download/attachments/7439044/Agents_userguide.jpg)

**Screen 1: Agents tab**

You can select what to do next based on the following table.

<div id="bkmrk-insert-new-click-to-"><table><tbody><tr><td>Insert New</td><td>Click to add a new agent information.</td></tr><tr><td colspan="1">Publish</td><td colspan="1">Click to publish the agent information.</td></tr><tr><td colspan="1">Unpublish</td><td colspan="1">Click to unpublish agent information.</td></tr><tr><td colspan="1">Delete</td><td colspan="1">Click to delete the agent information from the site.</td></tr></tbody></table>

</div>### Adding a new Agent

To add a new agent to the company, click Insert New from the Agents tab.

![](https://wiki.comdev.eu/download/attachments/7439044/Agents_userguide1.jpg)

**Screen 2: Adding a new agent**

For detailed information about information that needs to included in each field, see [Agents](https://wiki.comdev.eu/display/JE/Agents) in the Administrator's guide.

# Profile & Settings (User Profile)

### Overview

After creating a user, a user can edit his profile details such as password, email address, language settings, timezone settings, and much more.

To edit your profile, from the Front Admin, click **Profile** as shown in the following screen.

<span class="confluence-embedded-file-wrapper confluence-embedded-manual-size">![](https://wiki.comdev.eu/download/attachments/5735703/profile.jpg)</span>

**Screen 1: Profile screen**

### Editing a profile

On the Profile screen, click **Edit Profile** as shown in the following screen.

<span class="confluence-embedded-file-wrapper confluence-embedded-manual-size">![](https://wiki.comdev.eu/download/attachments/5735000/Profile_Edit.jpg)</span>

**Screen 2: Edit Profile screen**

The following screen shows the different fields you can edit for a profile.

<span class="confluence-embedded-file-wrapper confluence-embedded-manual-size">![](https://wiki.comdev.eu/download/attachments/5735000/Profile_Edit1.jpg)</span>

**Screen 3: Edit profile fields**

Provide the values as given in the following table.

<div bis_skin_checked="1" class="table-wrap" id="bkmrk--3">  
</div><table class="confluenceTable tablesorter tablesorter-default stickyTableHeaders" id="bkmrk-edit-your-profile-na" role="grid" style="padding: 0px;"><tbody aria-live="polite" aria-relevant="all"><tr role="row"><td class="confluenceTd">##### Edit Your Profile

</td><td class="confluenceTd">Name

</td><td class="confluenceTd">Provide a name.

</td></tr><tr role="row"><td class="confluenceTd"></td><td class="confluenceTd">Username

</td><td class="confluenceTd">Cannot be edited.

</td></tr><tr role="row"><td class="confluenceTd"></td><td class="confluenceTd">Password

</td><td class="confluenceTd">Provide a new password.

</td></tr><tr role="row"><td class="confluenceTd"></td><td class="confluenceTd">Confirm Password

</td><td class="confluenceTd">Confirm the new password.

</td></tr><tr role="row"><td class="confluenceTd"></td><td class="confluenceTd">Email Address

</td><td class="confluenceTd">Provide a new email address.

</td></tr><tr role="row"><td class="confluenceTd"></td><td class="confluenceTd">Confirm email Address

</td><td class="confluenceTd">Confirm the new email address.

</td></tr><tr role="row"><td class="confluenceTd">##### Basic Settings

</td><td class="confluenceTd">Editor

</td><td class="confluenceTd">Select one of the following:

- Editor – CodeMirror
- Editor-none
- Editor-TinyMCE

</td></tr><tr role="row"><td class="confluenceTd"></td><td class="confluenceTd">Timezone

</td><td class="confluenceTd">Select a timezone.

</td></tr><tr role="row"><td class="confluenceTd"></td><td class="confluenceTd">Frontend language

</td><td class="confluenceTd">Select the required language for front end.

</td></tr><tr role="row"><td class="confluenceTd"></td><td class="confluenceTd">Backend Template Style

</td><td class="confluenceTd">Select from the available templates or keep as default.

</td></tr><tr role="row"><td class="confluenceTd"></td><td class="confluenceTd">Backend language

</td><td class="confluenceTd">Select the required language for back end.

</td></tr><tr role="row"><td class="confluenceTd"></td><td class="confluenceTd">Help Site

</td><td class="confluenceTd">Select from the available Help site options for your required language.

</td></tr><tr role="row"><td class="confluenceTd">##### Additional Options

</td><td class="confluenceTd">Logo

</td><td class="confluenceTd">Click Choose File to select an image for the user profile picture.

</td></tr><tr role="row"><td class="confluenceTd"></td><td class="confluenceTd">Eventbrite User Key

</td><td class="confluenceTd">Provide the key for JomEstate extension.

</td></tr><tr role="row"><td class="confluenceTd"></td><td class="confluenceTd">Plan expiry

</td><td class="confluenceTd">This field is controlled by the site admin.

</td></tr></tbody></table>

# Modules


# Latest Items Module

### Overview

This module helps you create the panel where latest listings are displayed. You can decide where to position the latest panel on the page and also control on which pages the panel should appear. To view all the available modules, click **Extension** &gt; **Module Manager**. The modules available are listed as seen in the following image.

**Screen 6: Module Manager listing**

### Editing the JomEstate Latest module

To edit the module, click on the module link or select the check box next to the module name, and then click **Edit**.

The following image shows the module edit screen.

#### Module tab

This tab controls the layout where the latest listings panel is to be displayed on the screen.![](https://wiki.comdev.eu/download/attachments/5735709/modules6.jpg?version=2&modificationDateamp;api=v2)

**Screen 8: Module tab**

Provide the options as per the following table.

<div id="bkmrk-layout-select-the-re"><table><tbody><tr><td>**Layout**

</td><td>Select the required layout in the Layout field. The available options are:

- Slider – Displays the latest listings in the form of a slideshow.
- Default –Displays the latest listings in default format.

 ![](https://wiki.comdev.eu/download/attachments/5735709/modules5.jpg)

</td></tr><tr><td>**Count**

</td><td>Number of listings that should be listed in the panel.

</td></tr><tr><td>**Number of Characters**

</td><td>Number of characters that will be displayed in the short description for listing thumbnail.

</td></tr><tr><td>**Image Width**

</td><td>Provide the image width for the thumbnail image.

<div data-hasbody="true" data-macro-name="note"><div>If Slider Layout set, image width must be same size than Slider Width or larger.</div></div></td></tr><tr><td>**Image Format**

</td><td>The format for the thumbnail listing image.   
1:1 = Image will be unchanged.   
4:3 = image will be resized to 4:3 format.   
10:9 = Image will be resized to 10:9 format.

</td></tr><tr><td>**Featured**

</td><td>Enable to show only featured listings.

</td></tr><tr><td>**Show Address**

</td><td>Enable to show the address of the listing.

</td></tr><tr><td colspan="1">**Custom Fields**</td><td colspan="1">Enable to show custom fields.</td></tr><tr><td colspan="1">**Short Description**</td><td colspan="1">Enable to show short description along with the listing image.</td></tr><tr><td colspan="1">**Show Category**</td><td colspan="1">Enable to show category for the listing.</td></tr><tr><td colspan="1">**Show Price**</td><td colspan="1">Enable to show the listing price.</td></tr><tr><td>**Category**

</td><td>Enable either of the following options.

- Current Browse (auto) – Automatically displayed based on the category.
- Selected Below – Listings belonging to only these categories are shown.

</td></tr><tr><td>**Choose Category**

</td><td>If Selected Below is selected for the above field, select the required category.

</td></tr><tr><td>**Sort Options**

</td><td>Select how the displayed listings should be sorted by.

- Latest
- Most Viewed
- Alphabetically
- Updated
- Most Rated DESC
- Most Rated ASC

</td></tr><tr><td>**Slider Width**

</td><td>Slider width in pixels

</td></tr><tr><td>**Slider Height**

</td><td>Slider height in pixels

</td></tr><tr><td>**Slide Delay (seconds)**

</td><td>Slideshow delay in seconds

</td></tr><tr><td>**Slider Shadow**

</td><td>Enable to provide the shadow effect.

</td></tr><tr><td>**Slider Thumbs**

</td><td>Enable to show image thumbnails

</td></tr><tr><td>**Slider Caption**

</td><td>Enable to show the image caption.

</td></tr><tr><td>**Show Title**

</td><td>Show or hide the title for the search panel.

</td></tr><tr><td>**Position**

</td><td>Select the position based on your Joomla Template.

</td></tr><tr><td>**Status**

</td><td>Select from the given options.

- Published
- Unpublished
- Trashed

</td></tr><tr><td>**Start Publishing**

</td><td>Provide a date when the latest listings panel should be published.

</td></tr><tr><td>**Finish Publishing**

</td><td>Provide a date when the latest listings panel should be unpublished.

</td></tr><tr><td>**Access**

</td><td>Provide access level for the panel.

- Guest
- Public
- Registered
- Special

</td></tr><tr><td>**Ordering**

</td><td>Provide the order in which the side panel should appear. If more than one module is positioned at the same location, you can set the order of appearance in this field.

</td></tr><tr><td>**Language**

</td><td>Select the language for which you want to display this panel. For each language, you must create a new JomEstate Latest module.

</td></tr><tr><td>**Note**

</td><td>Provide additional information.

</td></tr></tbody></table>

</div>#### Menu Assignment tab

This tab controls where the module should be displayed. You can decide if it should be displayed on all pages for the site or just selective pages.

[![obraz.png](https://wiki.comdev.eu/uploads/images/gallery/2024-03/scaled-1680-/KUQobraz.png)](https://wiki.comdev.eu/uploads/images/gallery/2024-03/KUQobraz.png)

**Screen 9: Menu Assignment tab**

Select the required menu for module assignment. The available options are:

- On all pages
- No pages
- Only on the pages selected
- On all pages except those selected

<div id="bkmrk--5"><div></div></div>

# Search Module

Overview

Modules are extensions that assist in creating blocks of information on your site. They aggregate information from components and can be placed in predefined positions on the page based on your Joomla template.

### JomEstate Search module

This module helps you create the search panel with fields that are searchable. All the fields that are defined as searchable during creation can be seen on this panel. You can decide where to position the search panel on the page and also control on which pages the panel should appear. To view all the available modules, click **Extension** &gt; **Module Manager**.

To create a new module, click **New**. Select the JomEstate Search module. Provide the information as given in the following sections. Click **Save** to save the module.

### Editing the JomEstate Search module

To edit the module, click on the module link or select the check box next to the module name, and then click **Edit**.

The following image shows the module edit screen.

#### Module tab

This tab controls the layout where the search panel is to be displayed on the screen.

![](https://wiki.comdev.eu/download/attachments/5735709/modules1.jpg)

**Screen 3: Module tab**

Provide the options as per the following table.

<div id="bkmrk-layout-select-the-re"><table style="width: 100%;"><tbody><tr><td style="width: 13.718%;">**Layout**

</td><td style="width: 86.282%;">Select the required layout in the Layout field. The available options are:

- Address – Horizontal Keyword field, category and address search field as seen in the following image:

 ![](https://wiki.comdev.eu/download/attachments/5735709/jomestate_search.jpg)

- Side Search – Vertical Side panel to filter search results as seen in the following image:

 ![](https://wiki.comdev.eu/download/attachments/5735709/jomestate_search1.jpg)

<div data-hasbody="true" data-macro-name="info"><div>Custom fields that have the Field can be Searched field enabled are seen in this panel. For more information, see [Custom Fields](https://wiki.comdev.eu/display/JE/Custom+Fields) in the Administrative Guide.</div></div>- Single Search – Single keyword search field as seen in the following image:

 ![](https://wiki.comdev.eu/download/attachments/5735709/jomestate_search2.jpg)

</td></tr><tr><td style="width: 13.718%;">**Show Title**

</td><td style="width: 86.282%;">Show or hide the title for the search panel.

</td></tr><tr><td style="width: 13.718%;">**Position**

</td><td style="width: 86.282%;">Select the position based on your Joomla Template.

</td></tr><tr><td colspan="1" style="width: 13.718%;">**Status**</td><td colspan="1" style="width: 86.282%;">Select from the following options.

- Published
- Unpublished
- Trashed

</td></tr><tr><td style="width: 13.718%;">**Start Publishing**

</td><td style="width: 86.282%;">Provide a date when the search panel should be published.

</td></tr><tr><td style="width: 13.718%;">**Finish Publishing**

</td><td style="width: 86.282%;">Provide a date when the search panel should be unpublished.

</td></tr><tr><td style="width: 13.718%;">**Access**

</td><td style="width: 86.282%;">Provide access level for the panel.

- Guest
- Public
- Registered
- Special

</td></tr><tr><td style="width: 13.718%;">**Ordering**

</td><td style="width: 86.282%;">Provide the order in which the side panel should appear. If more than one module is positioned at the same location, you can set the order of appearance in this field.

</td></tr><tr><td style="width: 13.718%;">**Language**

</td><td style="width: 86.282%;">Select the language for which you want to display this panel. For each language, you must create a new JomEstate Search module.

</td></tr><tr><td style="width: 13.718%;">**Note**

</td><td style="width: 86.282%;">Provide additional information.

</td></tr></tbody></table>

</div>#### Menu Assignment tab

This tab controls where the module should be displayed. You can decide if it should be displayed on all pages for the site or just selective pages.

[![ClJobraz.png](https://wiki.comdev.eu/uploads/images/gallery/2024-03/scaled-1680-/jJWcljobraz.png)](https://wiki.comdev.eu/uploads/images/gallery/2024-03/jJWcljobraz.png)

**Screen 4: Menu Assignment tab**

Select the required menu for module assignment. The available options are:

- On all pages
- No pages
- Only on the pages selected
- On all pages except those selected

# Live Search Maps Module

{{@132}}

# Slideshow PRO Module

{{@133}}