# Products

### Overview

Each listing can have as many products as you need. Products can be found on the "Products" tab of each Listing item on the frontend of the website

### Access Products section of JomDirectory

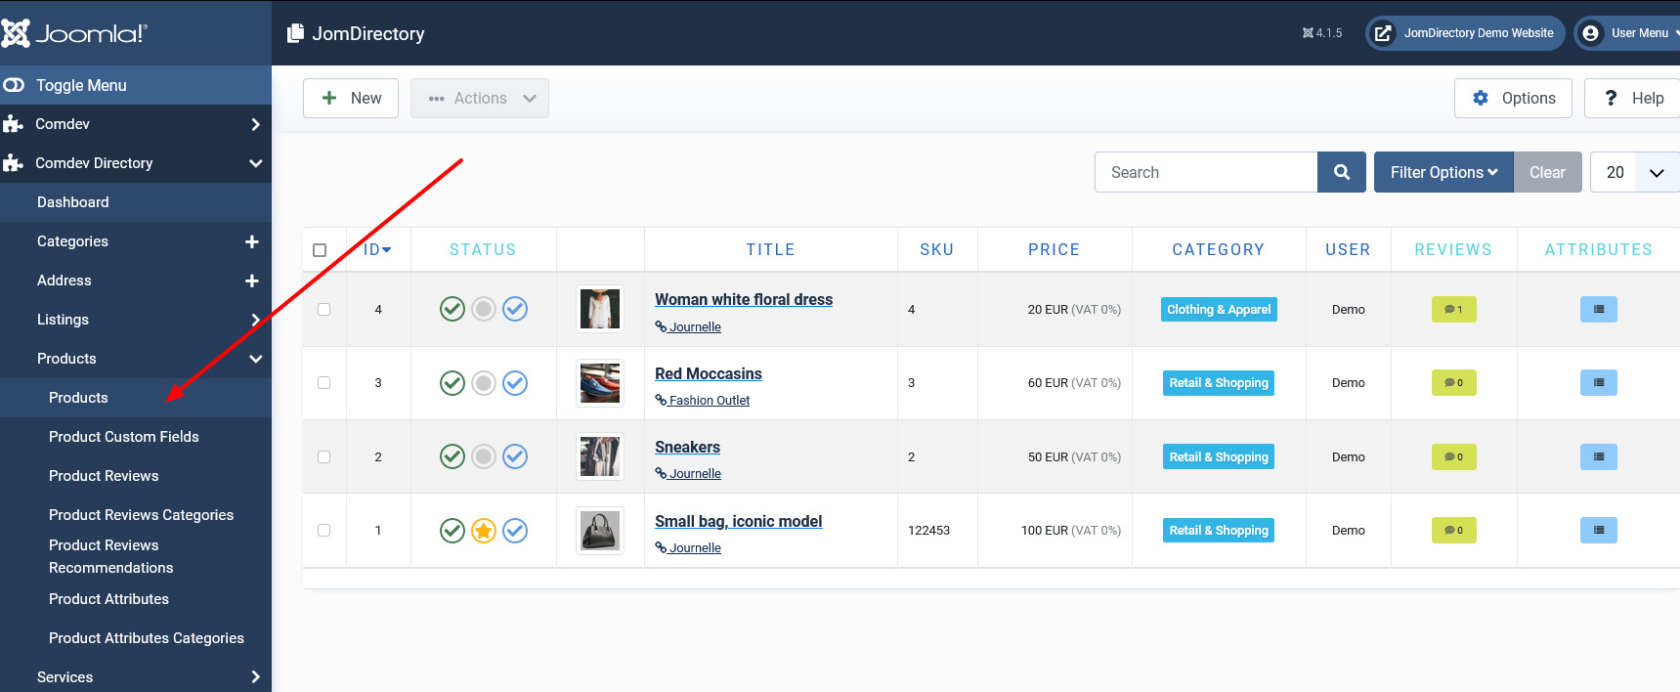
You can access Products section of JomDirectory by clicking on the Products item in the Sidebar as seen on the following screenshot

[![obraz.png](https://wiki.comdev.eu/uploads/images/gallery/2024-03/scaled-1680-/HLyobraz.png)](https://wiki.comdev.eu/uploads/images/gallery/2024-03/HLyobraz.png)

**Screen 1: Products screen**

The following table explains the different options seen on the screen.

<div bis_skin_checked="1" class="table-wrap" id="bkmrk-new-creates-a-new-pr"><table class="confluenceTable tablesorter tablesorter-default stickyTableHeaders" role="grid" style="padding: 0px;"><tbody aria-live="polite" aria-relevant="all"><tr role="row"><td class="confluenceTd">**New**

</td><td class="confluenceTd">Creates a new Product entry.

</td></tr><tr role="row"><td class="confluenceTd">**Edit**

</td><td class="confluenceTd">Provides the edit mode to make changes to the existing product.

</td></tr><tr role="row"><td class="confluenceTd">**Publish**

</td><td class="confluenceTd">Publishes the created product entry.

</td></tr><tr role="row"><td class="confluenceTd">**Unpublish**

</td><td class="confluenceTd">Removes the entry from the list of published product entries

</td></tr><tr role="row"><td class="confluenceTd">**Archive**

</td><td class="confluenceTd">Archives products entries that are not used anymore.

</td></tr><tr role="row"><td class="confluenceTd">**Trash**

</td><td class="confluenceTd">Deletes the product entry that is not required anymore.

</td></tr><tr role="row"><td class="confluenceTd" colspan="1">**Options**</td><td class="confluenceTd" colspan="1">Naviagate to the options screen in JomDirectory.</td></tr></tbody></table>

</div>### Creating A New Product

The following image shows the Products screen.

[![obraz.png](https://wiki.comdev.eu/uploads/images/gallery/2024-02/scaled-1680-/obraz.png)](https://wiki.comdev.eu/uploads/images/gallery/2024-02/obraz.png)

<div bis_skin_checked="1" class="table-wrap" id="bkmrk--3"></div>### Edit Product

If you want to edit existing entries, you can either click the entry from the Product screen or select the checkbox next to the entry, and then click Edit.

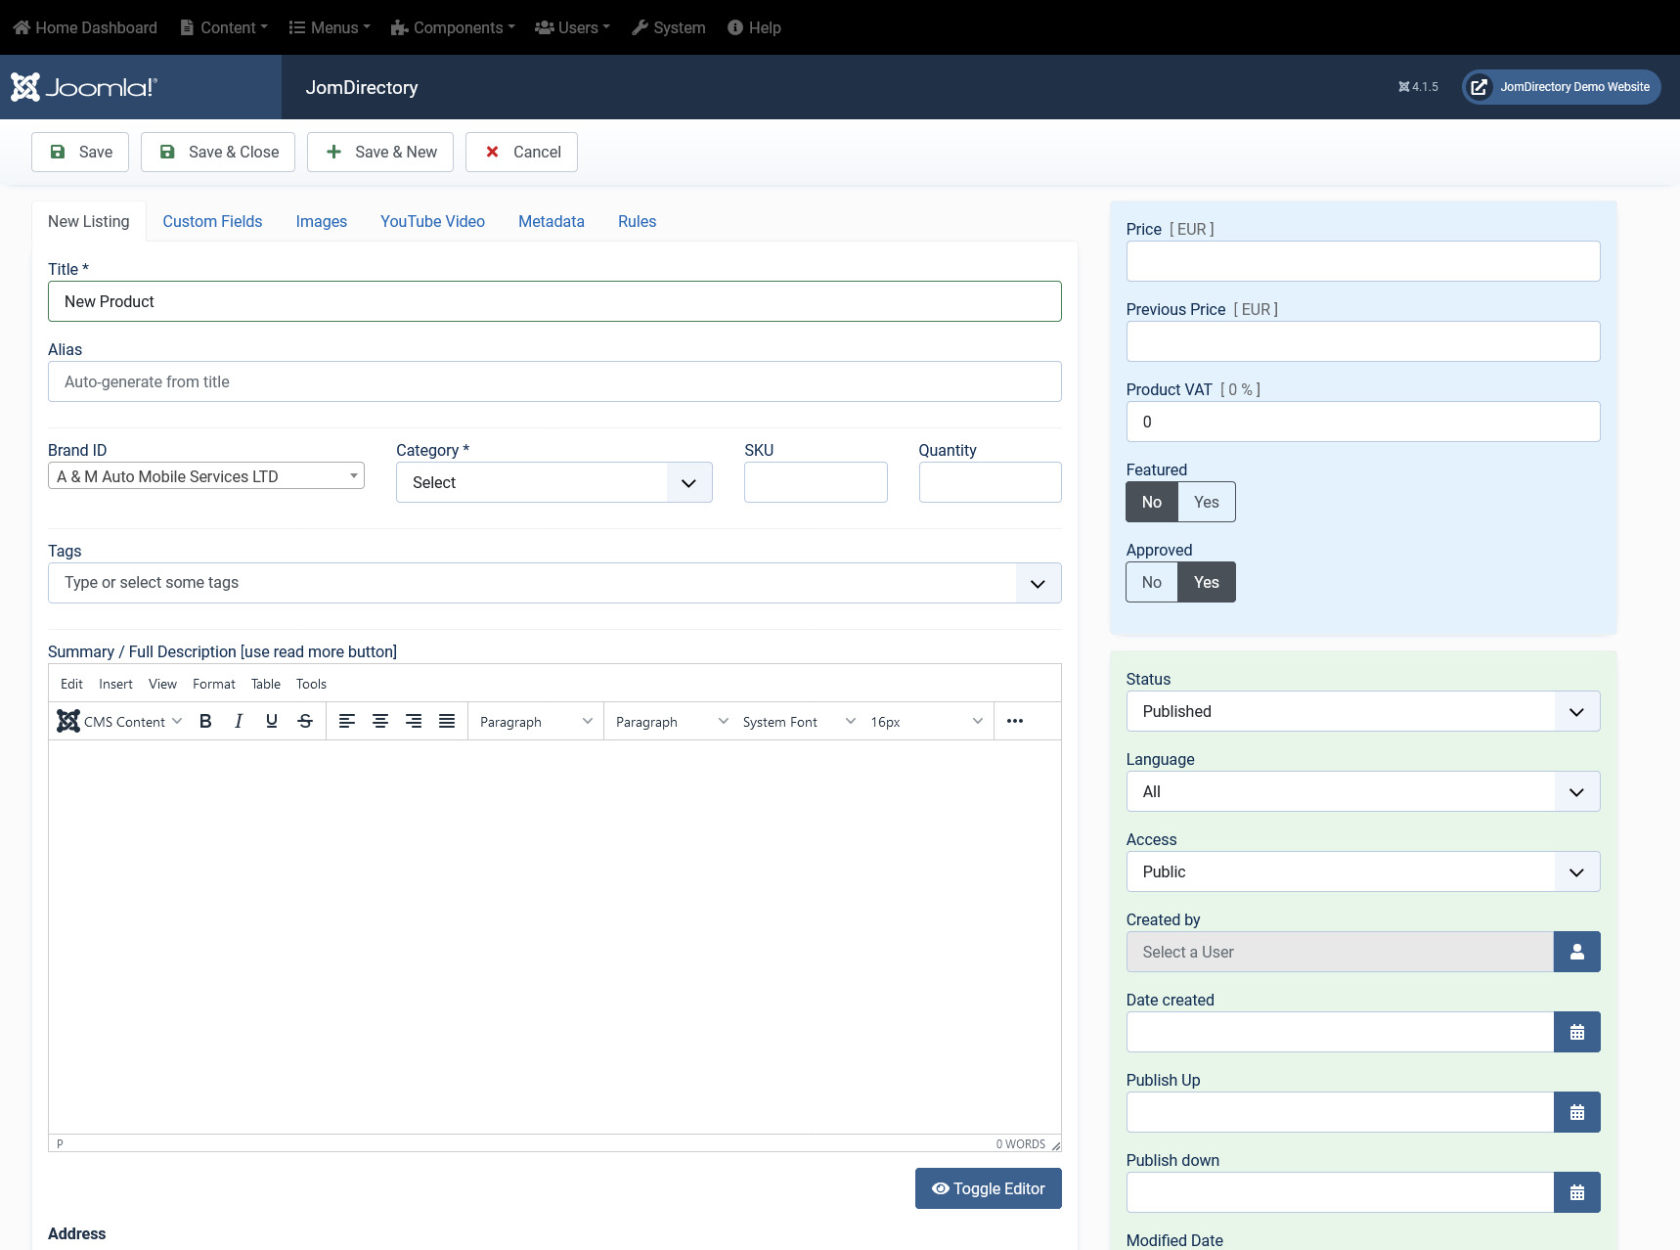
This tab provides options to add title, description, select category, and other options for the Product as seen in the following image:

[![obraz.png](https://wiki.comdev.eu/uploads/images/gallery/2024-02/scaled-1680-/LeUobraz.png)](https://wiki.comdev.eu/uploads/images/gallery/2024-02/LeUobraz.png)

**Screen 2: Edit Product screen**

The following table shows the options available:

<div bis_skin_checked="1" class="table-wrap" id="bkmrk-edit-listing-area-ti"><table class="confluenceTable tablesorter tablesorter-default stickyTableHeaders" role="grid" style="padding: 0px; width: 100%;"><tbody aria-live="polite" aria-relevant="all"><tr role="row"><td class="highlight-yellow confluenceTd" data-highlight-colour="yellow" style="width: 12.1137%;">#### Edit Listing area

</td><td class="confluenceTd" style="width: 13.3474%;">Title

</td><td class="confluenceTd" style="width: 74.5389%;">Title for the Product.

</td></tr><tr role="row"><td class="highlight-yellow confluenceTd" data-highlight-colour="yellow" style="width: 12.1137%;"></td><td class="confluenceTd" style="width: 13.3474%;">Alias

</td><td class="confluenceTd" style="width: 74.5389%;">URL alias for “SEF/SEO” URL.

</td></tr><tr role="row"><td class="highlight-yellow confluenceTd" data-highlight-colour="yellow" style="width: 12.1137%;"></td><td class="confluenceTd" style="width: 13.3474%;">Category

</td><td class="confluenceTd" style="width: 74.5389%;">Category where the product will be published.

</td></tr><tr role="row"><td class="confluenceTd" colspan="1" style="width: 12.1137%;"> </td><td class="confluenceTd" colspan="1" style="width: 13.3474%;">Tags

</td><td class="confluenceTd" colspan="1" style="width: 74.5389%;">Provide the tags for the listing. Tags are integrated and maintained with Joomla Tags Component.

</td></tr><tr role="row"><td class="confluenceTd" colspan="1" style="width: 12.1137%;"> </td><td class="confluenceTd" colspan="1" style="width: 13.3474%;">SKU</td><td class="confluenceTd" colspan="1" style="width: 74.5389%;">Short for stock-keeping unit, SKU is a unique numerical identifying number that refers to a specific stock item in a retailer's inventory or product catalog. The SKU is often used to identify the product, product size or type, and the manufacturer.</td></tr><tr role="row"><td class="confluenceTd" colspan="1" style="width: 12.1137%;"> </td><td class="confluenceTd" colspan="1" style="width: 13.3474%;">Quantity</td><td class="confluenceTd" colspan="1" style="width: 74.5389%;">Quantity of that specific product in the warehouse</td></tr><tr role="row"><td class="confluenceTd" colspan="1" style="width: 12.1137%;"> </td><td class="confluenceTd" colspan="1" style="width: 13.3474%;">Brand ID</td><td class="confluenceTd" colspan="1" style="width: 74.5389%;">ID of the brand to which this product belongs</td></tr><tr role="row"><td class="highlight-yellow confluenceTd" data-highlight-colour="yellow" style="width: 12.1137%;"></td><td class="confluenceTd" style="width: 13.3474%;">Summary / Full Description</td><td class="confluenceTd" style="width: 74.5389%;">Provide a description for the product.

You can create a short description as well a long description.

[![obraz.png](https://wiki.comdev.eu/uploads/images/gallery/2024-03/scaled-1680-/EvMobraz.png)](https://wiki.comdev.eu/uploads/images/gallery/2024-03/EvMobraz.png)

  
<div bis_skin_checked="1" class="aui-message hint shadowed information-macro"><span class="aui-icon icon-hint">Icon</span><div bis_skin_checked="1" class="message-content">In the above image, a tag appears when you click **Read More**. Any content above this tag is the **short description** while the entire content is the **long description**. Also, note that if there is no content after the **Read More** tag, the product description will be blank when users view the listing. Ensure that you have content after the **Read More** tag.</div></div></td></tr><tr role="row"><td class="highlight-yellow confluenceTd" data-highlight-colour="yellow" style="width: 12.1137%;">##### Joomla Articles area

</td><td class="confluenceTd" style="width: 13.3474%;">Article*Button*

</td><td class="confluenceTd" style="width: 74.5389%;">Click to select a relevant article. If an article is provided, it can be seen under the Details tab in the listing.

</td></tr><tr role="row"><td class="highlight-blue confluenceTd" data-highlight-colour="blue" style="width: 12.1137%;">#### Sidebar

</td><td class="confluenceTd" style="width: 13.3474%;">Price

</td><td class="confluenceTd" style="width: 74.5389%;">Price of that specific Product

</td></tr><tr role="row"><td class="highlight-blue confluenceTd" colspan="1" data-highlight-colour="blue" style="width: 12.1137%;"> </td><td class="confluenceTd" colspan="1" style="width: 13.3474%;">Previous Price</td><td class="confluenceTd" colspan="1" style="width: 74.5389%;">Previous price of the Product. If exists, a previous price will be visible on the Product tab on the Frontend, showing the increase or decrease of the price</td></tr><tr role="row"><td class="highlight-blue confluenceTd" colspan="1" data-highlight-colour="blue" style="width: 12.1137%;"> </td><td class="confluenceTd" colspan="1" style="width: 13.3474%;">Product VAT</td><td class="confluenceTd" colspan="1" style="width: 74.5389%;">VAT of the Product can be entered here</td></tr><tr role="row"><td class="highlight-blue confluenceTd" colspan="1" data-highlight-colour="blue" style="width: 12.1137%;"> </td><td class="confluenceTd" colspan="1" style="width: 13.3474%;">Featured</td><td class="confluenceTd" colspan="1" style="width: 74.5389%;">Enable to make the listing appear as featured listing.</td></tr><tr role="row"><td class="highlight-blue confluenceTd" data-highlight-colour="blue" style="width: 12.1137%;"></td><td class="confluenceTd" style="width: 13.3474%;">Approved

</td><td class="confluenceTd" style="width: 74.5389%;">Enable to approve the listing. Listing will not be published.

</td></tr><tr role="row"><td class="highlight-blue confluenceTd" data-highlight-colour="blue" style="width: 12.1137%;"></td><td class="confluenceTd" style="width: 13.3474%;">Language

</td><td class="confluenceTd" style="width: 74.5389%;">Select the language for which the listing needs to appear for. [For multiple languages, you must create separate entries for each language](http://confluence.comdev.eu/display/JD2/Multilingual+Site).

</td></tr><tr role="row"><td class="highlight-blue confluenceTd" data-highlight-colour="blue" style="width: 12.1137%;"></td><td class="confluenceTd" style="width: 13.3474%;">Status

</td><td class="confluenceTd" style="width: 74.5389%;">Select the required status.

- Published
- Unpublished
- Trashed
- Archived

</td></tr><tr role="row"><td class="highlight-blue confluenceTd" data-highlight-colour="blue" style="width: 12.1137%;"></td><td class="confluenceTd" style="width: 13.3474%;">Created by

</td><td class="confluenceTd" style="width: 74.5389%;">Select the user who created the listing.

</td></tr><tr role="row"><td class="highlight-blue confluenceTd" data-highlight-colour="blue" style="width: 12.1137%;"></td><td class="confluenceTd" style="width: 13.3474%;">Access

</td><td class="confluenceTd" style="width: 74.5389%;">Provide the access level for the listing.

- Guest
- Public
- SuperUsers
- Registered
- Special

</td></tr><tr role="row"><td class="highlight-blue confluenceTd" data-highlight-colour="blue" style="width: 12.1137%;"></td><td class="confluenceTd" style="width: 13.3474%;">Date created

</td><td class="confluenceTd" style="width: 74.5389%;">Select the date when the listing was created. You can select a future date for publishing the listing as well.

</td></tr><tr role="row"><td class="highlight-blue confluenceTd" data-highlight-colour="blue" style="width: 12.1137%;"></td><td class="confluenceTd" style="width: 13.3474%;">Publish Up

</td><td class="confluenceTd" style="width: 74.5389%;">Select a date when you want to publish the listing. Here too, you can schedule to post the listing at a future date.

</td></tr><tr role="row"><td class="highlight-blue confluenceTd" data-highlight-colour="blue" style="width: 12.1137%;"></td><td class="confluenceTd" style="width: 13.3474%;">Publish down

</td><td class="confluenceTd" style="width: 74.5389%;">Select a date when the listing should stop being published.

</td></tr><tr role="row"><td class="highlight-blue confluenceTd" data-highlight-colour="blue" style="width: 12.1137%;"></td><td class="confluenceTd" style="width: 13.3474%;">Modified Date

</td><td class="confluenceTd" style="width: 74.5389%;">Select a date when the listing was modified.

</td></tr><tr role="row"><td class="highlight-blue confluenceTd" data-highlight-colour="blue" style="width: 12.1137%;"></td><td class="confluenceTd" style="width: 13.3474%;">ID

</td><td class="confluenceTd" style="width: 74.5389%;">This is an auto-generated field.

</td></tr></tbody></table>

</div>### Custom Fields tab

This tab includes all the custom fields created for a particular category. If the custom field is not applied to a specific category, it can be seen for all categories when creating a listing. The following image shows the Custom Fields tab screen.

**Screen 3: Custom Fields tab**

For more information about creating custom fields, see [Custom Fields](https://wiki.comdev.eu/books/jomdirectory/page/custom-fields "Custom Fields").

### Images tab

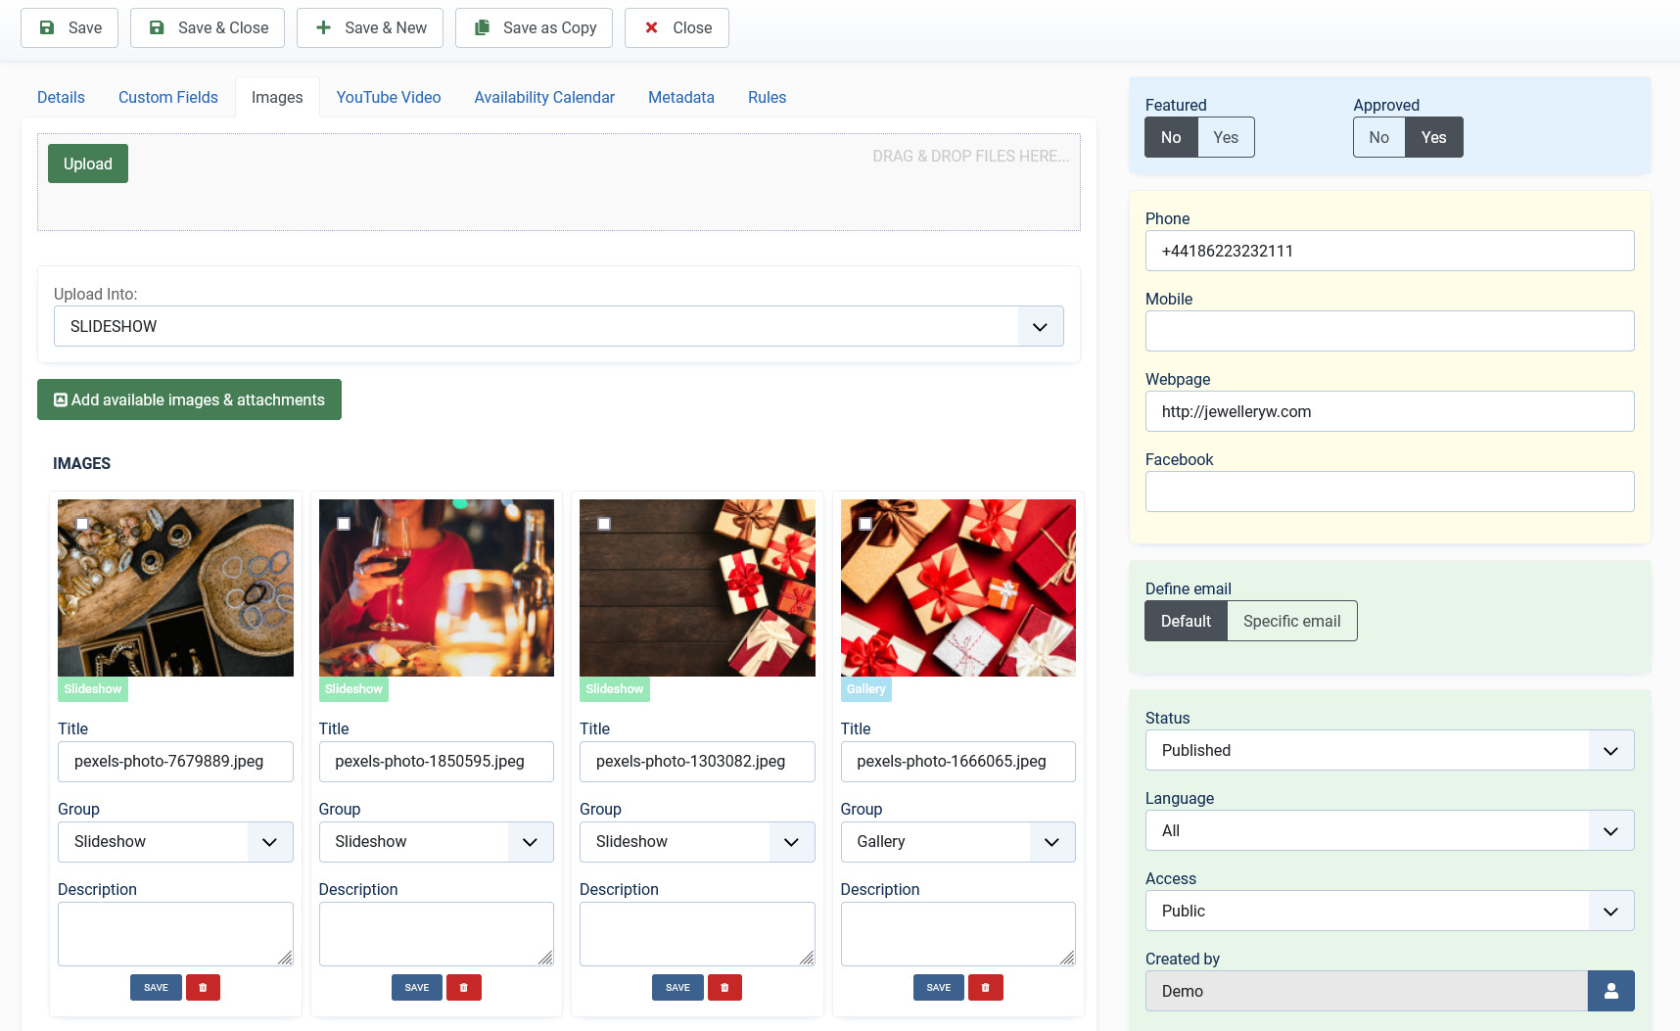
This tab includes information about images and videos attached to the listing. Before you can add images to the product, you must save your product at least once. This ensures that all the other data you have filled for the product does not disappear after the images are added.

The Images tab can be seen as shown in the following image:

[![obraz.png](https://wiki.comdev.eu/uploads/images/gallery/2024-03/scaled-1680-/Qx9obraz.png)](https://wiki.comdev.eu/uploads/images/gallery/2024-03/Qx9obraz.png)

**Screen 4: Images tab**

<p class="callout info">To set the Order of the images (which one displayed first) drag and drop images to switch positions.</p>

The first image in the gallery is used as the image thumbnail for the product.

Provide the options as shown in the following table.

<div bis_skin_checked="1" class="table-wrap" id="bkmrk-images-add-file-area"><table class="confluenceTable tablesorter tablesorter-default stickyTableHeaders" role="grid" style="padding: 0px; width: 100%;"><tbody aria-live="polite" aria-relevant="all"><tr role="row"><td class="highlight-yellow confluenceTd" colspan="1" data-highlight-colour="yellow" style="width: 13.4734%;">#### Images

</td><td class="confluenceTd" style="width: 9.88662%;">**Add file area**

</td><td class="confluenceTd" style="width: 13.5992%;">Add Files

</td><td class="confluenceTd" style="width: 63.0408%;">Click to select the image that needs to be uploaded.

</td></tr><tr role="row"><td class="highlight-yellow confluenceTd" colspan="1" data-highlight-colour="yellow" style="width: 13.4734%;"> </td><td class="confluenceTd" style="width: 9.88662%;"></td><td class="confluenceTd" style="width: 13.5992%;">Drag &amp; Drop Files Here

</td><td class="confluenceTd" style="width: 63.0408%;">Drag a bunch of images to this area to upload multiple images.

</td></tr><tr role="row"><td class="highlight-yellow confluenceTd" colspan="1" data-highlight-colour="yellow" style="width: 13.4734%;"> </td><td class="confluenceTd" style="width: 9.88662%;"></td><td class="confluenceTd" style="width: 13.5992%;">Upload Into

</td><td class="confluenceTd" style="width: 63.0408%;">Select which category the image falls under:

- Slideshow - detailed view main gallery
- Gallery - in gallery tab
- Logo - displayed in
    
    sidebar under custom fields and over the image with transparency in listings page.

</td></tr><tr role="row"><td class="highlight-yellow confluenceTd" colspan="1" data-highlight-colour="yellow" style="width: 13.4734%;"> </td><td class="confluenceTd" style="width: 9.88662%;"></td><td class="confluenceTd" style="width: 13.5992%;">Add available images &amp; attachments

</td><td class="confluenceTd" style="width: 63.0408%;">Click to add already uploaded images and attachments to this listing.

</td></tr><tr role="row"><td class="highlight-yellow confluenceTd" colspan="1" data-highlight-colour="yellow" style="width: 13.4734%;"> </td><td class="confluenceTd" style="width: 9.88662%;">**Images area**

</td><td class="confluenceTd" style="width: 13.5992%;">Editing an Image

</td><td class="confluenceTd" style="width: 63.0408%;">The options are as seen in the following image: You can provide a title, select group where the image will be displayed. The groups include Slideshow, Gallery or Logo.

 <span class="confluence-embedded-file-wrapper confluence-embedded-manual-size">![](https://wiki.comdev.eu/download/attachments/4194545/JD_admin_listing_7.jpg)</span>

Click the <span class="confluence-embedded-file-wrapper">![](https://wiki.comdev.eu/download/attachments/4194545/JD_admin_listing_8.jpg)</span> Delete icon to delete the image.

</td></tr><tr role="row"><td class="highlight-yellow confluenceTd" colspan="1" data-highlight-colour="yellow" style="width: 13.4734%;"> </td><td class="confluenceTd" style="width: 9.88662%;">**Attachments area**

</td><td class="confluenceTd" style="width: 13.5992%;"></td><td class="confluenceTd" style="width: 63.0408%;">Click the <span class="confluence-embedded-file-wrapper">![](https://wiki.comdev.eu/download/attachments/4194545/JD_admin_listing_9.jpg)</span> Edit icon to edit an attachment that is linked to the listing. The screen is as shown here:

 <span class="confluence-embedded-file-wrapper confluence-embedded-manual-size">![](https://wiki.comdev.eu/download/attachments/4194545/JD_admin_listing_10.jpg)</span>

Click the <span class="confluence-embedded-file-wrapper">![](https://wiki.comdev.eu/download/attachments/4194545/JD_admin_listing_8.jpg)</span> Delete icon to delete the attachment.

<div bis_skin_checked="1" class="confluence-information-macro confluence-information-macro-note conf-macro output-block" data-hasbody="true" data-macro-name="note"><div bis_skin_checked="1" class="confluence-information-macro-body">  
</div></div>Attachments are detected automatically based on file extension that’s are allowed in Configuration .

</td></tr><tr role="row"><td class="highlight-blue confluenceTd" colspan="1" data-highlight-colour="blue" style="width: 13.4734%;">#### YouTube Video

</td><td class="confluenceTd" colspan="1" style="width: 9.88662%;"> </td><td class="confluenceTd" colspan="1" style="width: 13.5992%;"> </td><td class="confluenceTd" colspan="1" style="width: 63.0408%;">Provide the YouTube video URL in this field as shown in the following image.

<span class="confluence-embedded-file-wrapper confluence-embedded-manual-size">![](https://wiki.comdev.eu/download/attachments/4194545/JD_admin_listing_11.jpg)</span>

</td></tr></tbody></table>

</div>