| **New** | Creates a new Custom Field. |
| **Edit** | Provides the edit mode to make changes to the existing level or titles created. |
| **Publish** | Publishes the created custom field. |
| **Unpublish** | Removes the entry from the list of published custom fields. |
| **Archive** | Archives custom fields that are not used anymore. |
| **Trash** | Deletes the custom fields that are not required anymore. |
| **Options** | Navigates to the Extension options screen. |
| ##### Custom Field Edit | **Title** | Title for the Custom Field. |
| **Alias** | URL alias for “SEF/SEO” URL. | |
| **Order** | Provide a value from 1 onwards. The lowest value will appear on the top. | |
| **Field Required?** | Enable whether to make the field required. | |
| **Category** | Category where the Custom Field will be published.
When you select a custom field for a particular category, it is visible only for that category. While creating a listing if you select the said category and save, the custom field is available only then. | |
| **Field Type** | Set the Field Type for the Custom Field. For more information, see the [Field Type Table](https://wiki.comdev.eu/display/JD2/Custom+Fields#CustomFields-FieldTypes). | |
| **Field Database Type** | Set the field type, needed for database settings. - String - Used for text - Decimal - Decimal number e.g. 10.060 - Integer - Number e.g. 1232 | |
| **Field Group** | There are 5 custom field groups. Custom fields are grouped into groups. It has many advantages, one of them is display purposes. There are few groups available:
- Items - group displayed on the listings page under the description
- Item - group displayed on the left-hand side of the slideshow under detailed view.
- Tabs - special group to create own Tabs in detailed view.
- Features - special group for featured listings.
- Paid Items - Paid group displayed on the listings page under the description.
- Paid Item - Paid group displayed on the left-hand side of the slideshow under detailed view.
***JomEstate, JomEvents only***
- Location - group displayed under the Location Tab in listing details.
Groups are static and cannot be created. Paid groups are related to the [membership plans](https://wiki.comdev.eu/display/JD2/Membership) that are applied to custom fields. Paid Items are displayed in the Items list, while the Paid Item is displayed in an Item (detailed) view. | |
| **Field Can Be Searched** | Enable to make the field values searchable.
This setting applies only for the Search Module -> Layout Filter. | |
| **Field Search Type** | Provide the type of search option to include:
- Single Input Field Type
- Range Input Field Type
- Range Dropdown Field Type
- Range Slider
Depending on the Field search type you select, the search criteria field will be displayed in the search module – layout side search.
This field is functional when the **Field Type is selected as Input** and **Field can be searched set to Yes** | |
| **Minimum Value** | When, as an example, the Range Dropdown option is selected, you can select the range between which the options can be selected. For example, for Price range between X and Y, with incremental steps of 2, you can set x value in this field. 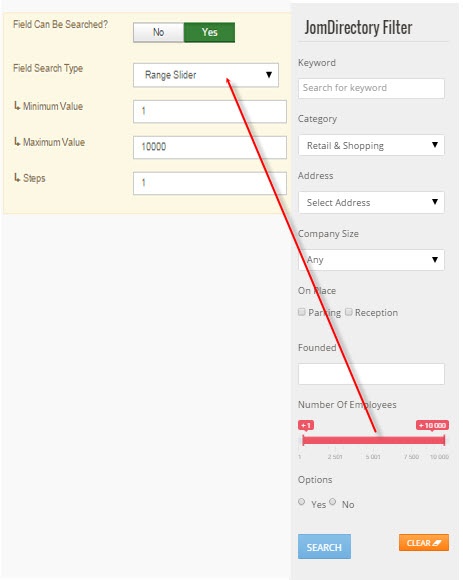 | |
| **Maximum Value** | Set the Y value for the range in this field. | |
| **Steps** | Define the incremental steps. For example, for increments of x+2, provide the value as 2. | |
| **Custom Field Template** | Custom fields have own templates that can be used and customized. There are 3 templates available: - default - horizontal - horizontal float - horizontal float + icon - horizontal no label - default no label If you would like to create and customize your own templates, see the [Developer Guide](https://wiki.comdev.eu/display/JD2/Custom+Fields+Templates). | |
| **ID** | This field is auto - generated. | |
| ##### Custom fields values area | **Add new** | If the field type is selected to hold **multiple values**, this button lets you create the multiple values. |
| **Delete** | Delete the value. |
| **Type** | **Multiple select** | **Multiple Values** | **Description** |
| **Radio button** | No | Yes | Standard radio button with multiple values |
| **Checkbox** | Yes | Yes | Standard check boxes with multiple values |
| **Dropdown** | No | Yes | Dropdown (select) field with multiple values |
| **Multiple Select** | Yes | Yes | Select box with multiple values |
| **Input** | No | No | Single text box |
| **Web Address** | No | No | Single text box for URL, it will display as the link in the front page |
| **Email** | No | No | Single text box for email |
| **Text** | No | No | Text area |
| **Date Time** | No | No | Select a date and time from the Calendar icon on screen. |
| **Date** | No | No | Select a date from the Calendar icon on screen. |
| **Editor textarea** | No | No | Creates a rich text editor box, it can be combined with Tabs group. |
| **Status** | Based on the status seen here, the visibility changes as follows: - Published - Entries are visible on the front-end. - Unpublished – Entries are invisible in the front-end, but can be published later. - Archived – Older entries that are not ready for deletion yet. - Trashed – Older entries that should be removed. |
| **Language** | Select the language for the address entry.
To create a custom field that applies to a particular language, you need to select the appropriate language from the drop down. For each [language](https://wiki.comdev.eu/display/JD2/Multilingual+Site) that you want it to appear for, create a separate entry. |
| **Created Date** | Date when the entry was created. |
| **Start Publishing** | Date when publishing needs to start in case of limited viewing of the field. |
| **Finish Publishing** | Date when publishing needs to stop in case of limited viewing of the field. |
| **Modified Date** | Date when the entry was modified. |